RESOURCES / ARTICLES
How to Connect your Industrial Assets to Microsoft Azure IoT Hub using N3uron’s MQTT Module
Connecting Azure IoT Hub: Overview
As stated in our previous article, MQTT: The Universal Messaging Protocol for Cloud Providers and IIoT Systems, MQTT has emerged as the defacto standard for IIoT and of course, is also supported by Microsoft Azure.
OT infrastructures can be connected to Azure IoT Hub using MQTT, enabling access to the entire ecosystem of services currently provided by Microsoft Azure and for instance, making it very easy to ingest real-time data in Stream Analytics and subsequently perform actions or send alarms using Event Hubs or Azure Functions. In short, Azure IoT Hub is the service that receives and routes MQTT messages from edge devices and applications such as N3uron.
This guide explains in detail how to communicate your industrial assets bi-directionally with Azure IoT Hub in a secure way through N3uron’s MQTT module and thus, bridge the gap between OT and IT.
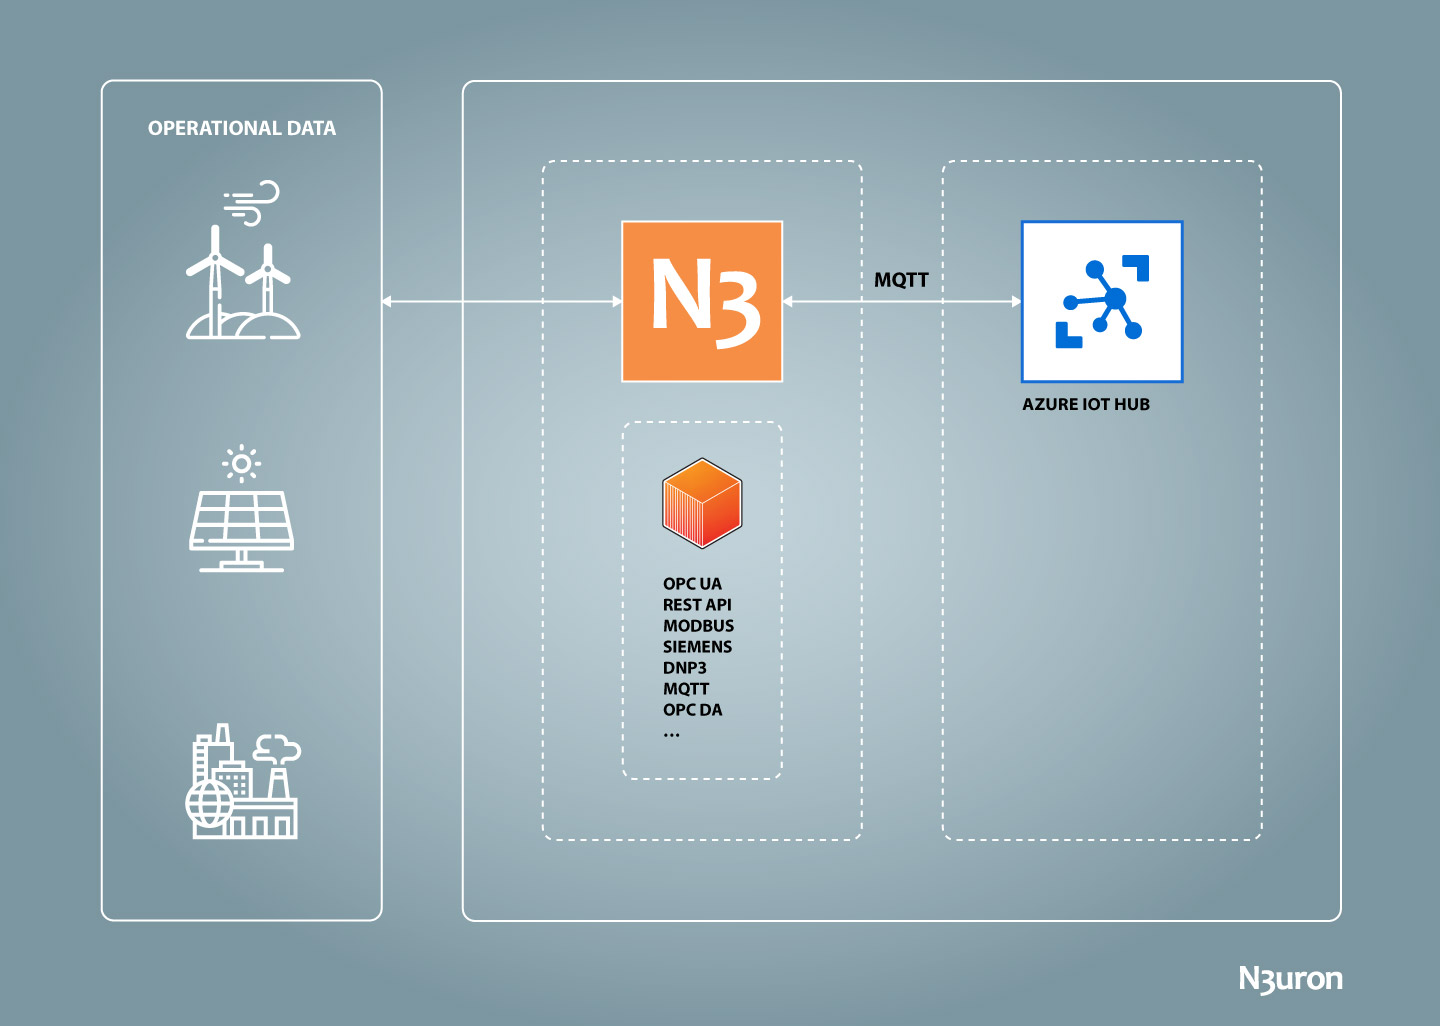
Diagram showing operational data flow between Azure IoT Hub and N3uron IIoT platform.
Azure IoT Hub and N3uron Requirements
It is assumed that you already have an Azure subscription. If not, you can create one at https://azure.microsoft.com/en-us/free/search/.
If you haven’t downloaded N3uron yet, you can do so at https://n3uron.com/downloads/. If this is the first time you are installing N3uron, our Quick User Guide will guide you through the entire installation process.
You will also need access to Azure IoT Explorer, a graphical tool for interacting with all devices connected to your IoT hub. Go to Azure IoT explorer releases and expand the list of assets to see the most recent release. Download and install the most recent version of the application.
Setting up an Azure IoT Hub
Creating a new IoT Hub
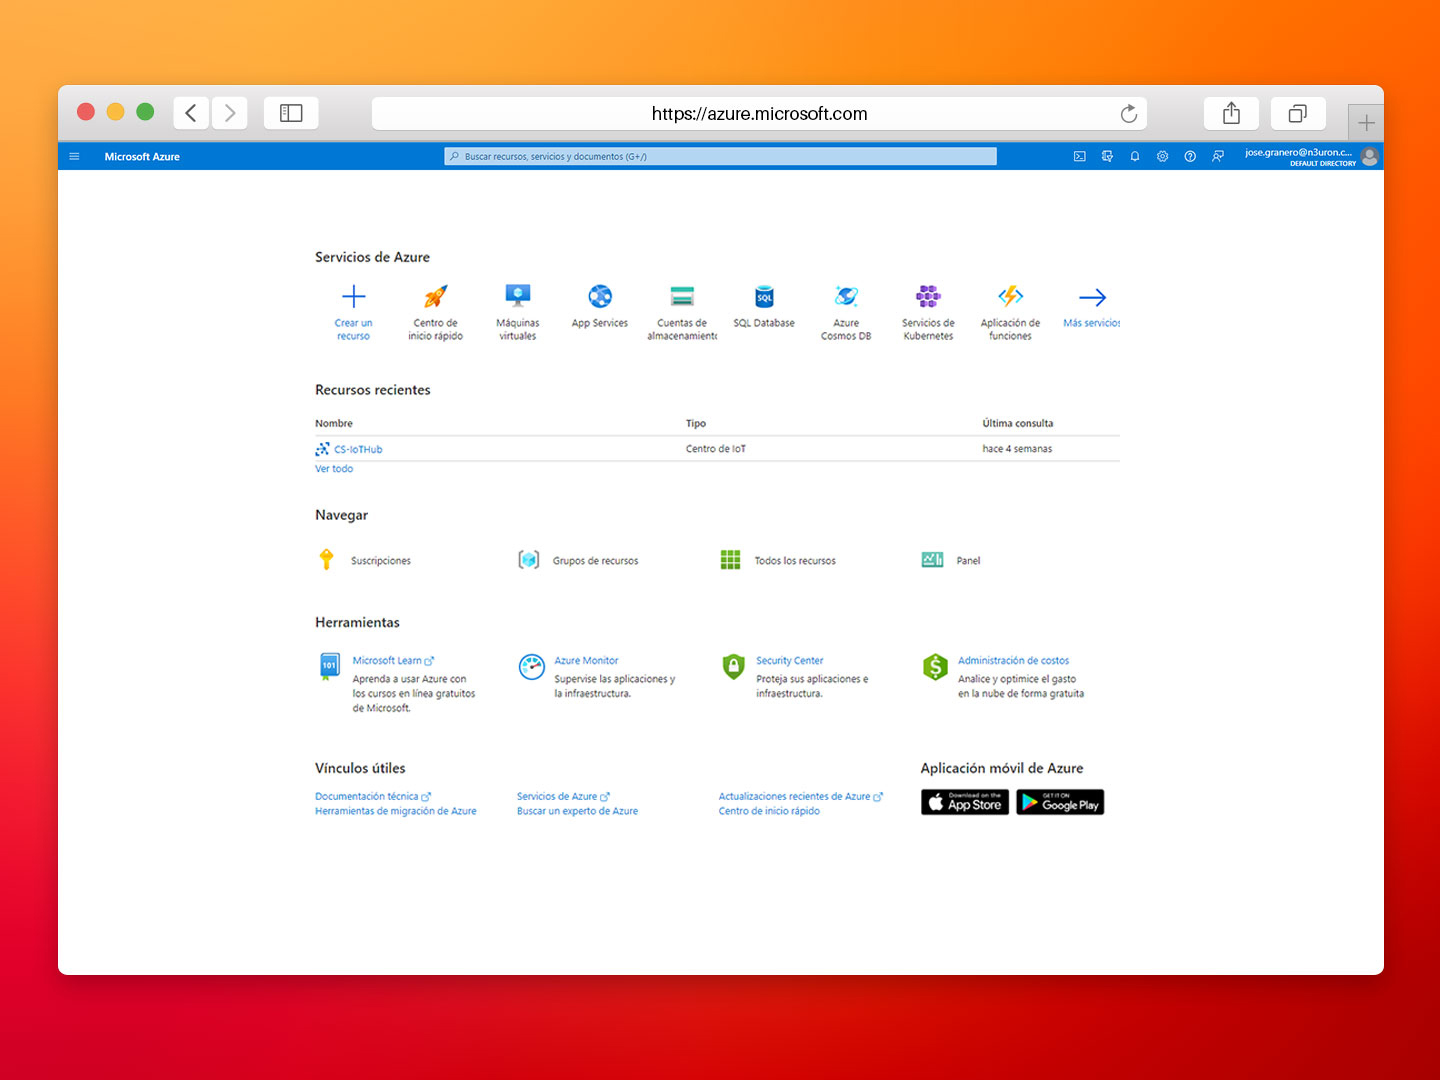
- Step 01: Log into Microsoft Azure and go to the Azure Portal. Click on the link to get to the Microsoft Azure Portal.
Screenshot displaying Azure portal tools panel.
Once logged in, you’ll need to create the Azure resources that your device, in our case a N3uron node, will require in order to connect to the Azure IoT Hub and start exchanging messages.
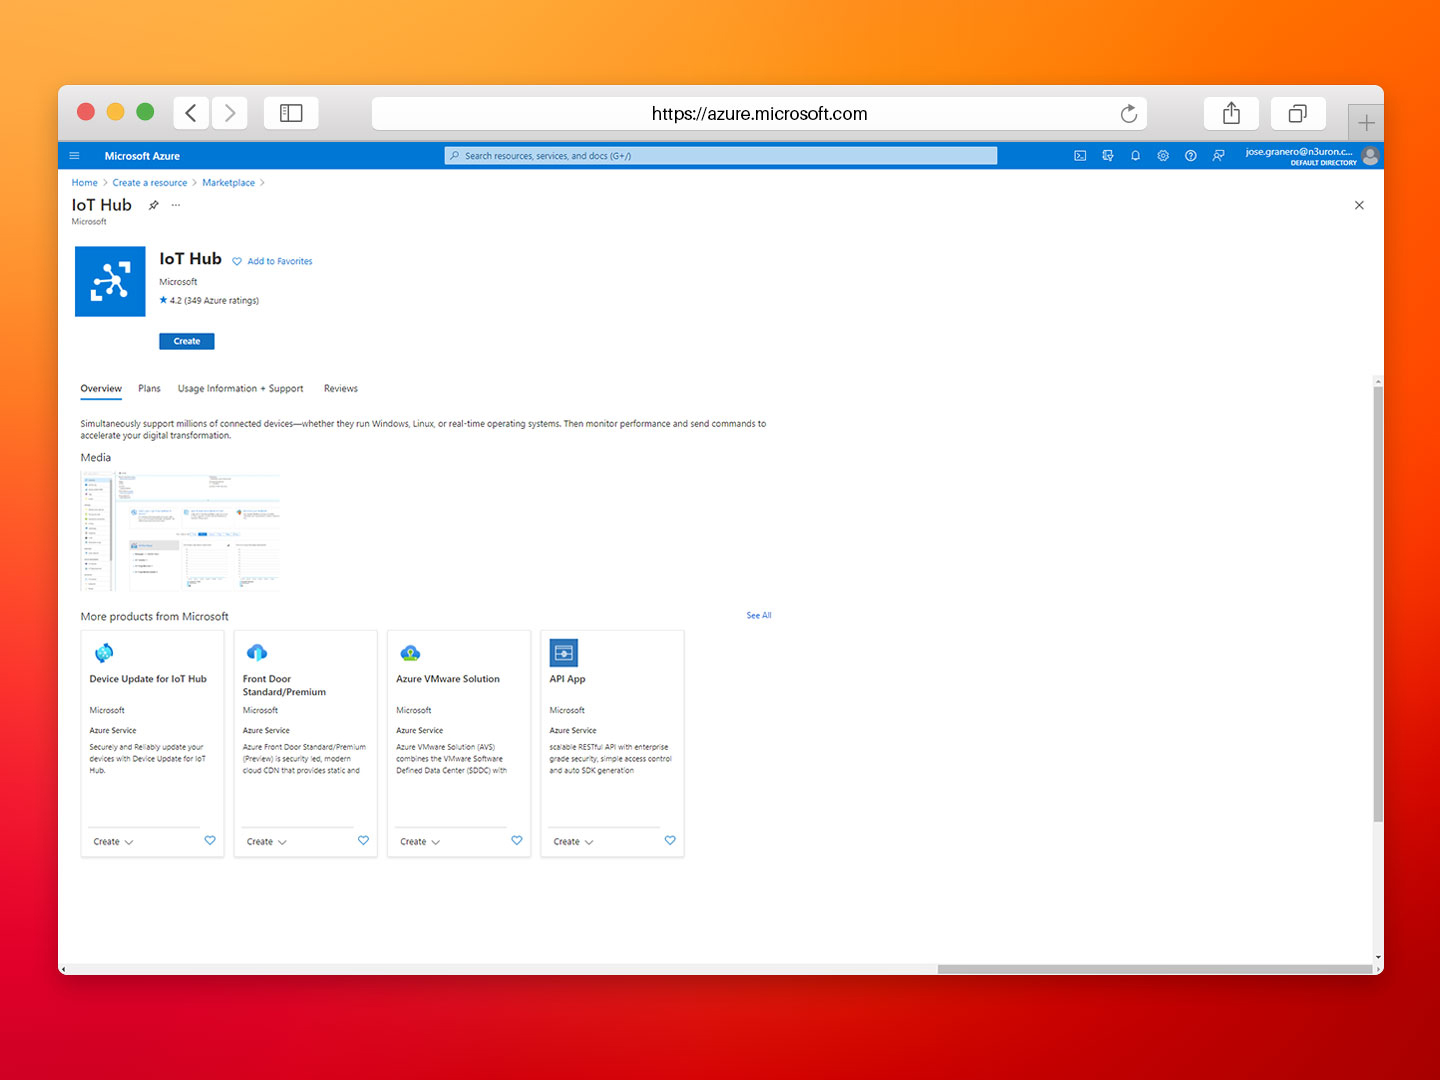
- Step 02: From the Azure homepage, select the + Create a resource option and then enter IoT Hub in the Search the Marketplace field.
- Step 03: Select IoT Hub from the search results and then select Create.
Screenshot displaying how to create a hub within the Azure IoT Hub.
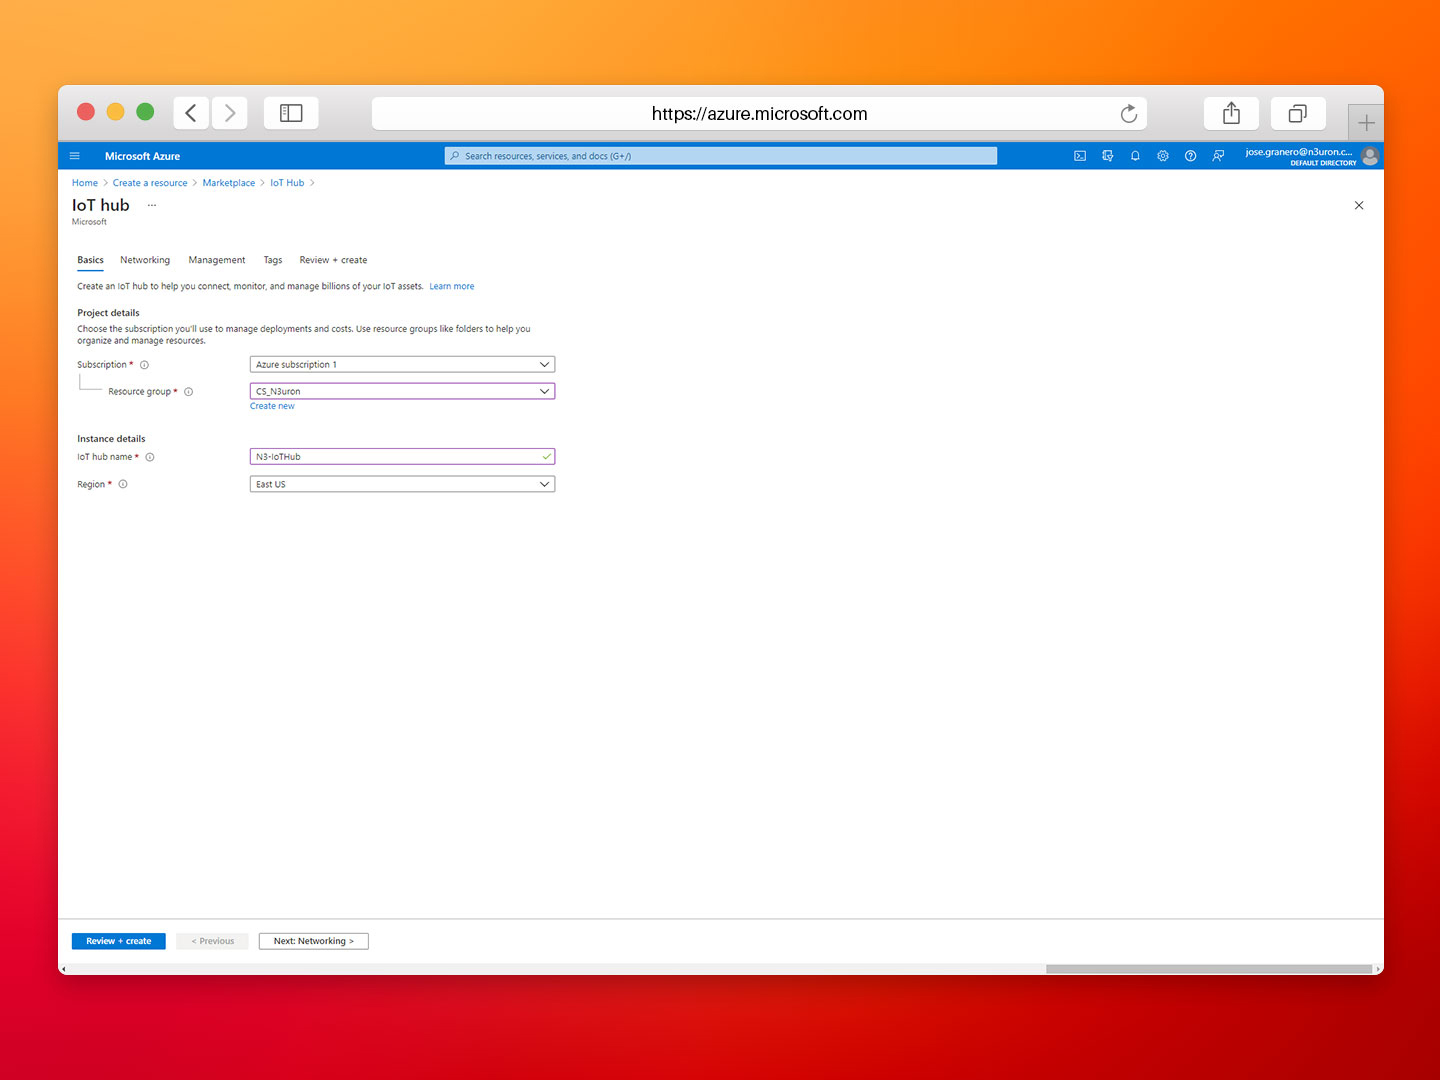
- Step 04: In the Basics tab, complete the fields as follows:
– Subscription: Select the subscription to use for your hub. In this example, we have selected Azure subscription 1.
– Resource Group: Select a resource group or create a new one. To create a new one, select Create new and fill in the name you want to use. To use an existing resource group, select the specific resource group. For more information, see Manage Azure Resource Manager resource groups. In this example, we have selected CS_N3uron.
– Region: Select the region you want your hub to be located in. Select the location closest to you.
– IoT Hub Name: Enter a name for your hub. In this example, we have named it N3-IoT.
Screenshot displaying Azure IoT Hub details panel.
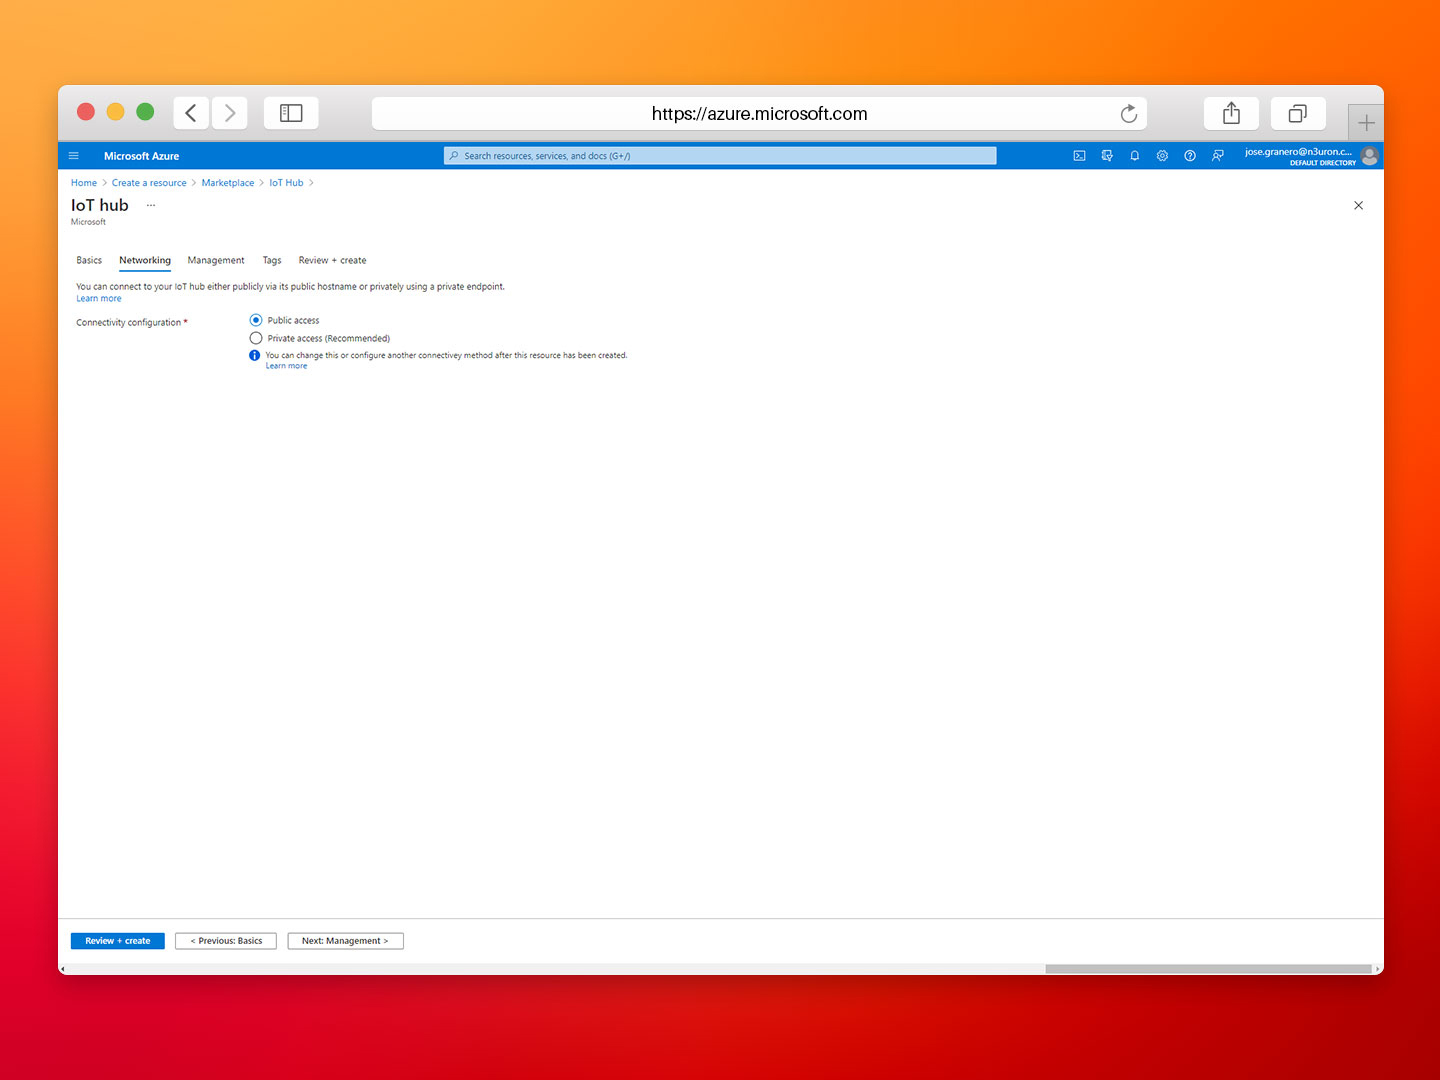
- Step 05: Select Next: Networking to continue creating your hub. Choose the endpoints that the devices can use to connect to your IoT Hub and select the Public access default setting.
Screenshot displaying Azure IoT Hub networking panel.
- Step 06: Select Next: Management to continue creating your hub Accept the default settings here.
- Step 07: Select Next: Tags to continue to the next screen. Accept the default settings here.
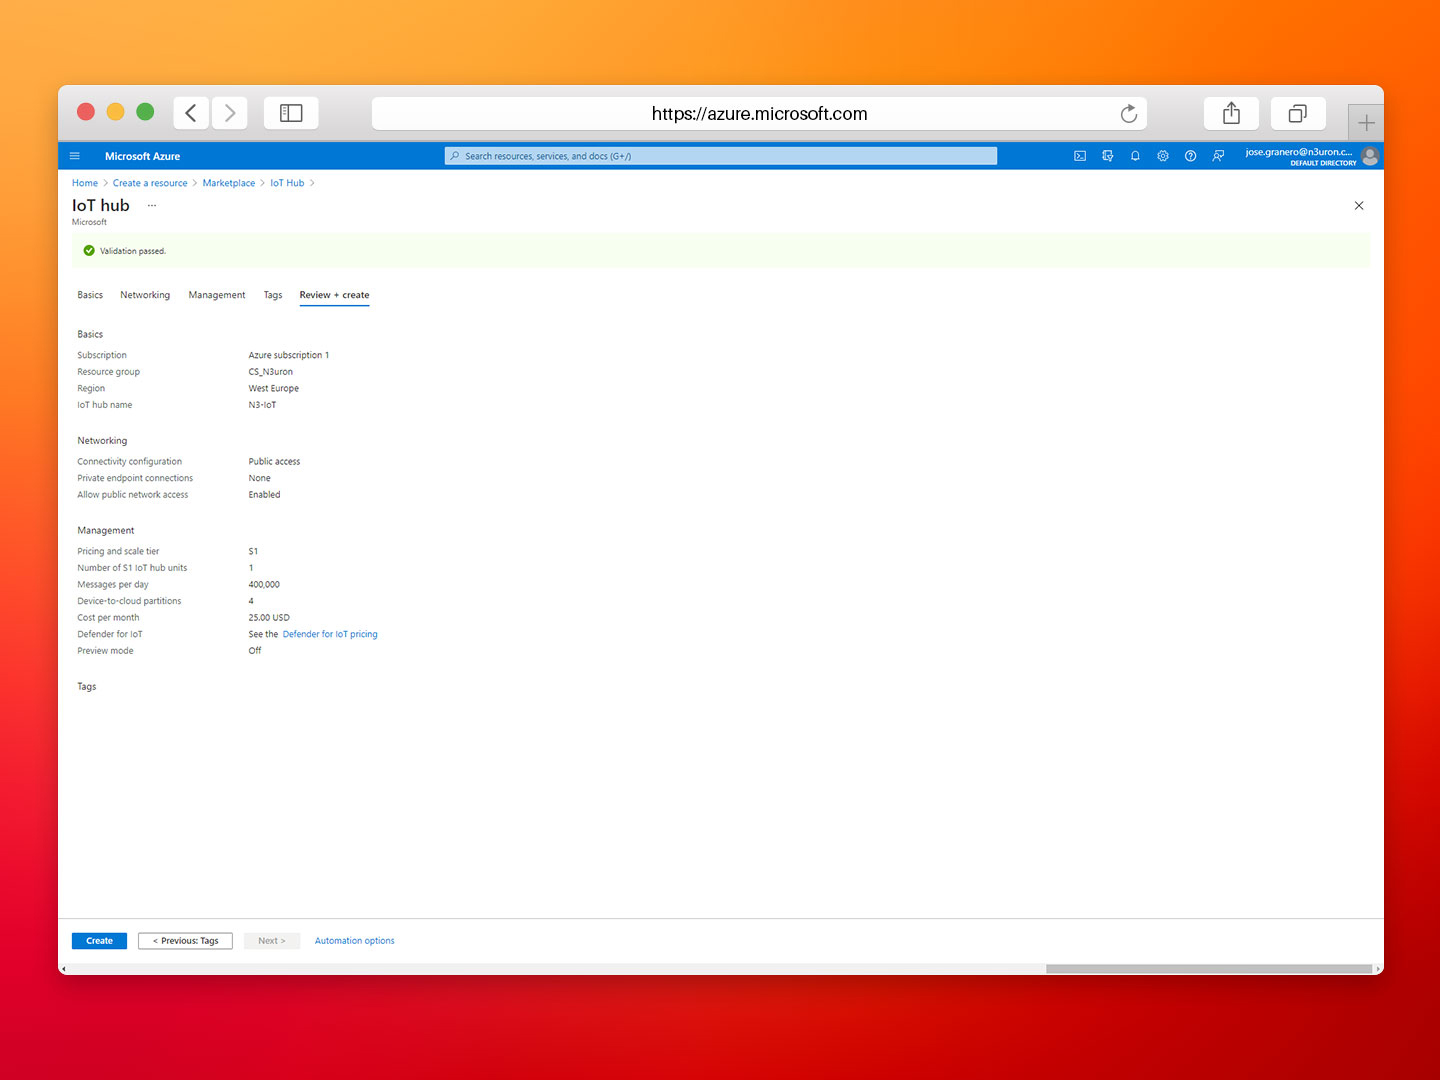
- Step 08: Select Next: Review + create to review your choices. You should see something similar to this screen but with the values you selected when creating the hub.
- Step 09: Select Create to start the deployment of your new hub. Your deployment will remain in progress for a few minutes while the hub is being created. Once the deployment is complete, select Go to resource to open the new hub.
Screenshot displaying validation passed confirmation in Azure IoT Hub.
Configuring Your Shared Access Policy
You can choose between two different mechanisms provided by Azure IoT Hub to authenticate devices and services: Security Tokens and X.509 Certificates. In this example, we are going to use Security Tokens. These Security Tokens are also known as Shared Access Signature (SAS) tokens. For more details about configuration using X.509 Certificates, please visit our Knowledge Base.
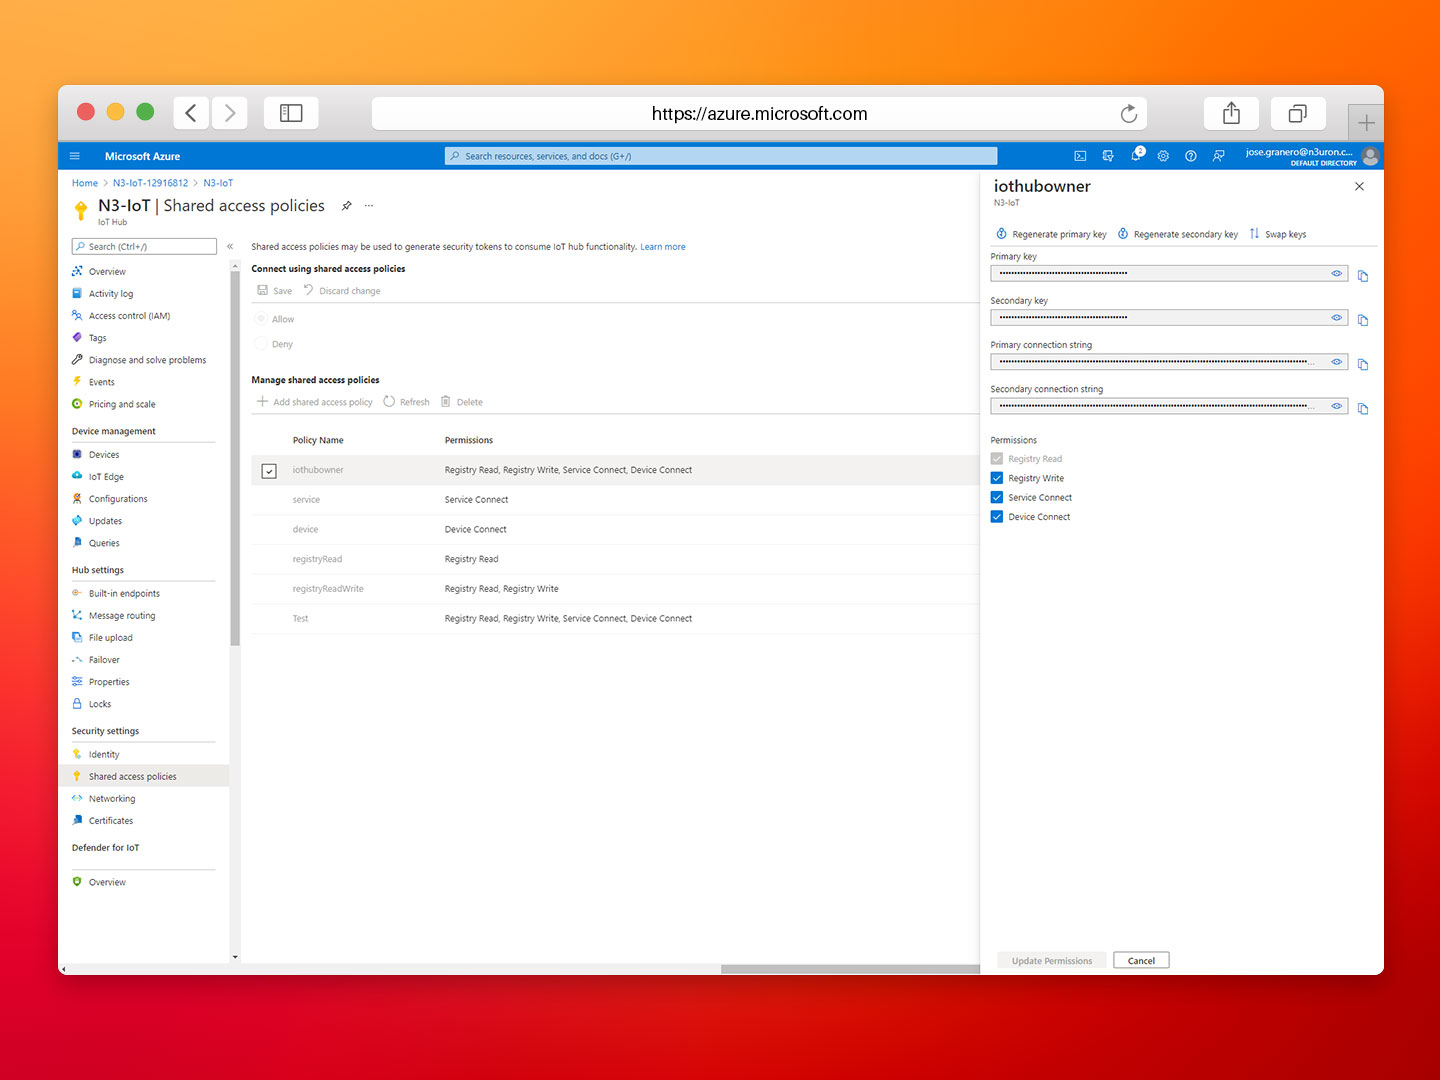
- Step 01: In the resource panel of the IoT Hub you have just created, select Shared access policies.
- Step 02: Click on iothubowner and copy the Primary connection string from the right-hand panel.
Screenshot displaying the shared access policies panel in Azure IoT Hub.
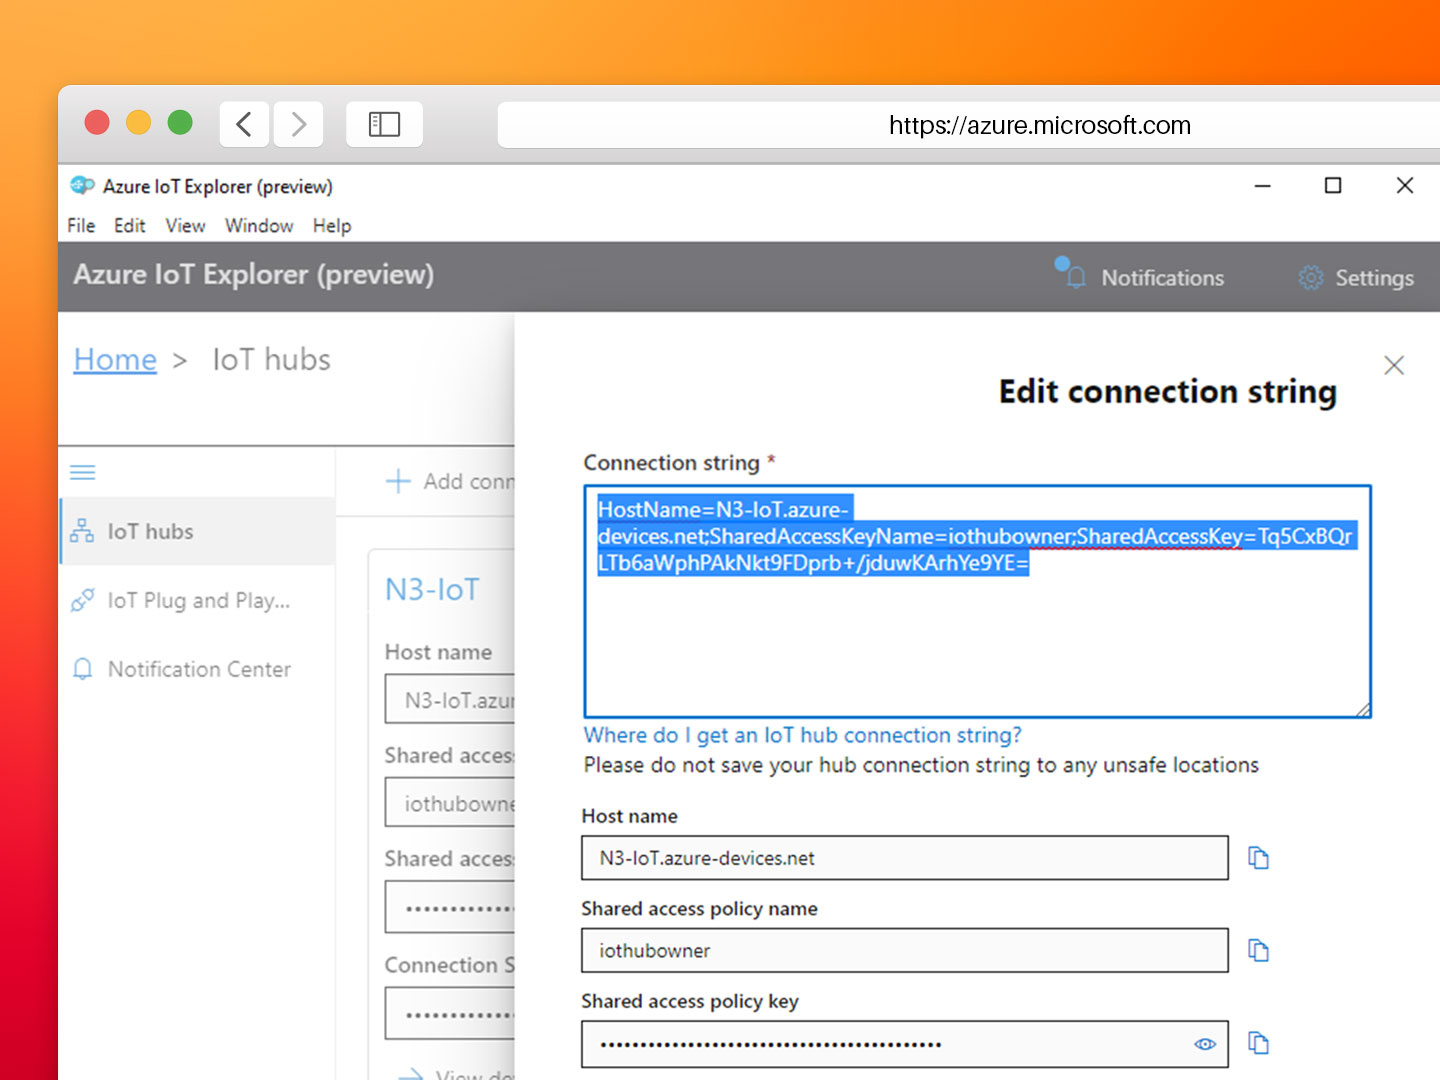
- Step 03: Start the Azure IoT Explorer, click on the + Add connection button, and paste the Primary connection string in the Connection String text box. Next click Save.
Screenshot displaying Azure IoT Explorer Graphical Tool interface.
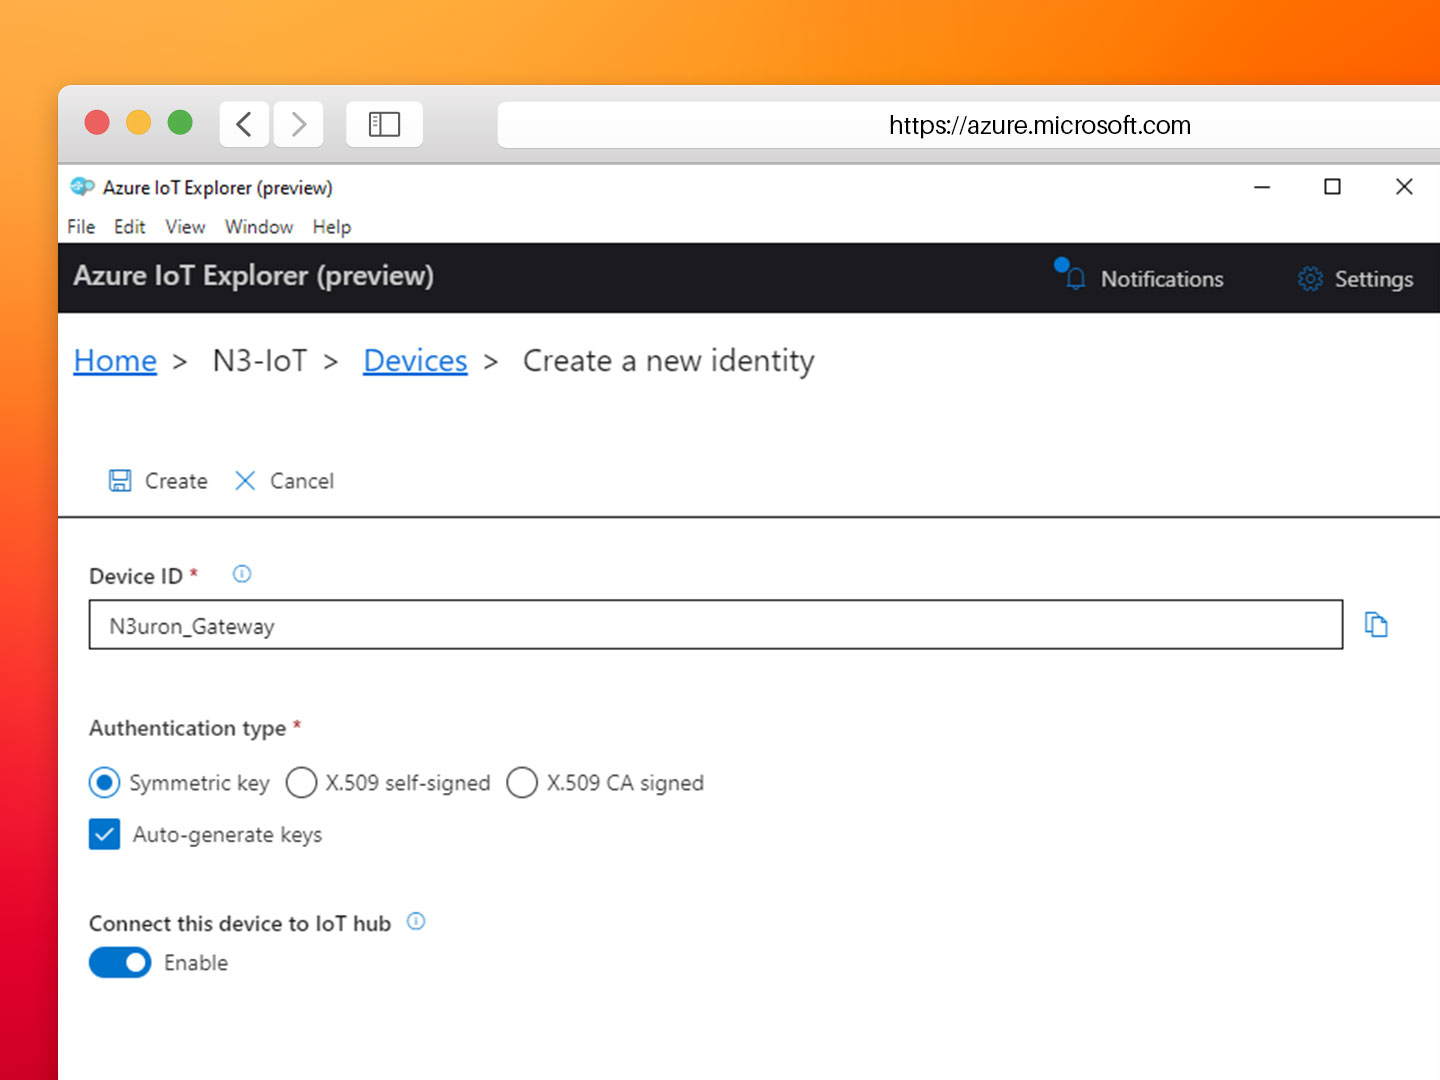
- Step 04: In the Devices section, click on the +New button and enter a name for your device. In this example, we have named it “N3uron_Gateway”. In Authentication type, select Symmetric key, check the Auto-generate keys field, and click on Create.
Screenshot displaying the create a new identity window in Azure IoT Explorer interface.
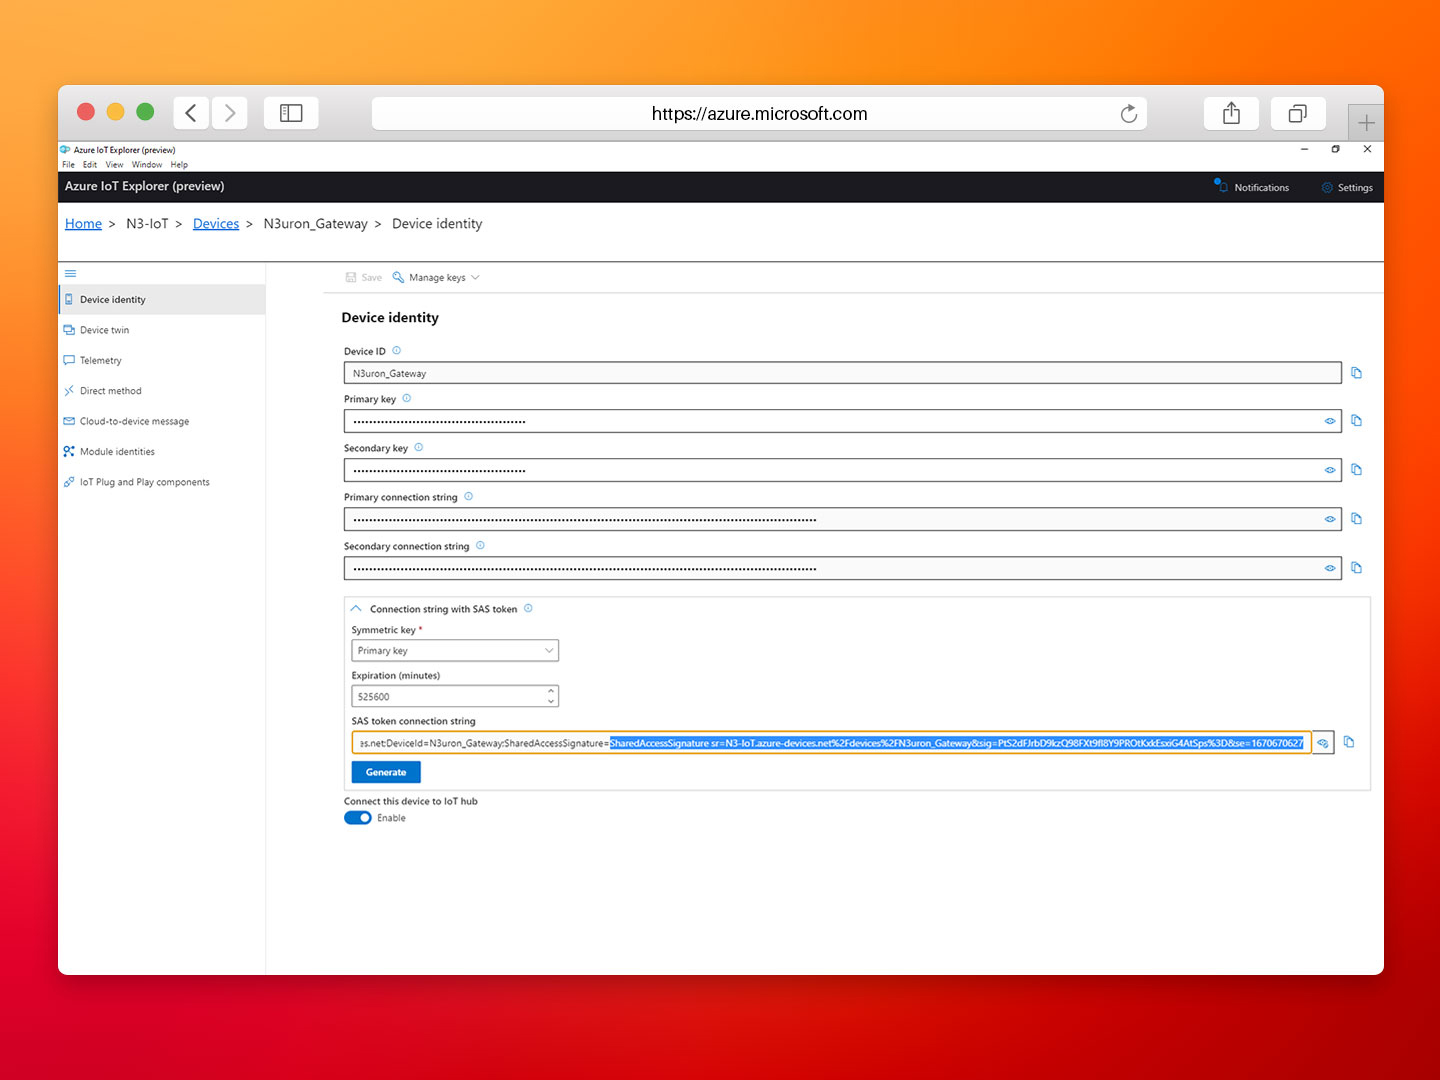
- Step 05: After creating the new identity, expand the Connection string with SAS token section. In the Symmetric key drop-down menu, select Primary Key, enter a sufficiently high figure in Expiration (minutes), click on the Generate Button, and copy the part of the SAS token connection string form SharedAccessSignature= onwards.
Screenshot displaying SAS Token Connection String in Azure IoT Explorer interface
Start Configuring the N3uron IIoT Platform
Log into the N3uron IIoT Platform Using a Web Browser
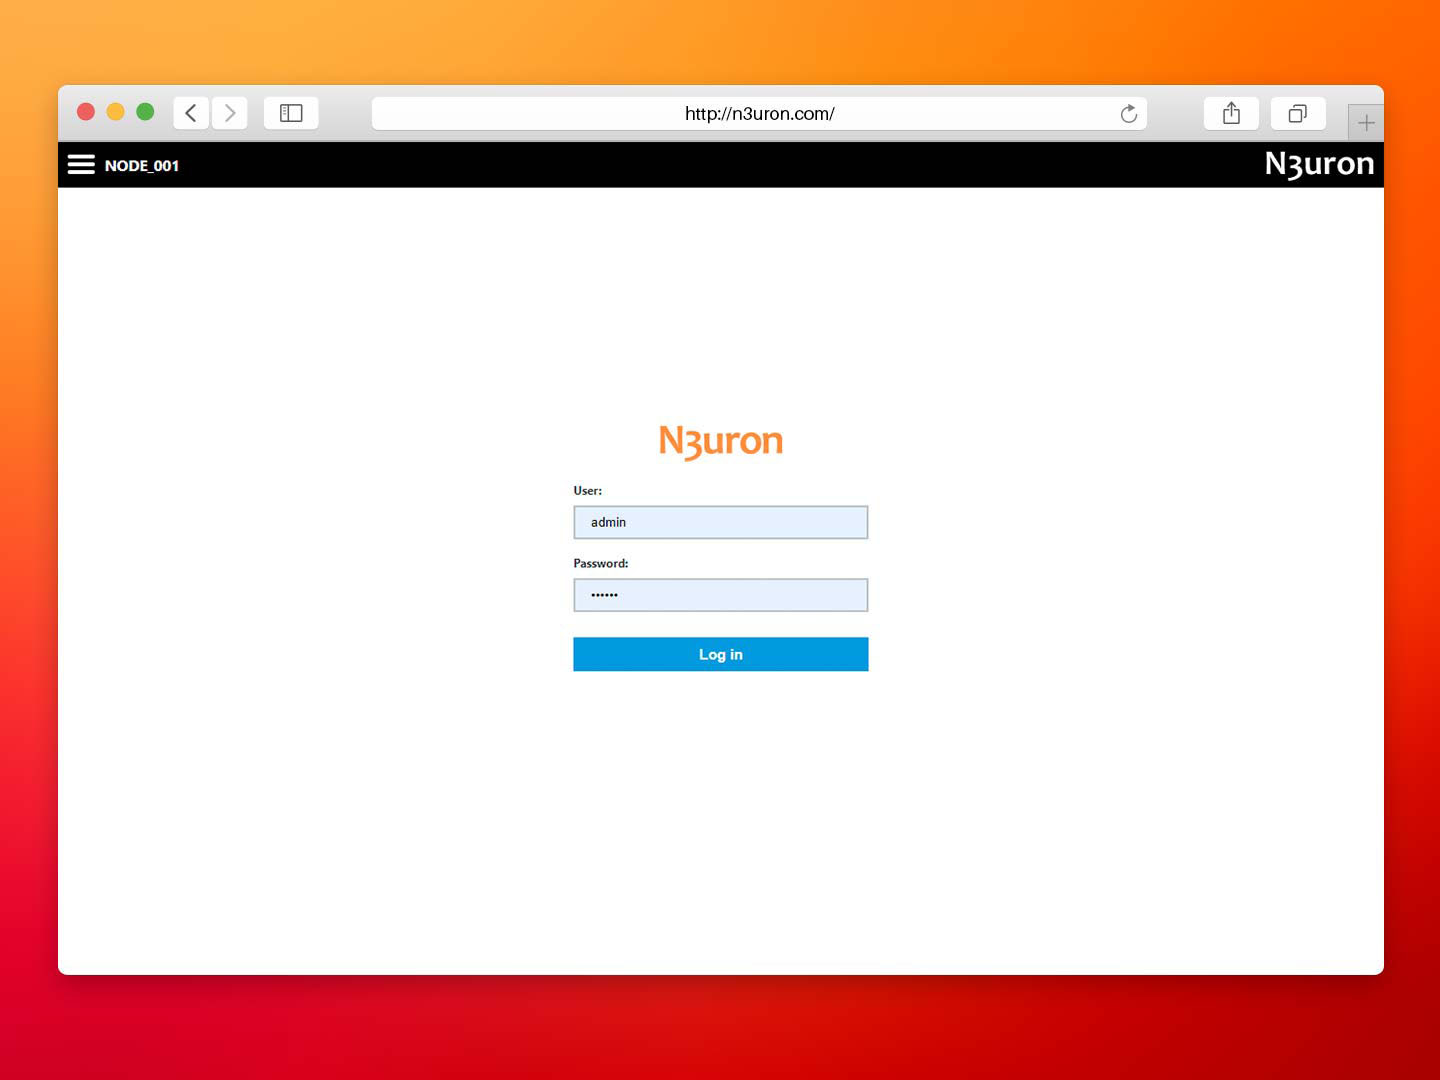
If this is your first time accessing N3uron, open your web browser and type http://localhost:8003. By default, the User and Password are admin and n3uron respectively.
Screenshot displaying the log-in interface within N3uron’s IIoT platform WebUI.
Create a Module Instance Within N3uron’s WebUI Interface
- Step 01: In the Navigation panel, select Config.
- Step 02: In the Explorer panel, select Modules.
- Step 03: Click on the Model menu and select New Module.
- Step 04: The instance can be given any name but for this example, we will use MQTT.
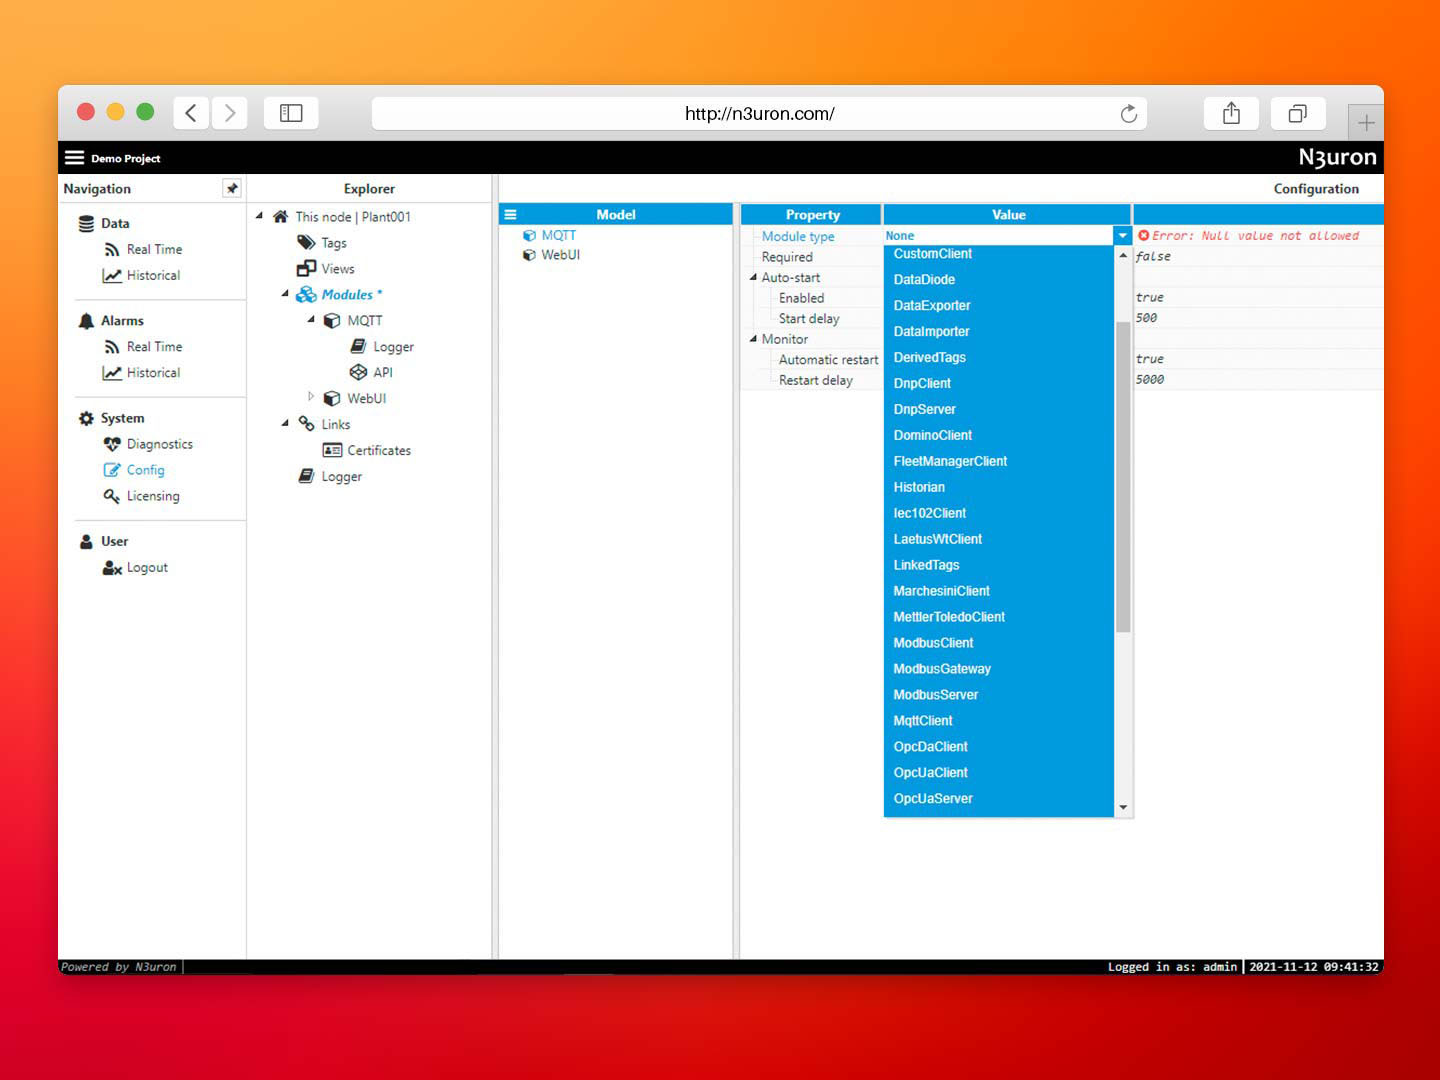
- Step 05: Set the Module Type property to MQTT Client. Leave the rest of the properties as their default values and click Save.
Screenshot displaying how to create an instance using N3uron’s MQTT Module panel.
Configuring N3uron’s MQTT Module within the WebUI’s Explorer Panel
- Step 01: In the Explorer panel, select the MQTT instance you have just created.
- Step 02: Click on the Model menu bottom bar and select New Connection.
- Step 03: Give the new connection a name. In this example, it has been named AZURE.
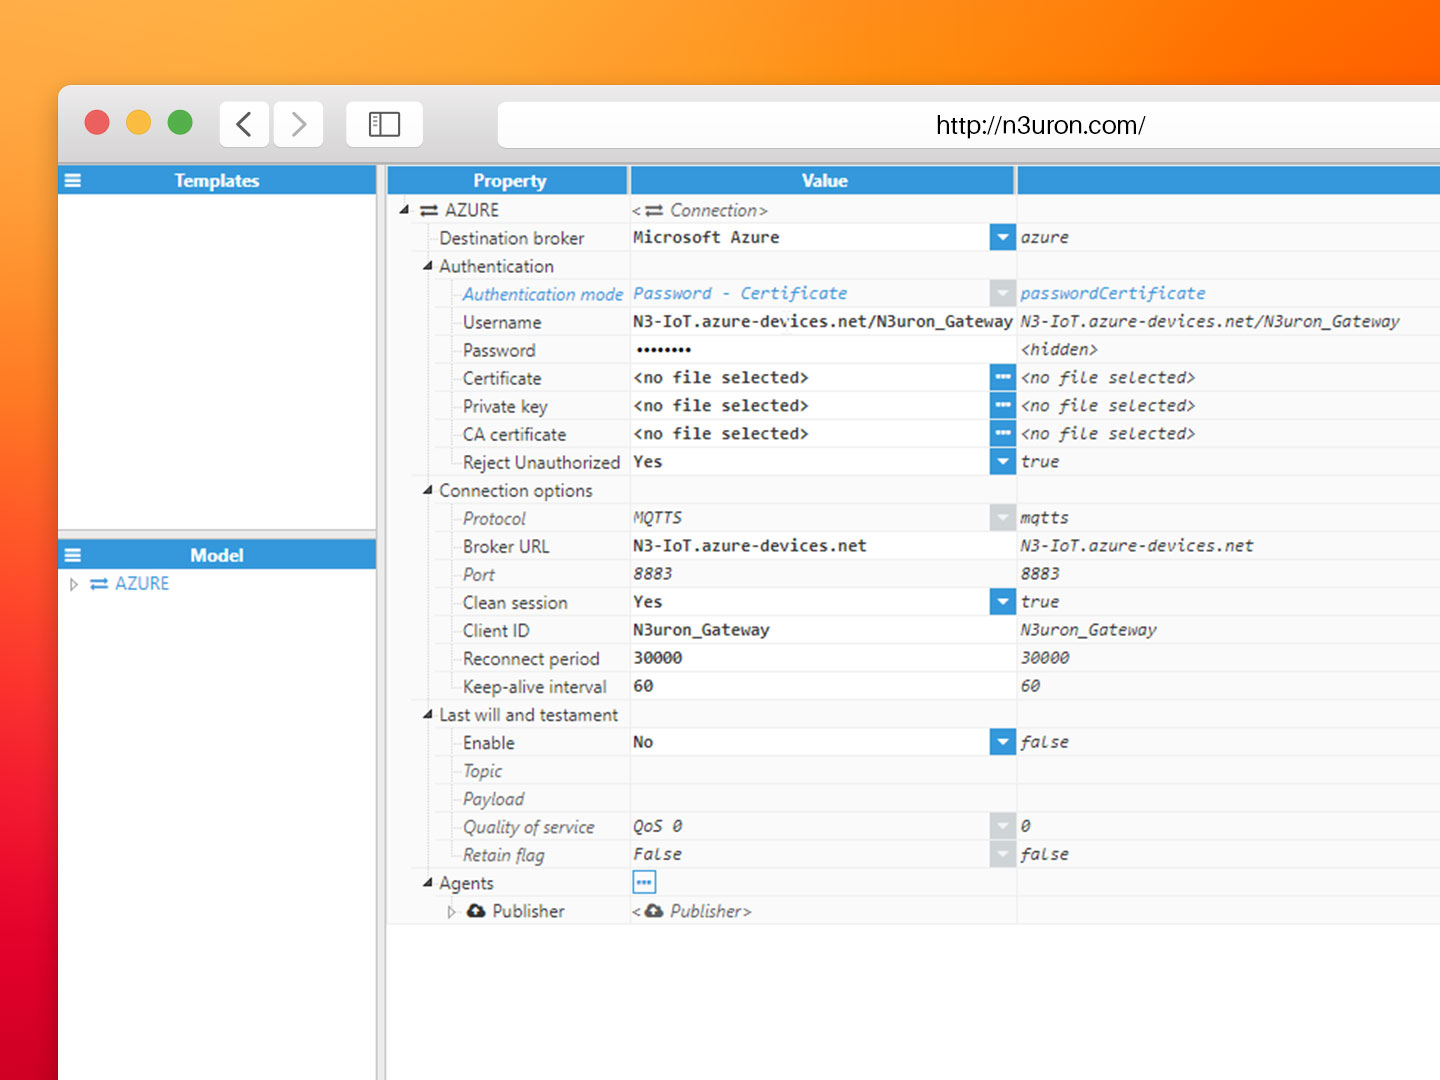
- Step 04: Configure the connection properties:
A: Select Microsoft Azure from the Destination Broker drop-down menu.
B: In Username, enter the Hostname of your Azure IoT Hub followed by “/” and the name of your device. In our case, this will be N3-IoT.azure devices.net/N3uron_Gateway.
C: In Password, enter the string you copied from the SAS Token.
D: In Broker URL, enter the Hostname of your Azure IoT Hub. In our case, this is N3-IoT.azure-devices.net.
E: Leave the rest of the properties as their default values and click on Save.
Screenshot displaying Azure IoT Hub connection configuration in N3uron’s MQTT module panel.
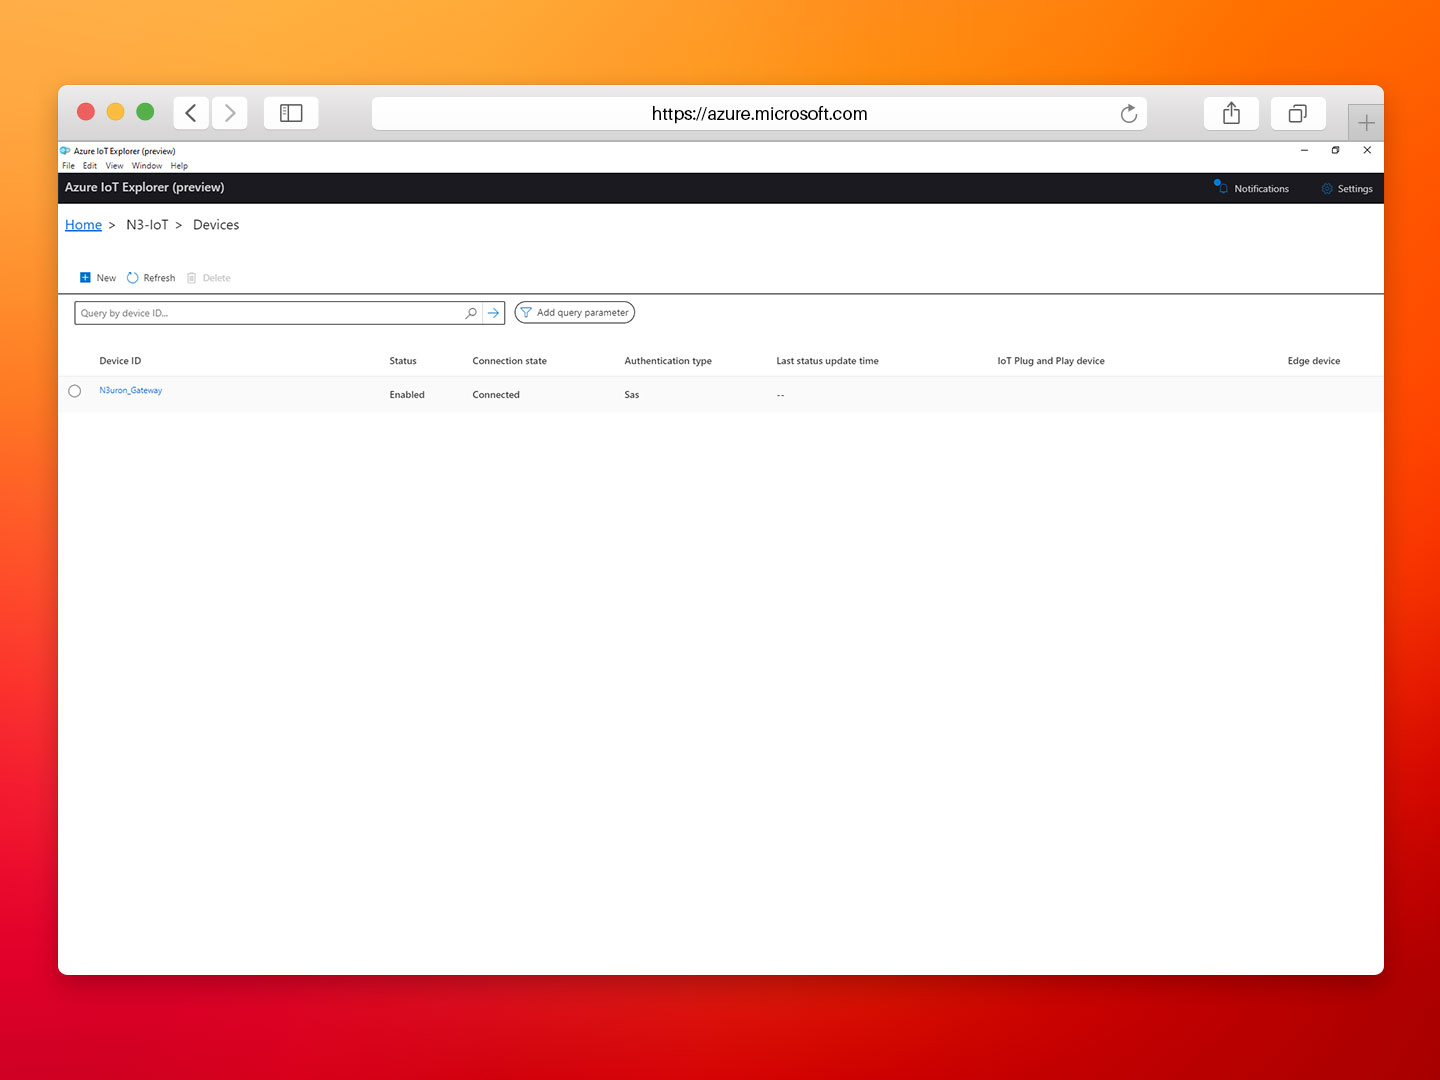
Now, navigate back to Azure IoT Explorer where, providing that everything has been properly configured, you should see your device connected to your IoT Hub.
Screenshot displaying Azure IoT Explorer connection with N3uron Node.
Publish Data Using N3uron’s MQTT Module
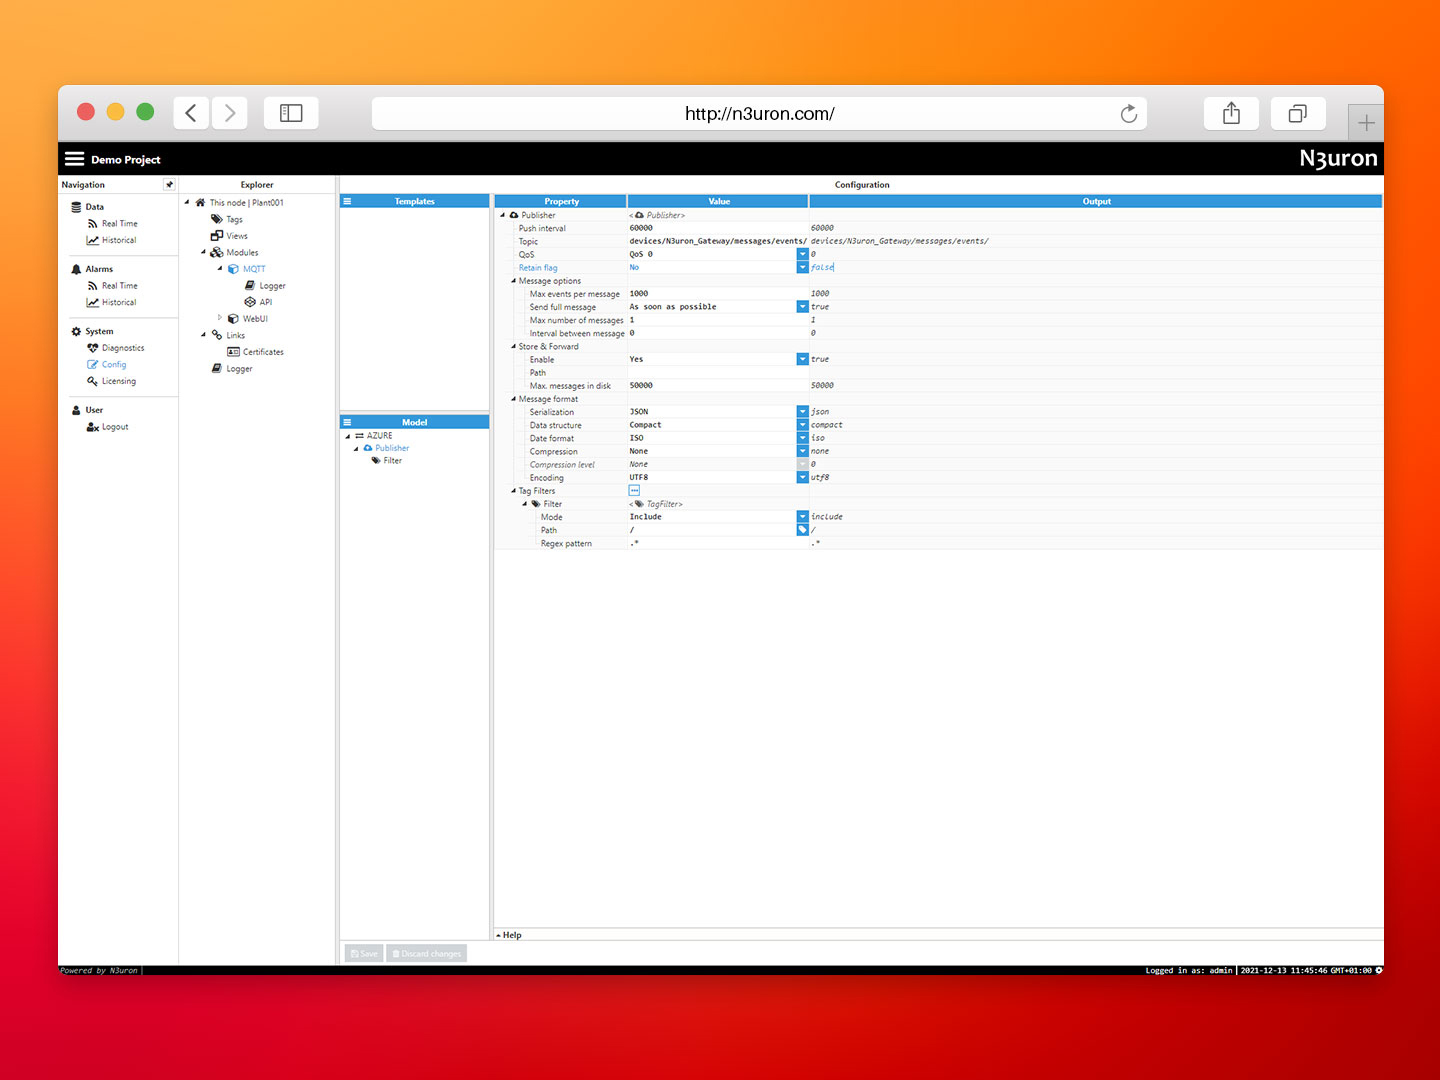
- Step 01: Within the Model panel, right-click on the AZURE Connection you have just configured, select New Publisher, and give it a name. In this example, we will simply use Publisher.
- Step 02: Click on it and add a name in the Topic field. To publish an MQTT message to Azure, you cannot use any topic name, as it must be named according to the following format devices/{device_id}/messages/events/. In our example, we have used devices/N3uron_Gateway/messages/events/.
- Step 03: Click on the Tag Filter button, select New Tag Filter, and change the default name. In this example, we have used Filter. Leave Mode, Path, and Regex pattern as their default values.
With this configuration, every tag configured in N3uron will be published to our Azure Broker.
Screenshot displaying the publisher configuration setting within N3uron’s MQTT module panel.
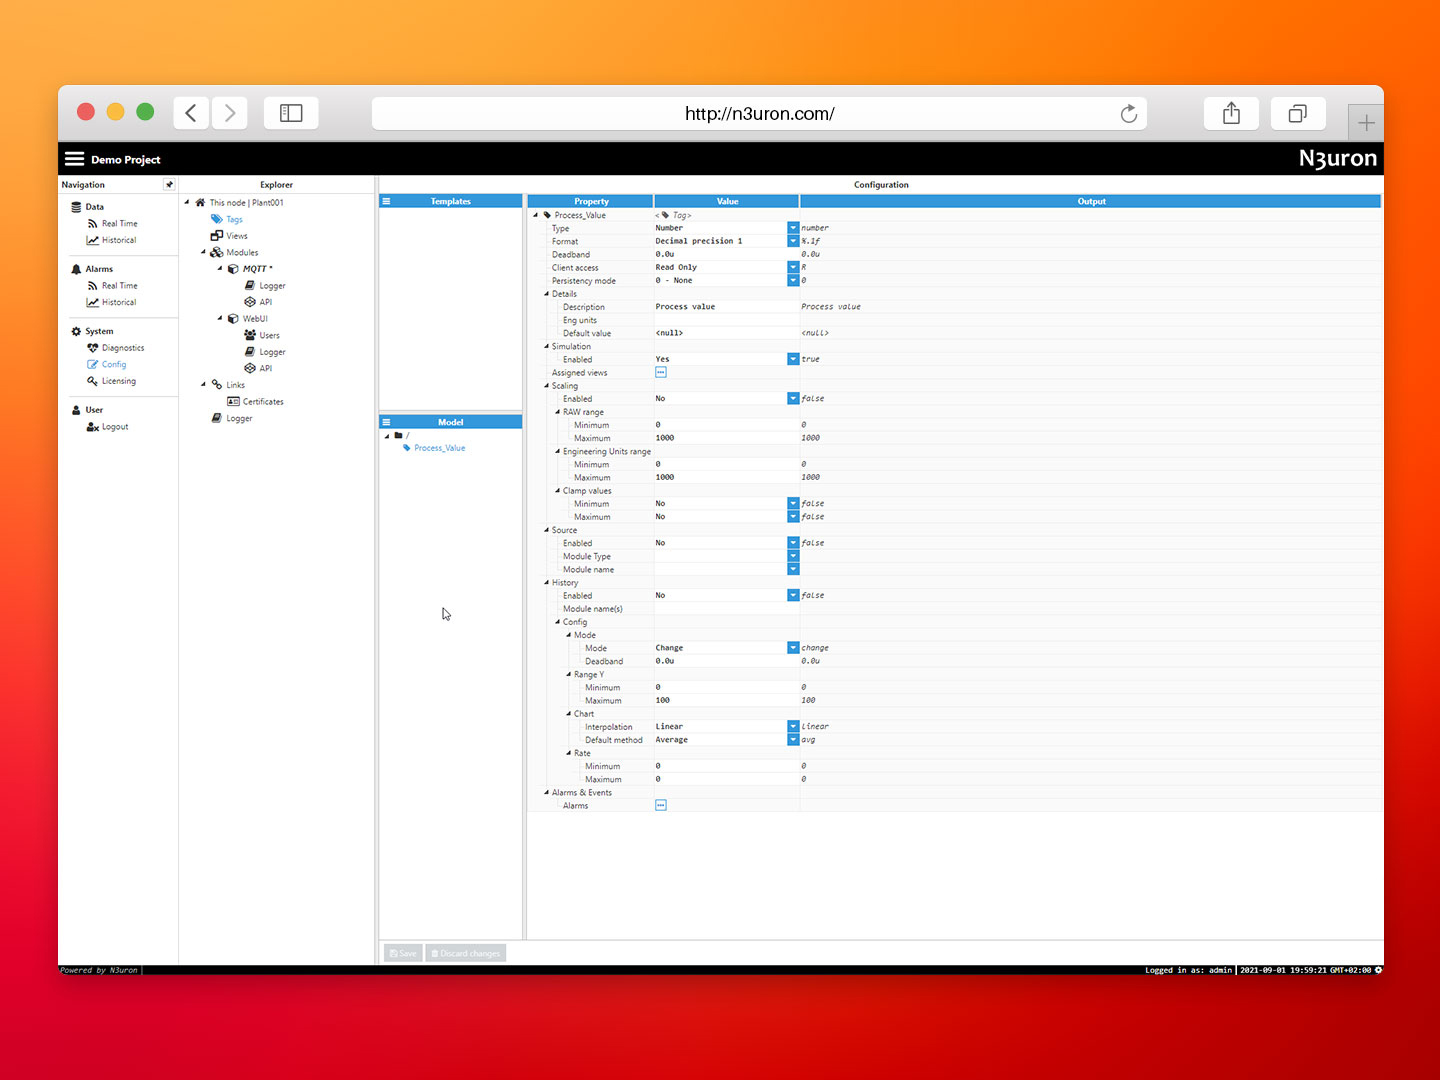
- Step 04: In the Explorer panel, select Tags.
- Step 05: In the Model menu, right-click on the folder icon, select New Tag, and give it a name. In this example, we will use Process_value.
- Step 06: Within the Configuration panel, set the following properties using the values shown below, leaving the rest of them as their default values:
– Type: Number.
– Simulation/Enabled: Yes.
Screenshot displaying tag configuration setting within N3uron’s MQTT module panel.
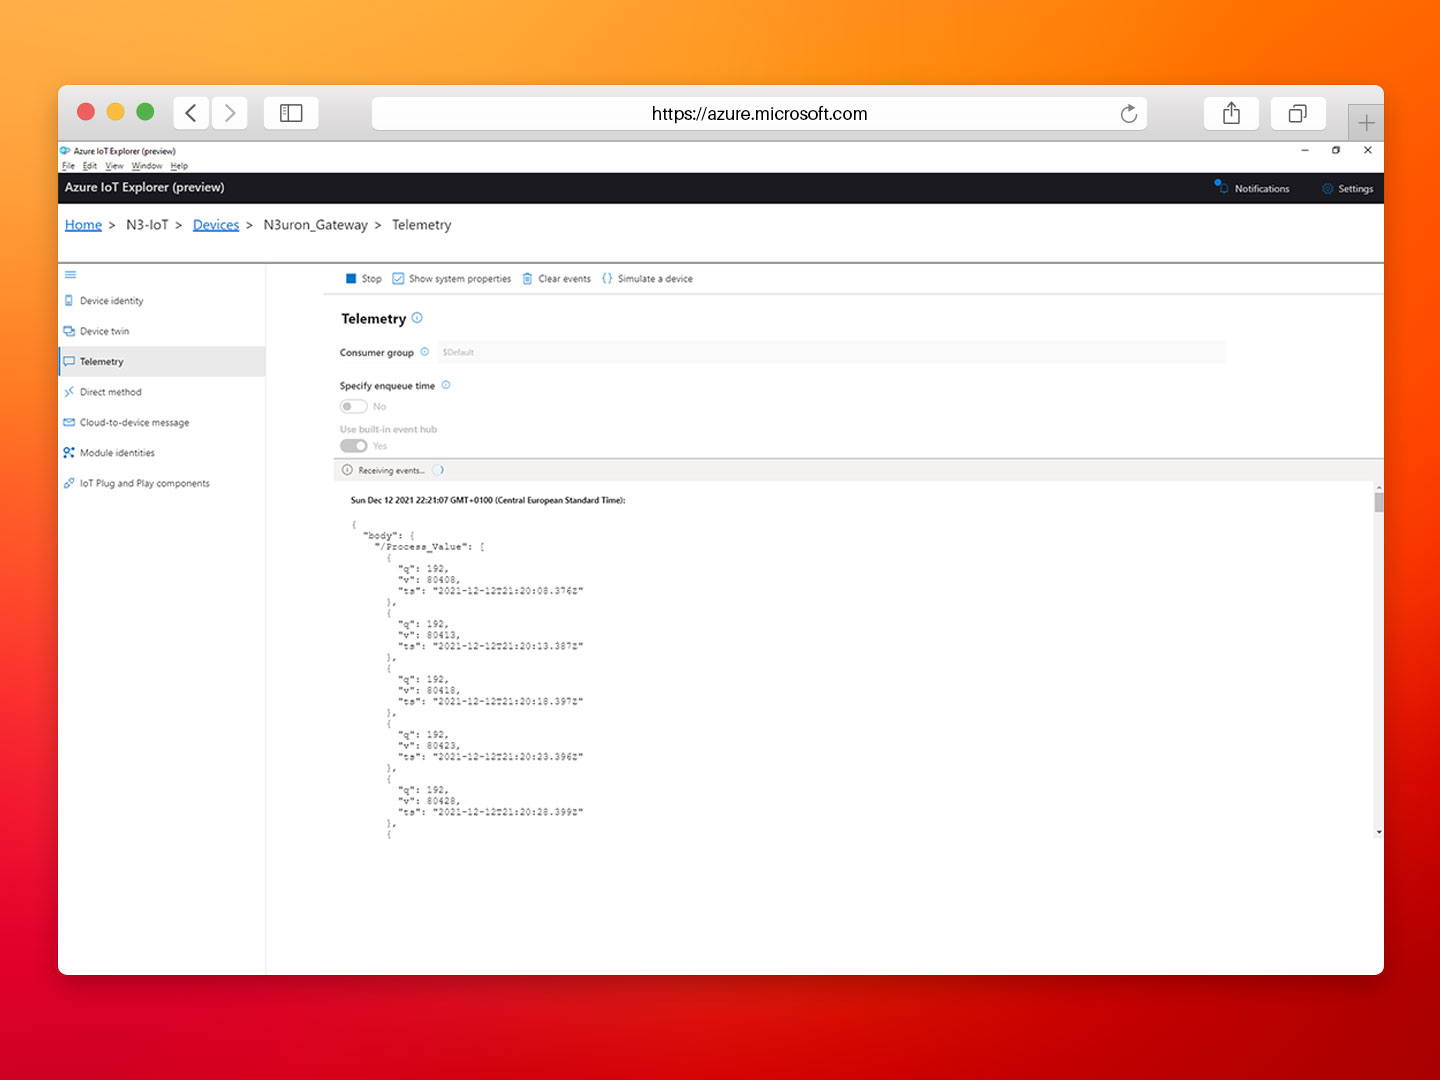
- Step 07: Go to the Azure IoT Explorer and in the Telemetry Tab of your device, you should see the messages being sent by your N3uron node in real-time, as shown in the image below.
Screenshot displaying Azure IoT Explorer interface receiving messages from N3uron Node.
Subscribe to a Topic Using N3uron’s MQTT Module
- Step 01: In the Model panel, right-click on the AZURE Connection, select New Subscriber and give it a name. In this example, we will simply use Subscriber.
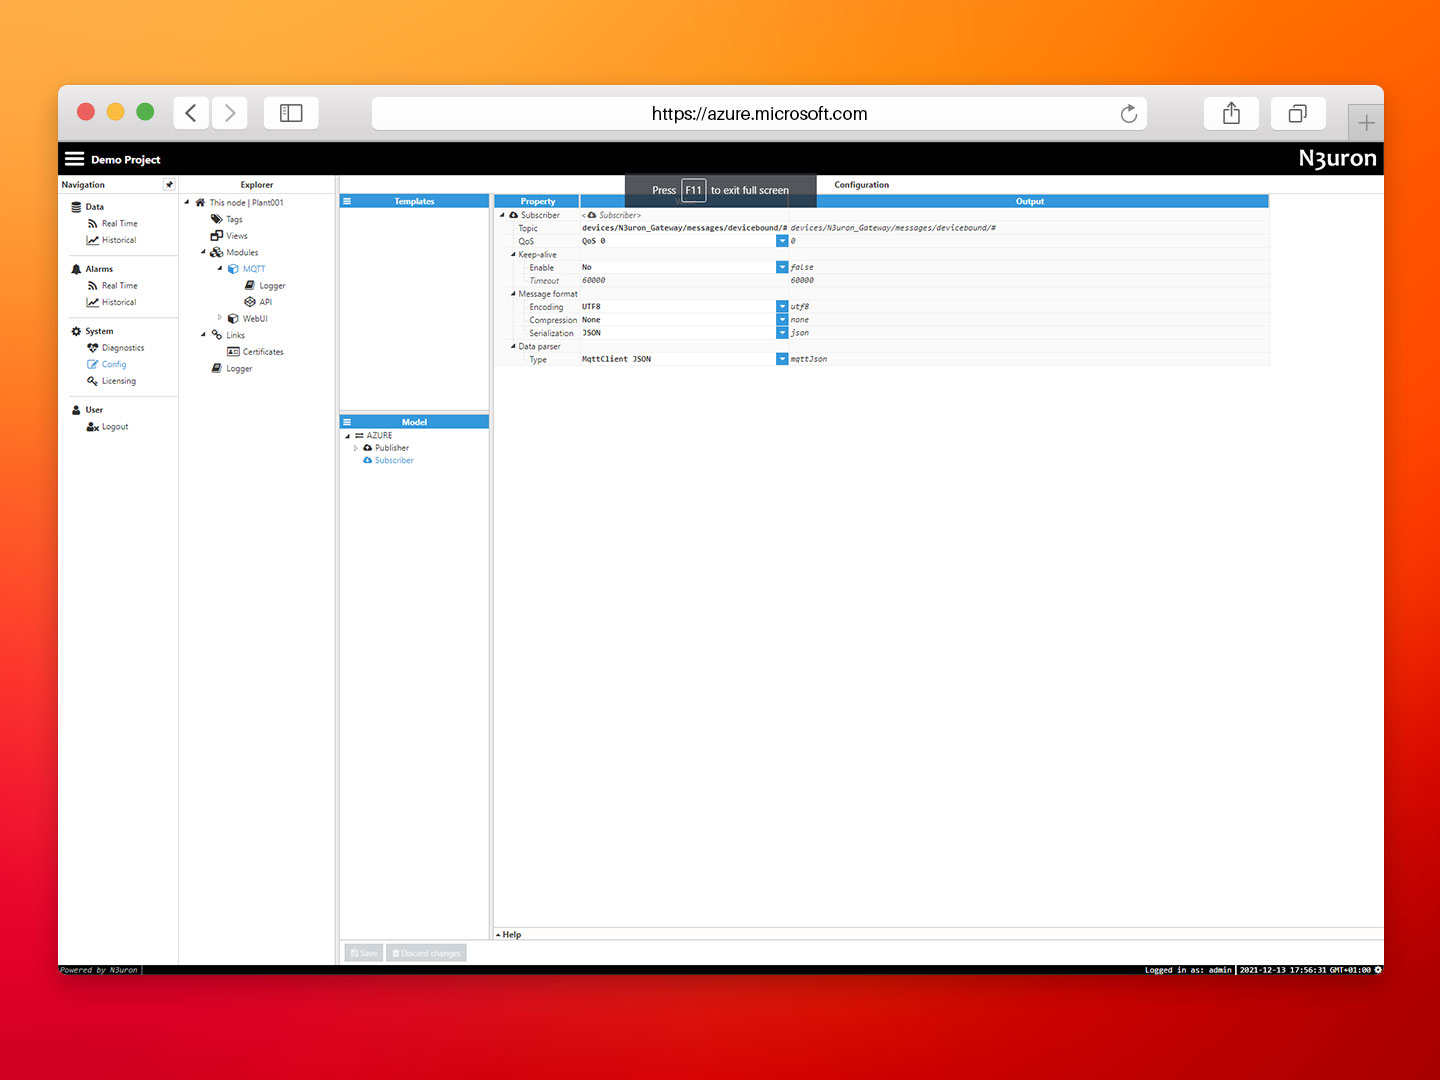
- Step 02: Click on it and add a name in the Topic field. Since IoT Hub is not a general-purpose pub-sub messaging broker, it only supports the documented topic names and topic filters. IoT Hub delivers messages with the Topic Name devices/{device_id}/messages/devicebound/, or devices/{device_id}/messages/devicebound/{property_bag} if there are any message properties. In this example, we are going to enter the following string in the Topic: devices/N3uron_Gateway/messages/devicebound/#.
- Step 03: Set the following properties using the values shown below, leaving the rest of them as their default values:
– Qos: Qos 0.
– Encoding: UTF8.
– Compression: None.
– Serialization: JSON.
– Data parser/Type: MqttClient JSON.
Screenshot displaying the subscriber configuration settings in N3uron’s MQTT panel.
- Step 04: Within the Explorer panel, select Tags.
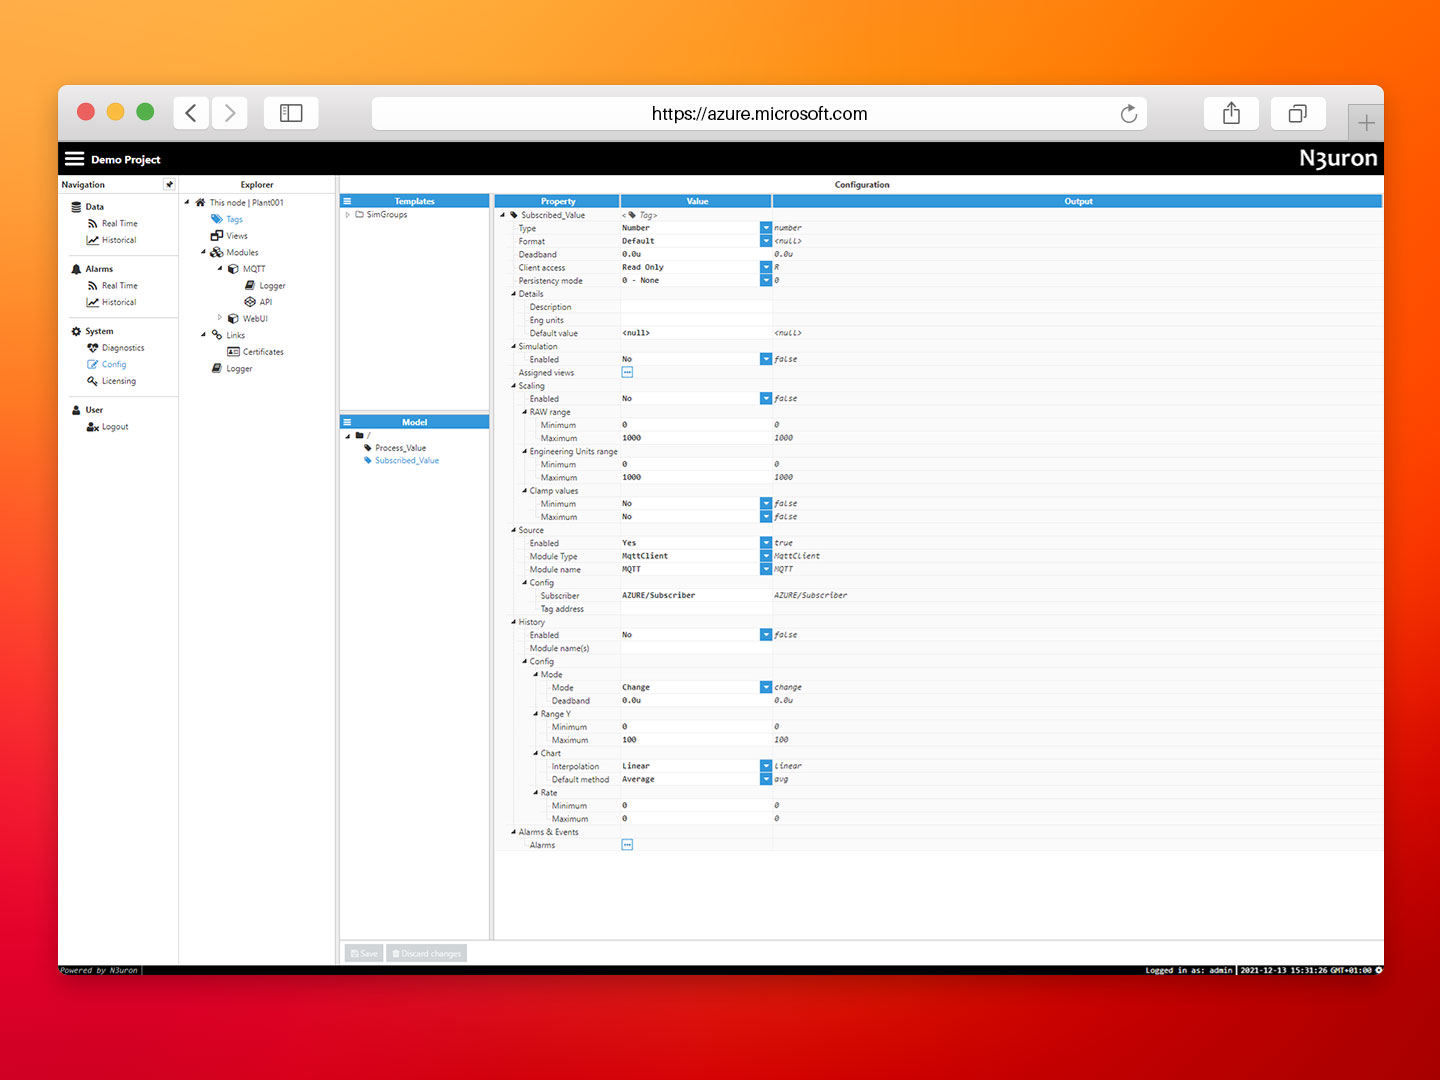
- Step 05: In the Model menu, right-click on the folder icon, select New Tag, and give it a name. In this example, we will use Subscribed_Value.
- Step 06: In the Configuration panel, set the following properties using the values shown below, leaving the rest of them as their default values:
– Type: Number.
– Source/Enabled: Yes.
– Module Type: MqttClient.
– Module name: MQTT.
– Config/Subscriber: Azure/Subscriber. - Step 07: Click Save.
Screenshot displaying N3uron’s MQTT panel showing tag configuration settings.
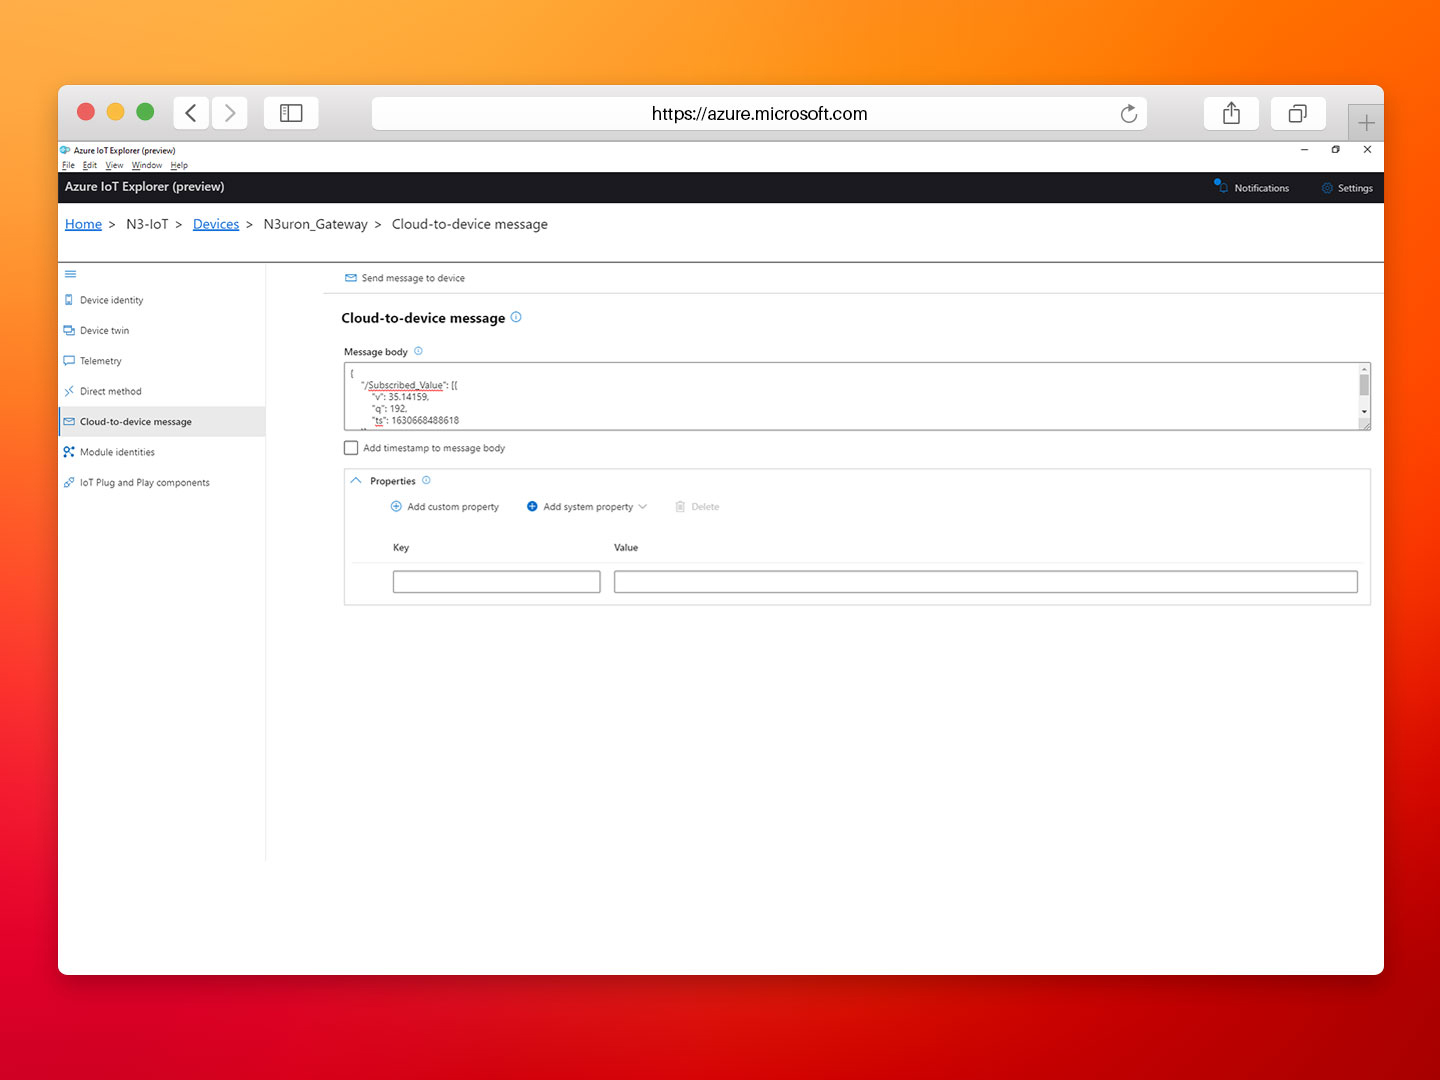
- Step 08: Go to the Azure IoT Explorer, click on the Cloud-to-device-message tab of your device.
- Step 09: In the Message Body enter the following in Message Payload:
{
“/Subscribed_value”: [{
“v”: 3.14159,
“q”: 192,
“ts”: 1630668488618
}]
}
- Step 10: Click on the Add system property drop-down menu and select messageid. In the Vaule field enter Test2, as shown below.
Screenshot displaying cloud-to-device message within Azure IoT Explorer interface.
- Step 11: Click on the Send message to device button.
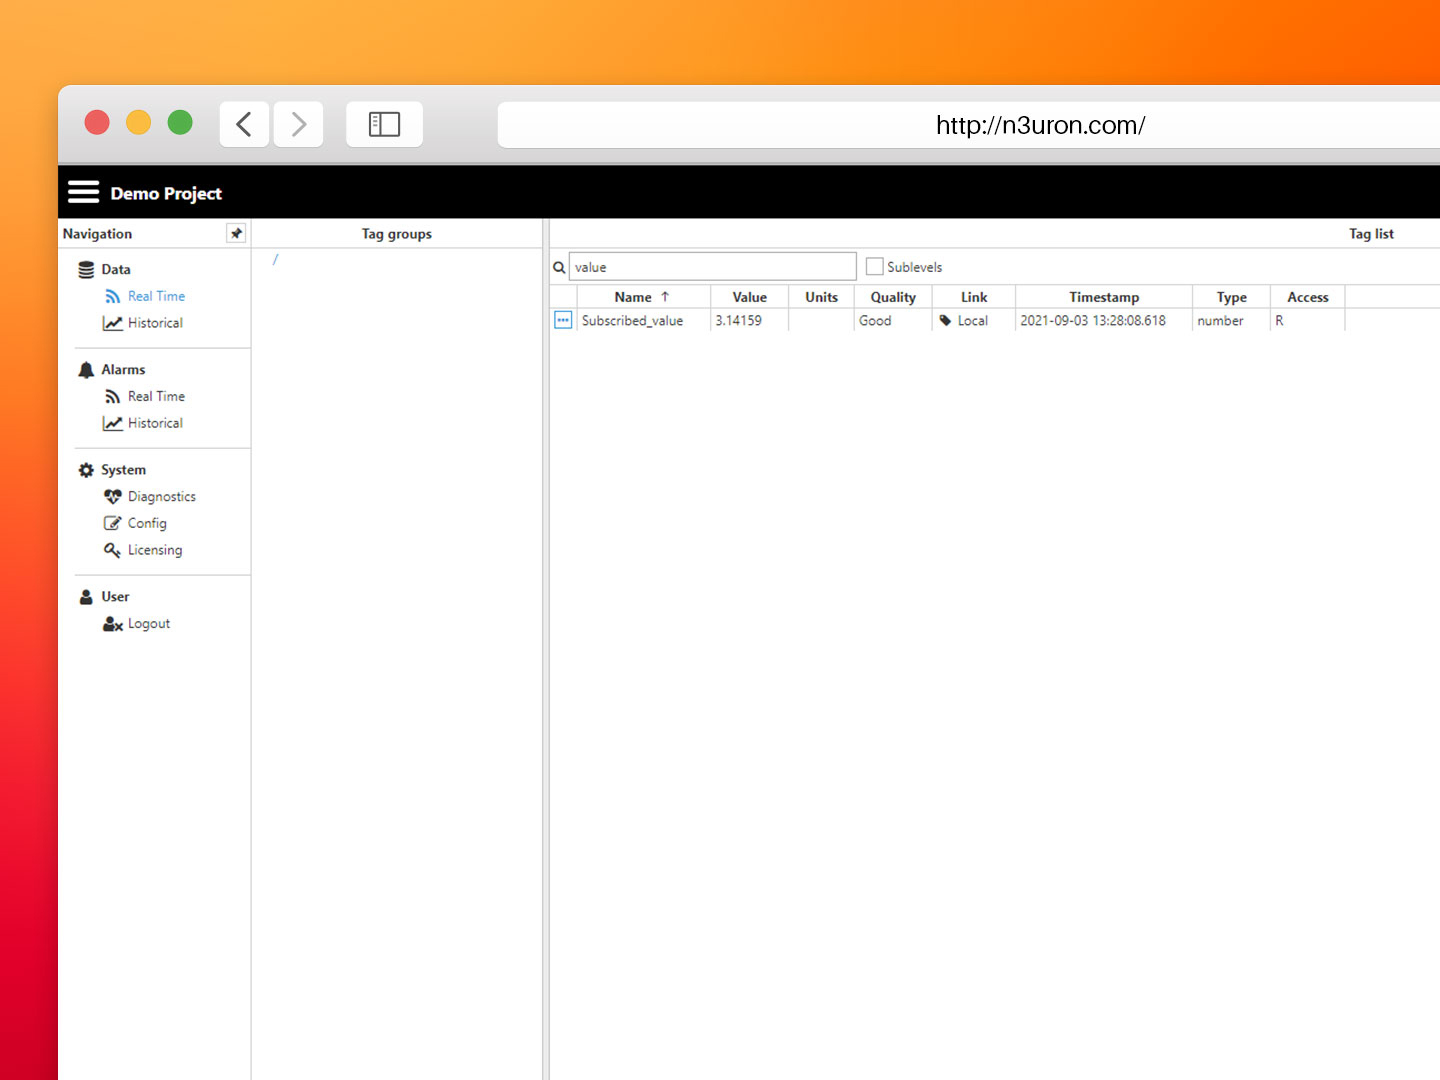
- Step 12: Navigate back to the N3uron WebUI interface and select Data/Real Time from the left-hand panel. You should now see the Subscribed_Value tag you created previously with a value of 3.14159.
Screenshot displaying real-time values in N3uron’s MQTT panel.
Conclusion on How to Exchange Data with Azure IoT Hub Using N3uron’s MQTT Module
Connecting your assets to Microsoft Azure IoT Hub is extremely easy using N3uron’s MQTT Client module. If you’re ready to go using MQTT, download the N3uron free trial version and read our MQTT Client Manual on how to implement and use N3uron’s MQTT software module on our communication platform. Download the MQTT Client Manual.
