RESOURCES / ARTICLES
How to Connect your Industrial Assets to Tatsoft FactoryStudio SCADA using N3uron’s Sparkplug Client Module

Sparkplug Overview
Sparkplug standard is being widely adopted for integrating industrial data within corporate MQTT infrastructures. Its popularity is thanks to its simplicity, scalability, and robustness. The Eclipse Foundation’s specification defines how edge gateways, native MQTT-enabled devices, and applications can communicate within an MQTT infrastructure.
Sparkplug creates a secure foundation for IIoT networks that can be easily scaled and reliably operated for mission-critical applications. This standardization introduced by Sparkplug represents one of the major breakthroughs for industrial communications, since it defines an MQTT topic namespace, an MQTT payload optimized for industrial processes, and MQTT session state management required by real-time applications like SCADA systems.
N3uron‘s Sparkplug Client module makes it easy to create and configure Sparkplug compliant clients at the network edge, simplifying connections to broker clusters and centralizing the management of data from multiple sources. It offers a plug-and-play solution for making all plant data available via an MQTT-based IIoT infrastructure.
This document explains how to communicate with Tatsoft’s FactoryStudio using the Sparkplug Client module.
Although the article specifically applies to Tatsoft, all other applications compatible with the Sparkplug standard, such as Ignition, Canary, AVEVA, or OSIsoft PI, can also subscribe to and receive data from N3uron in real-time.
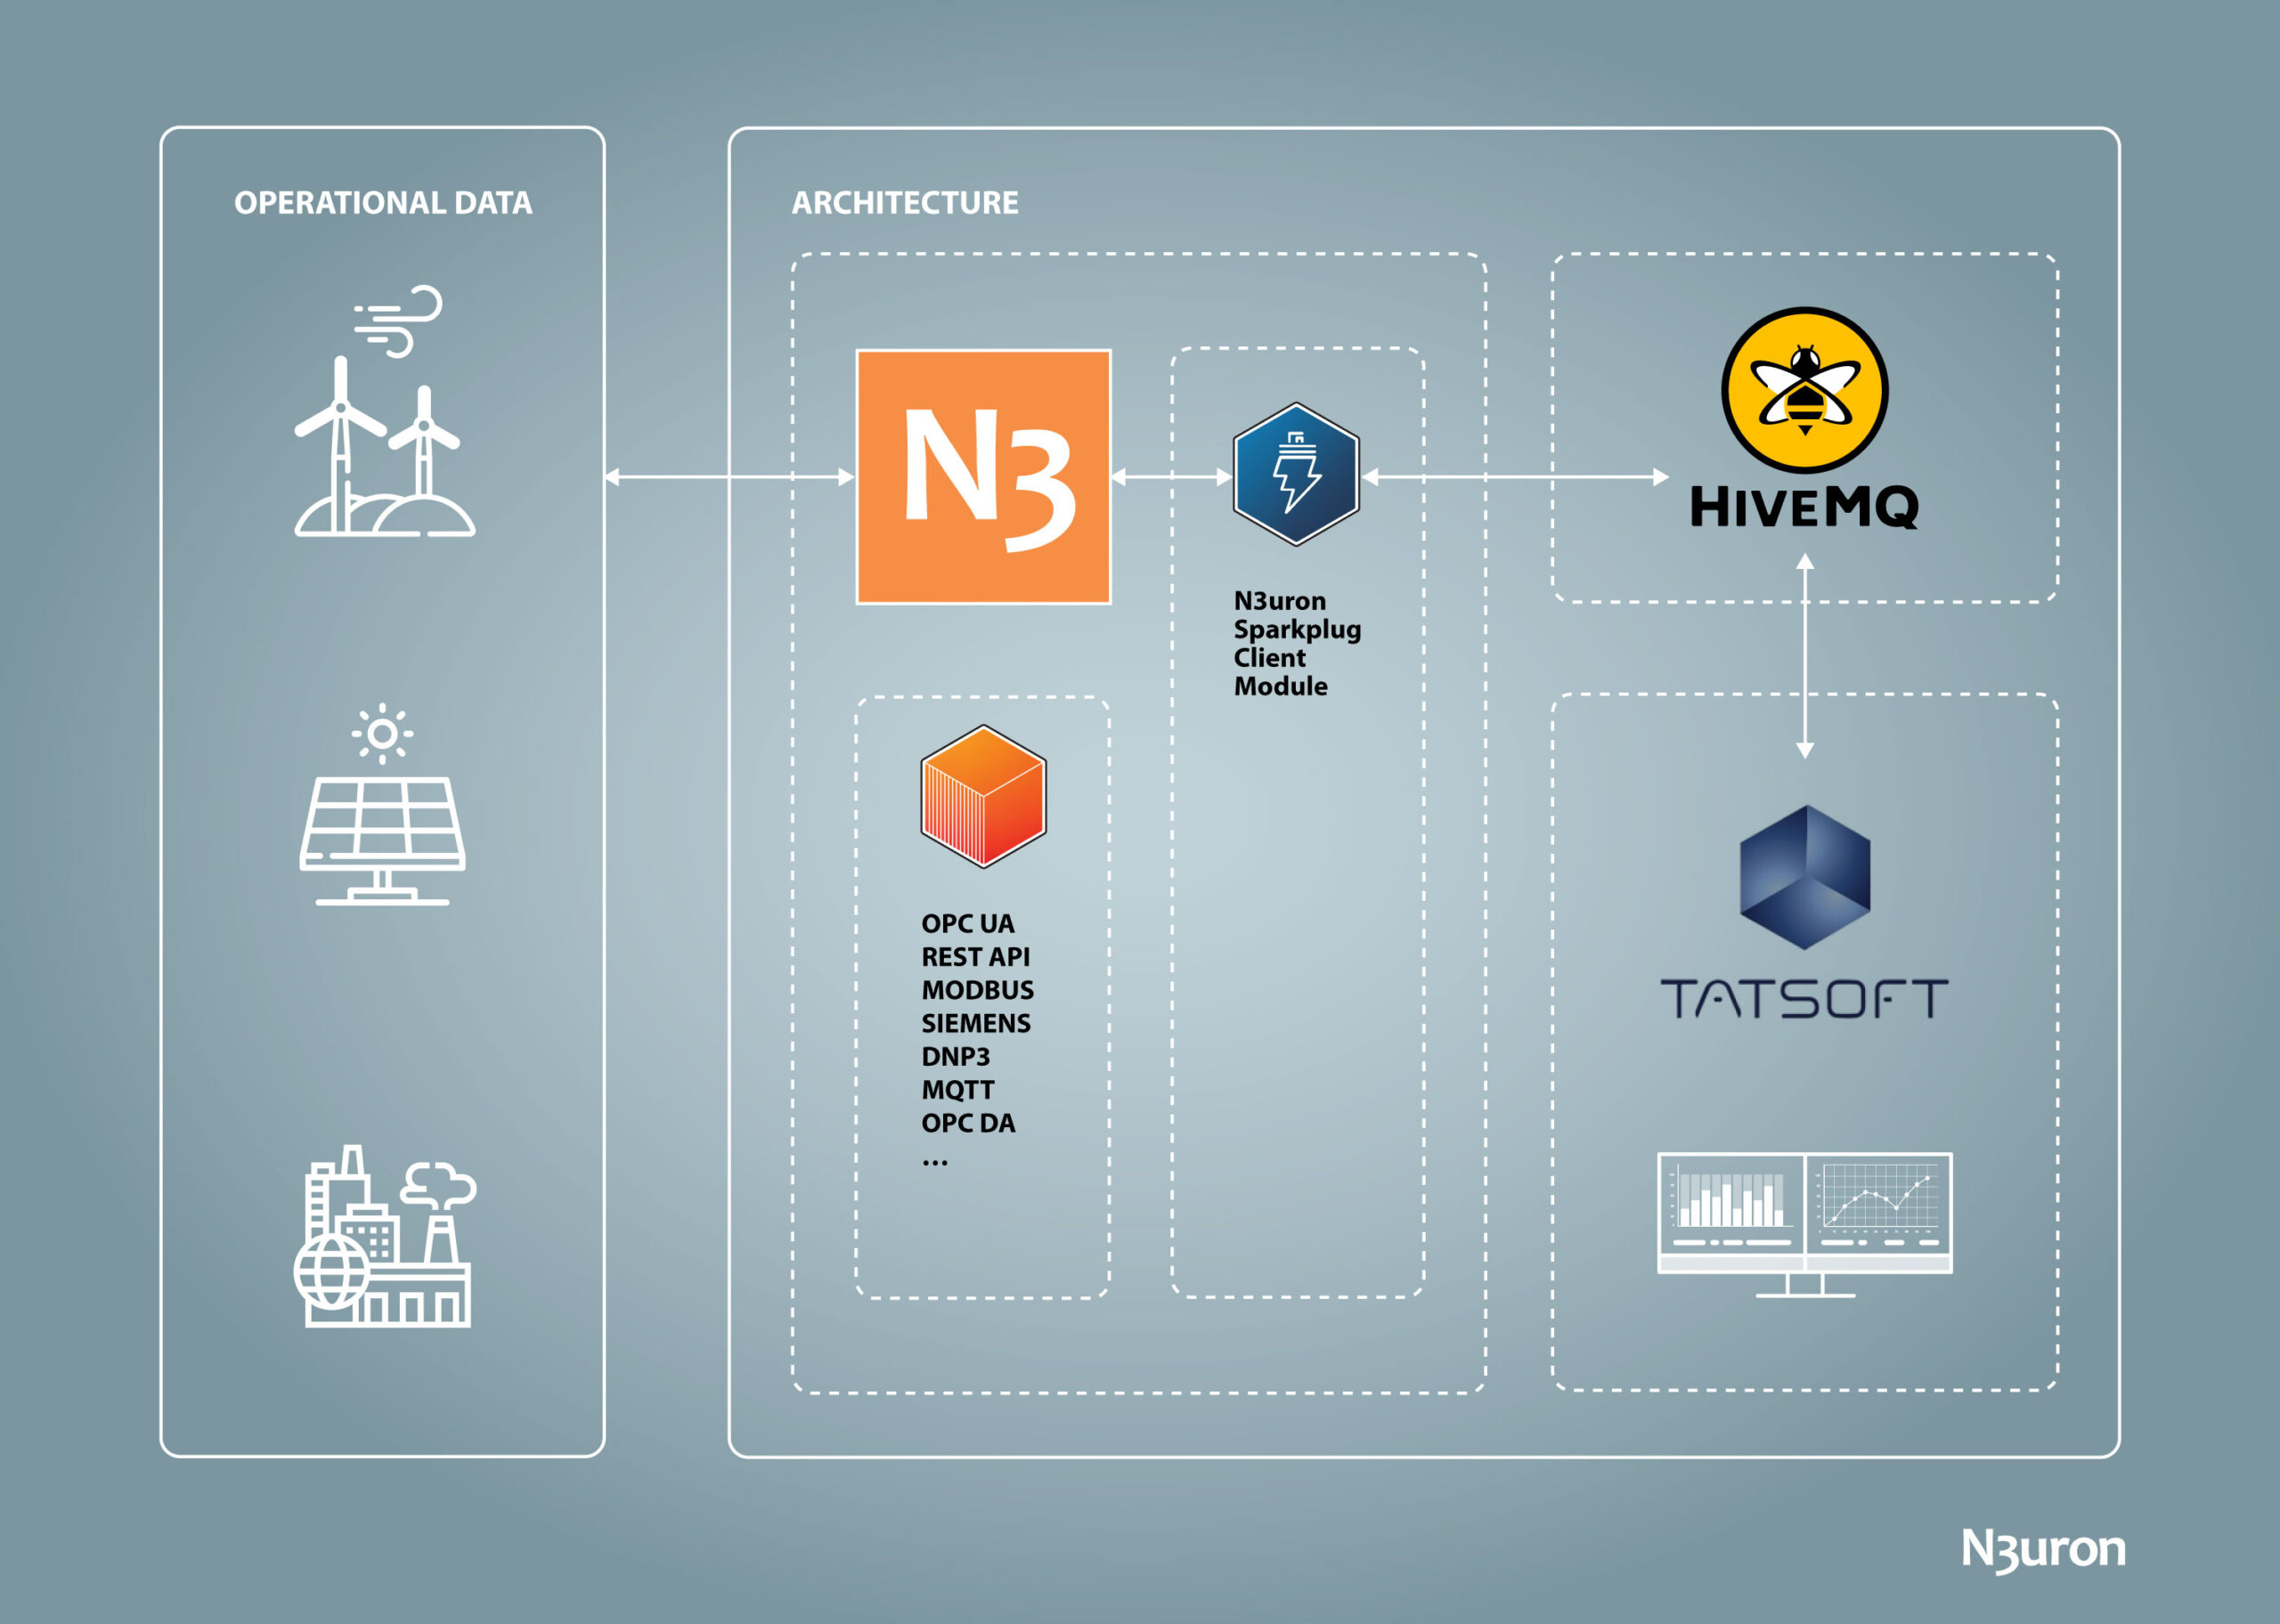
Diagram displaying how the Sparkplug Client module allows receiving and visualizing data into Tatsoft SCADA using HiveMQ
as professional message broker software
N3uron and Tatsoft’s FactoryStudio Requirements
If you haven’t downloaded N3uron yet, you can do so at https://n3uron.com/downloads/. If this is the first time you are installing N3uron, our Quick User Guide will guide you through the entire installation process.
You will also need to install Tatsoft’s FactoryStudio, which can be downloaded from the following link: Tatsoft’s FactoryStudio, in addition to signing up for the Cloud MQTT Broker offered by HiveMQ.
Configuring the Broker (HiveMQ Cloud MQTT)
To get started with HiveMQ Cloud, navigate to console.hivemq.cloud. To configure the HiveMQ Cloud MQTT Broker, proceed as follows:
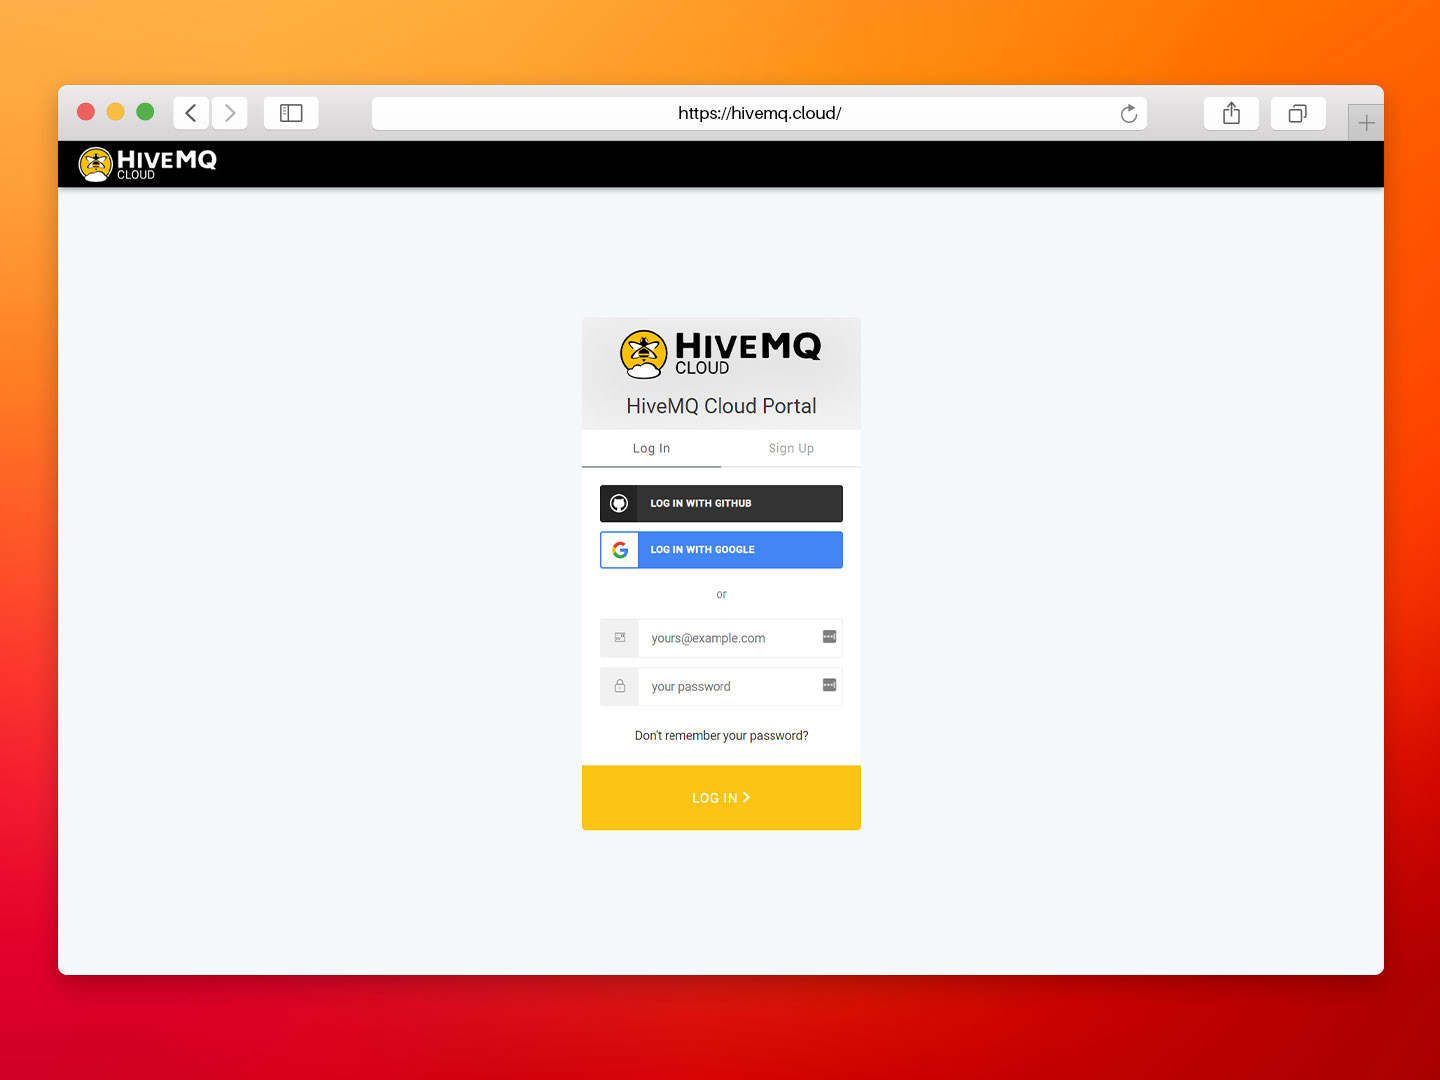
- Step 1: On the HiveMQ Cloud Portal dialog, switch to the Sign Up tab and sign up with your GitHub account, Google account, or email address.
- Step 2: Once you have successfully registered an account, switch back to the Log In tab and log in to your HiveMQ Cloud account.
Image displaying HiveMQ cloud portal sign up panel
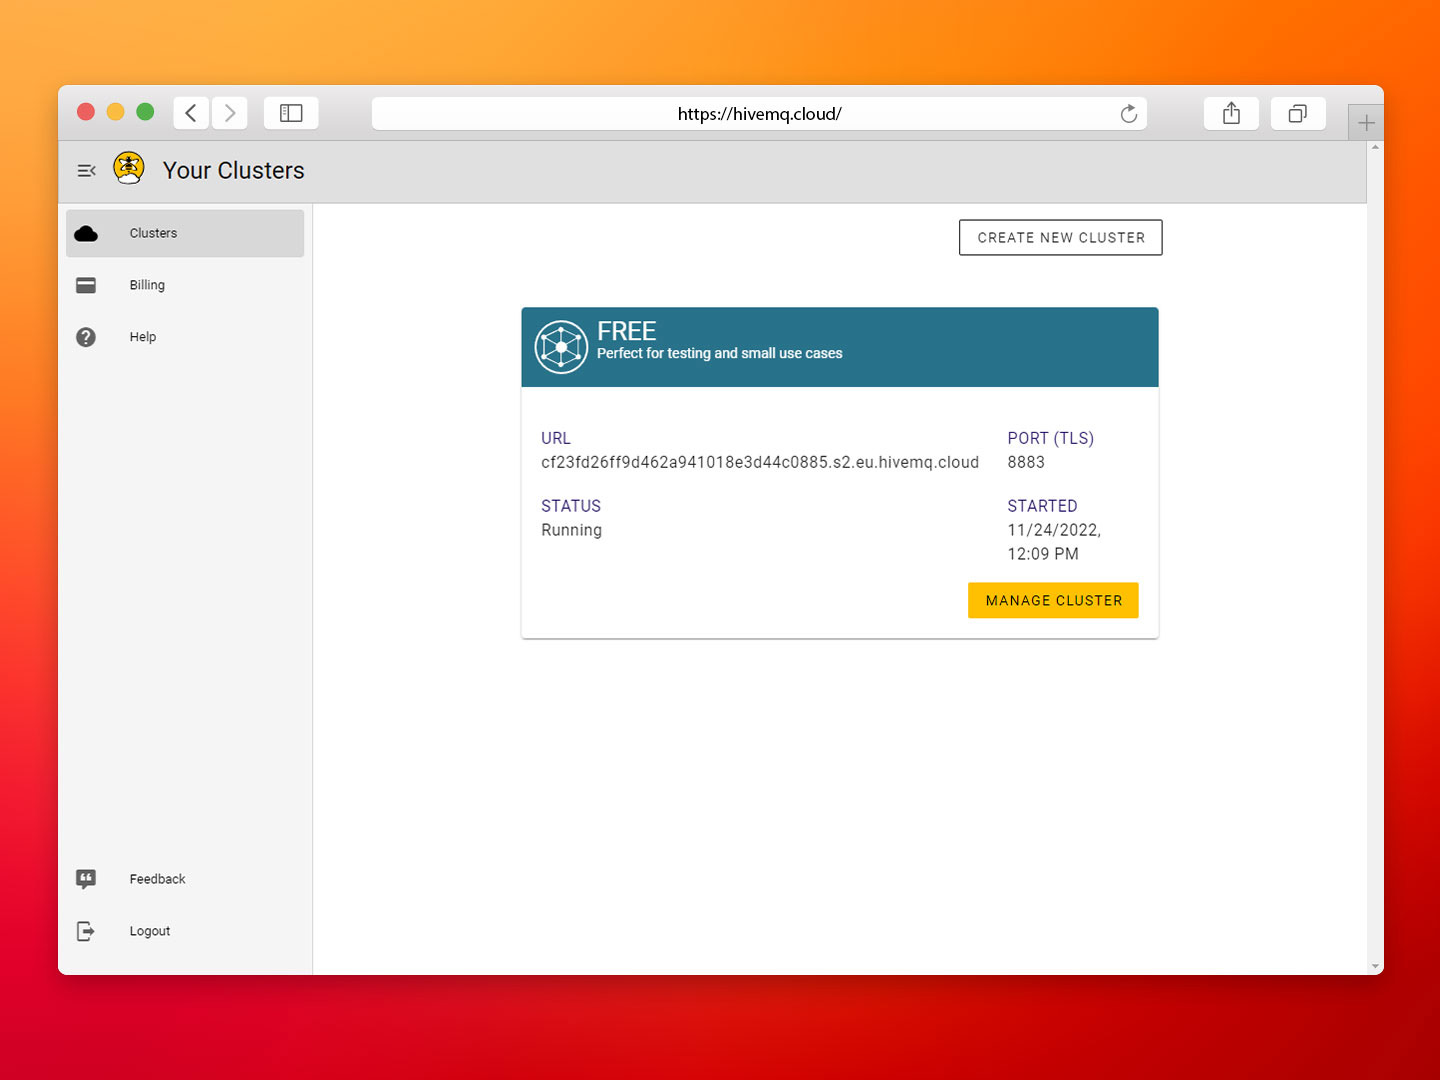
- Step 3: After you sign up and log in, your free HiveMQ Cloud cluster will be running and ready within a few moments.
Screenshot showing the URL and port of the HiveMQ Cloud Cluster
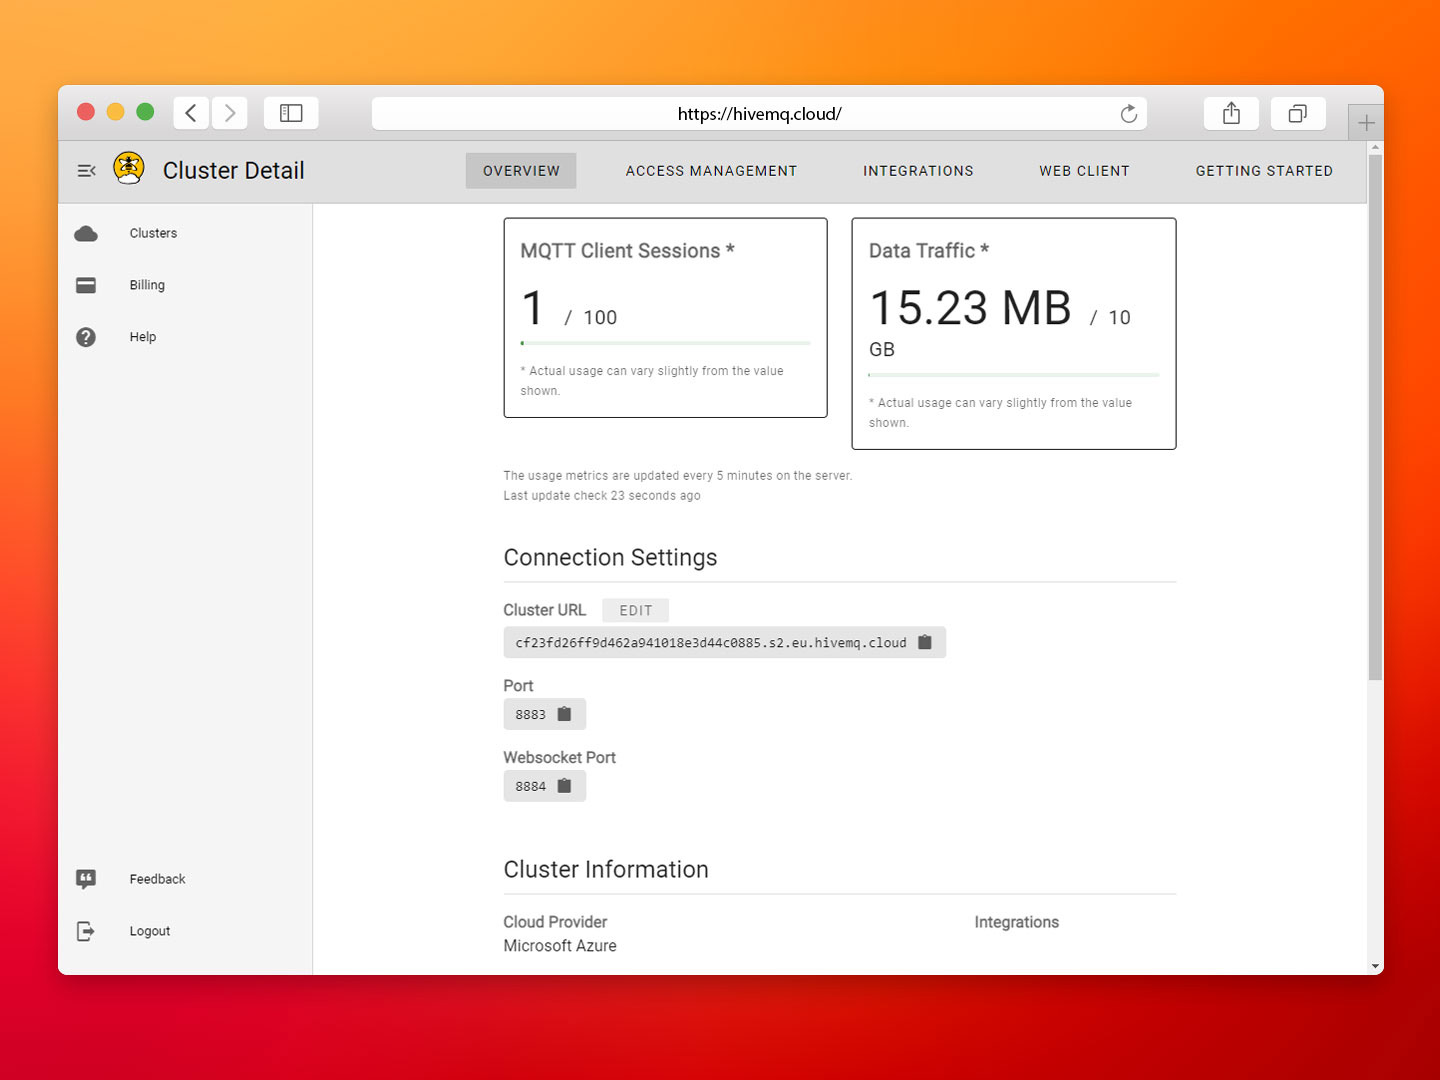
- Step 4: To view cluster information and access the area where you can define the credentials that your MQTT clients will use to connect to the cluster, select Manage Cluster.
Screenshot displaying the HiveMQ cloud cluster overview
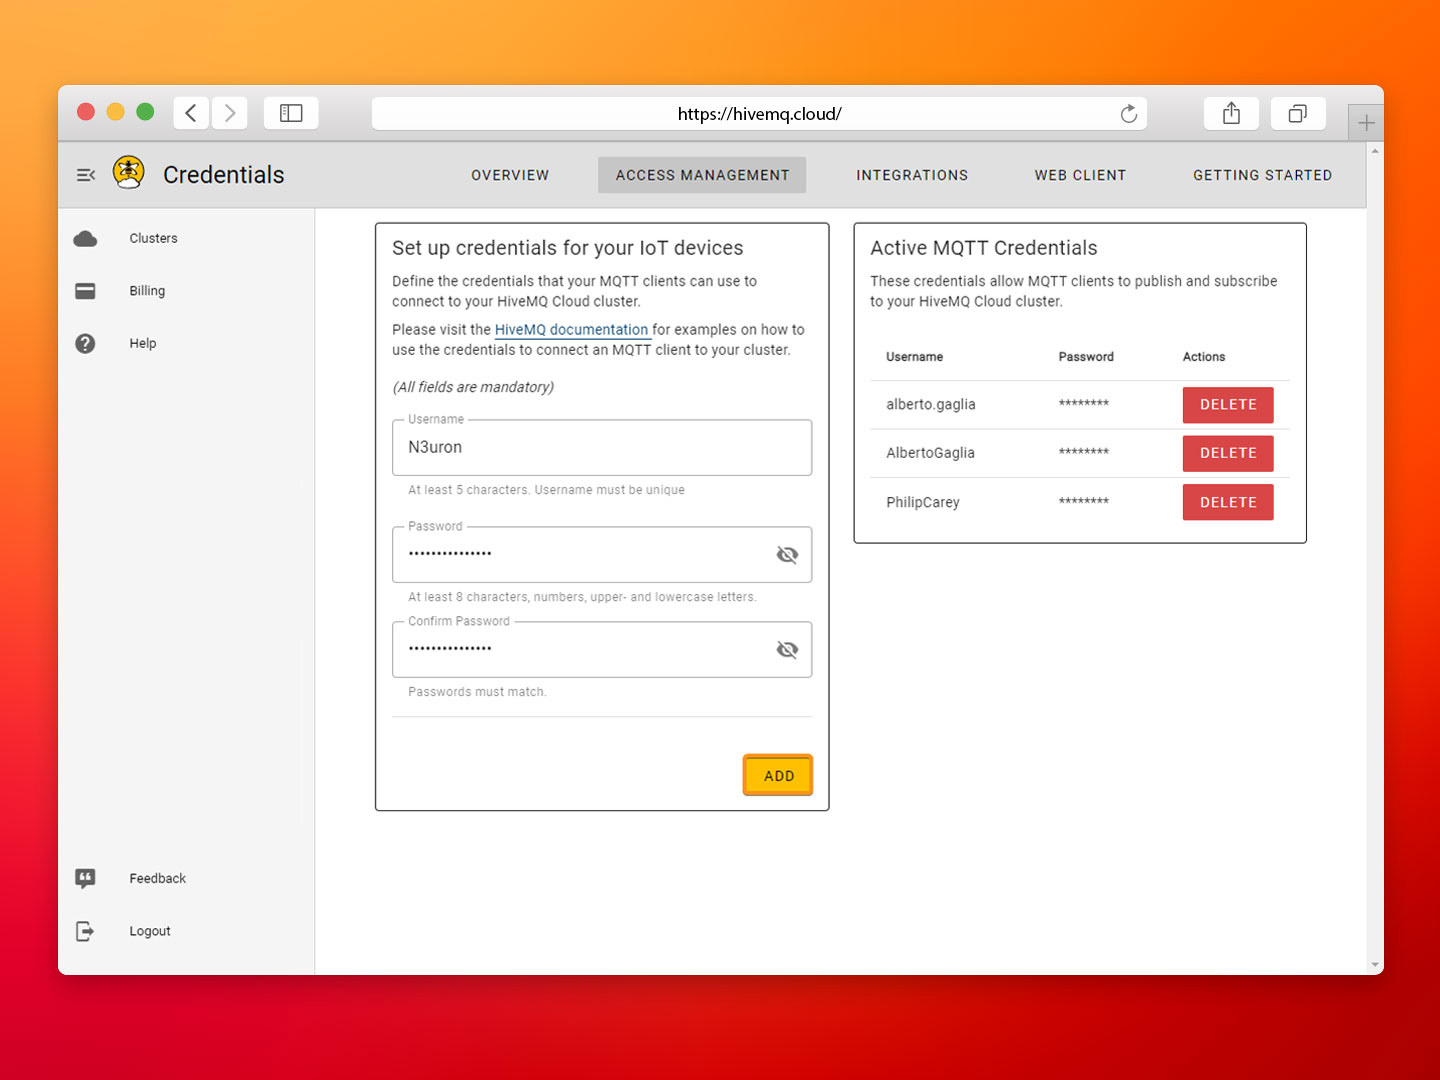
- Step 5: To connect an MQTT client to your cluster, you first need to define the MQTT credentials that allow clients to access the cluster. To create an MQTT credential, enter a Username and Password in the credentials input area of the Access Management tab for your HiveMQ Cloud cluster and select Add.
Image showing the HiveMQ cloud access management credentials
Configuring the Sparkplug Client Module (N3uron)
It is assumed that you have already created a Sparkplug Client instance. If not, please take a look at the following link Create a new module instance.
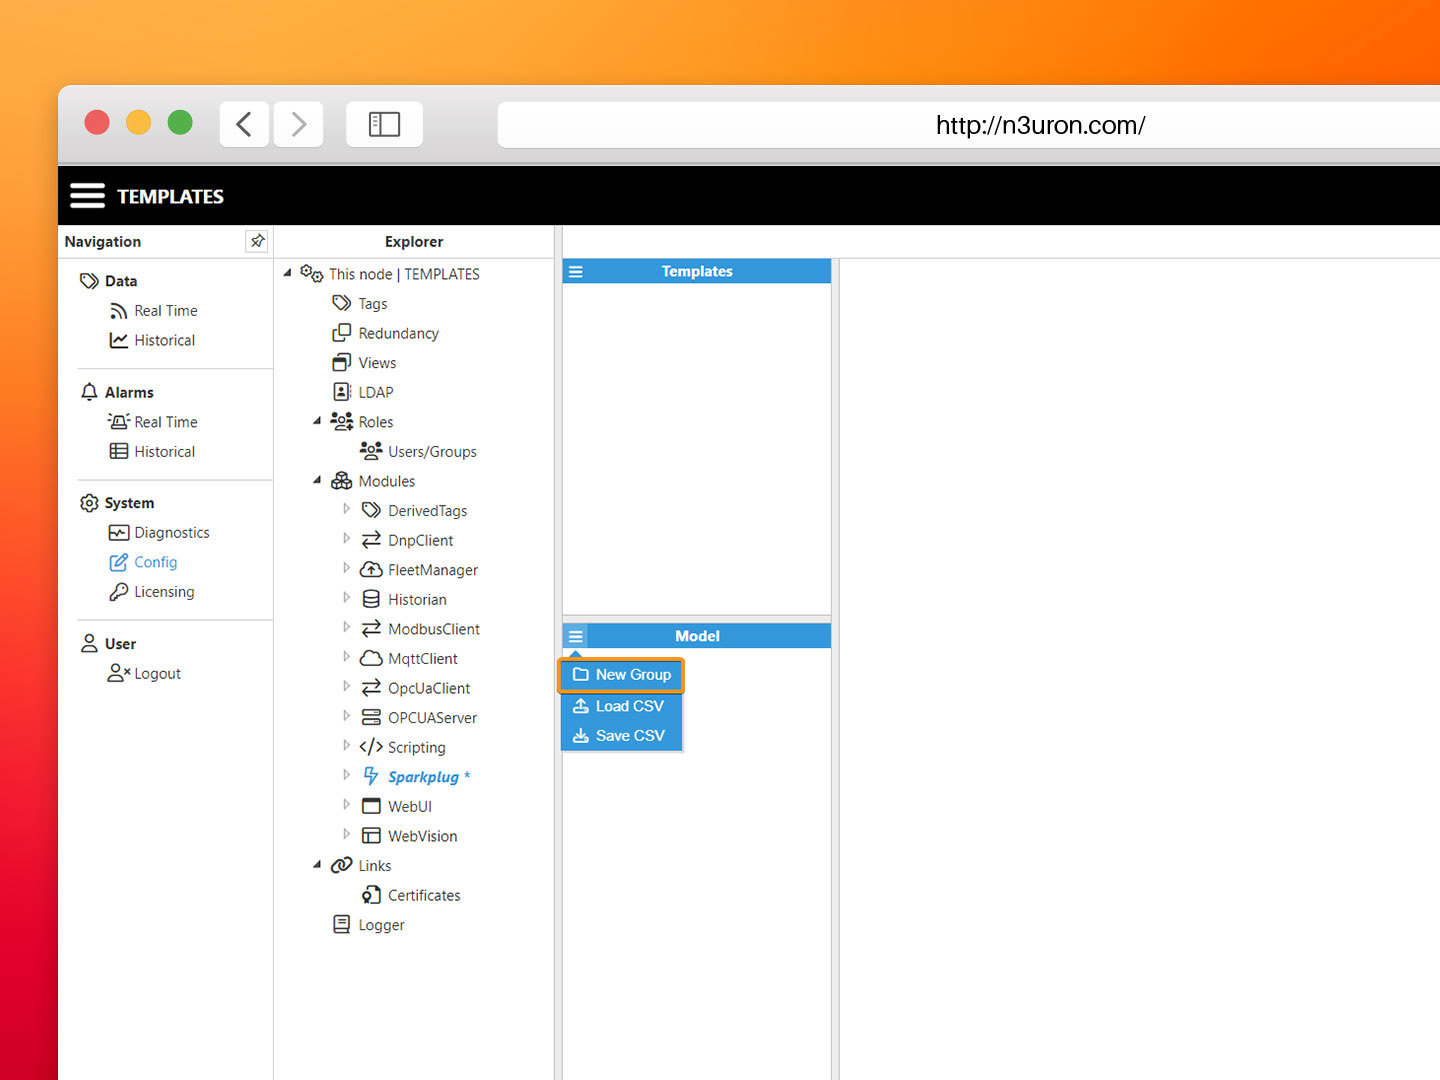
- Step 1: Select your module instance from the Explorer Panel, click the button on the left-hand side of the Model header, select New Group, and give it a name. In this case, N3uron.
Screenshot displaying how to create a new group in the N3uron’s Sparkplug client module
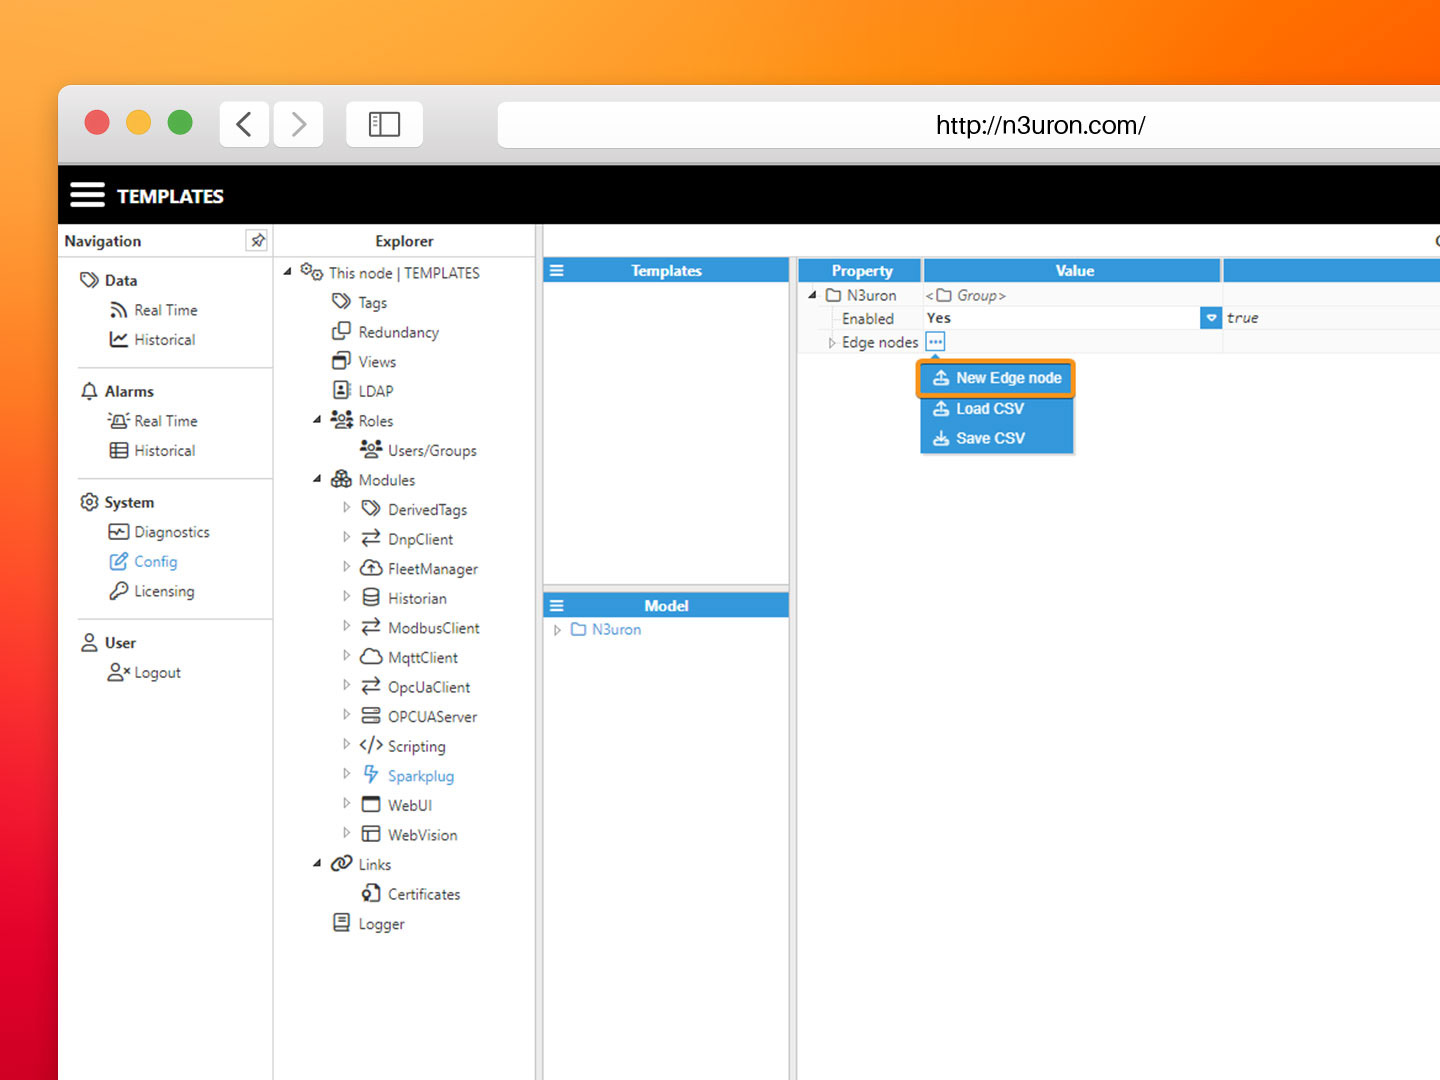
- Step 2: Once the Group has been created, click on the Edge nodes button and select New Edge Node, as shown in the image below.
Image showing how to create a new edge node in the N3uron’s Sparkplug client module
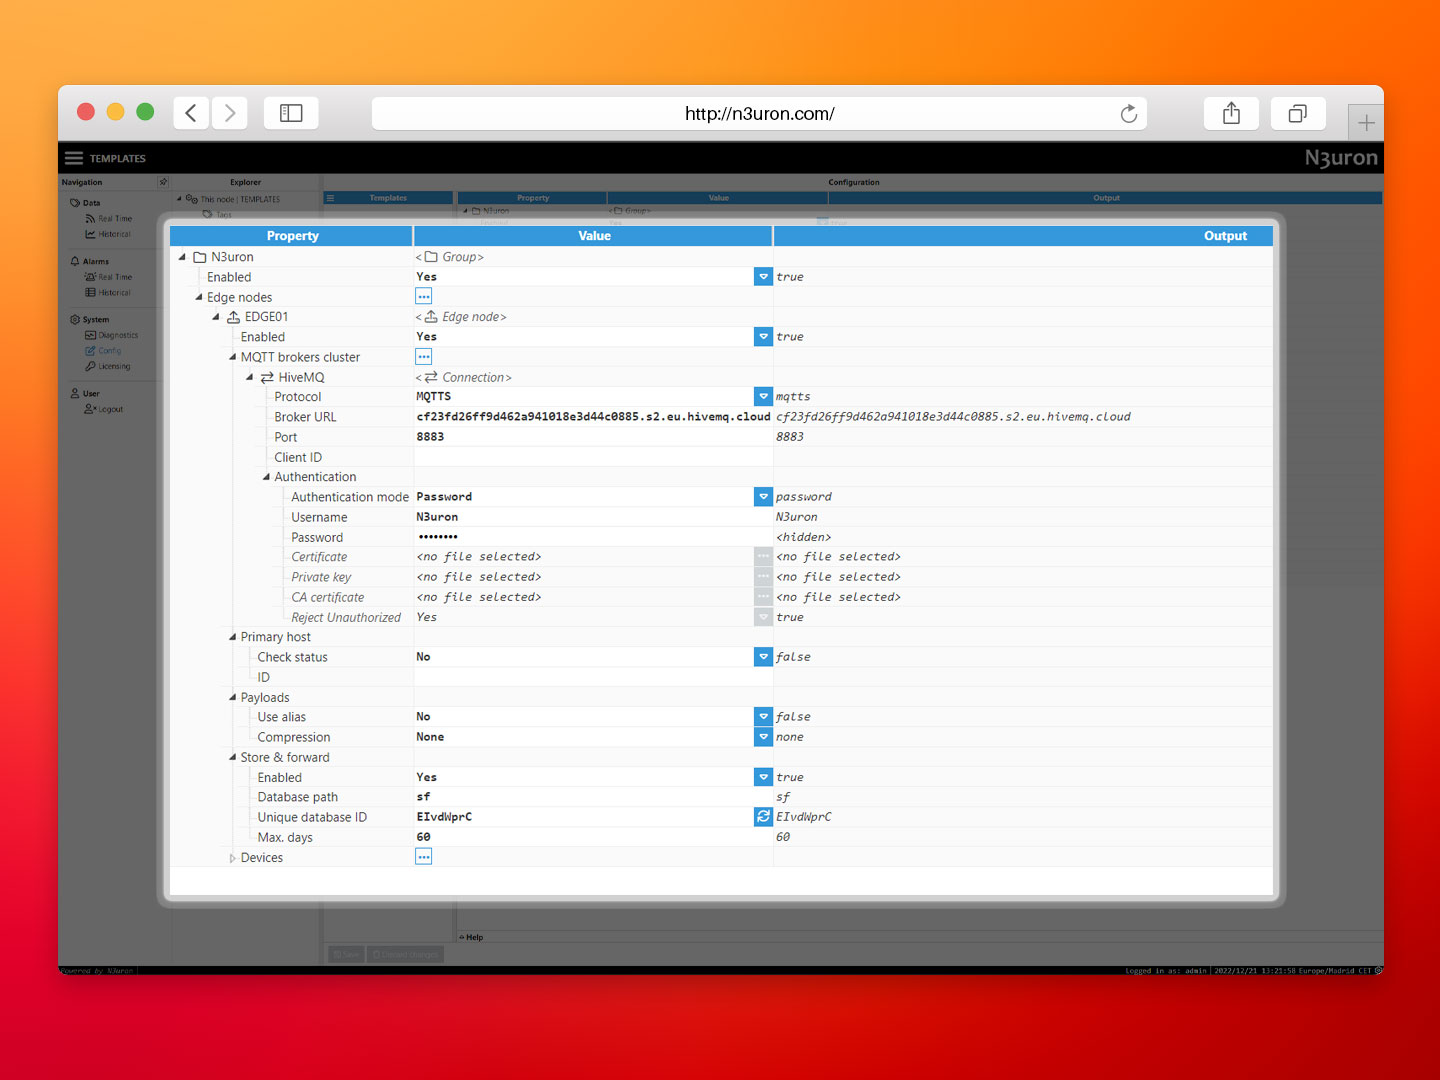
- Step 3: Provide a name (in this case, EDGE01) and configure the rest of the parameters as follows:
Enabled: Yes.
MQTT Broker cluster:
– EDGE01:
– Protocol: MQTTS.
– Broker URL: Enter the IP Address of your HiveMQ Gateway.
– Port: 8883.
– Client ID: Identifies each MQTT client that connects to an MQTT broker. A unique Client ID is automatically generated.
– Authentication:
1. Authentication mode: Password.
2. Username: N3uron.
3. Password: Enter the password you used for the N3uron user when you configured it in the MQTT Distributor.
Primary Host:
– Check status: No.Payloads:
– Use alias: No.
– Compression: None.Store & Forward:
– Enabled: Yes.
– Database Path: sf.
– Unique Database ID: EIvdWprC.
– Max. Days: 60.
Screenshot displaying the N3uron’s Sparkplug client module configuration
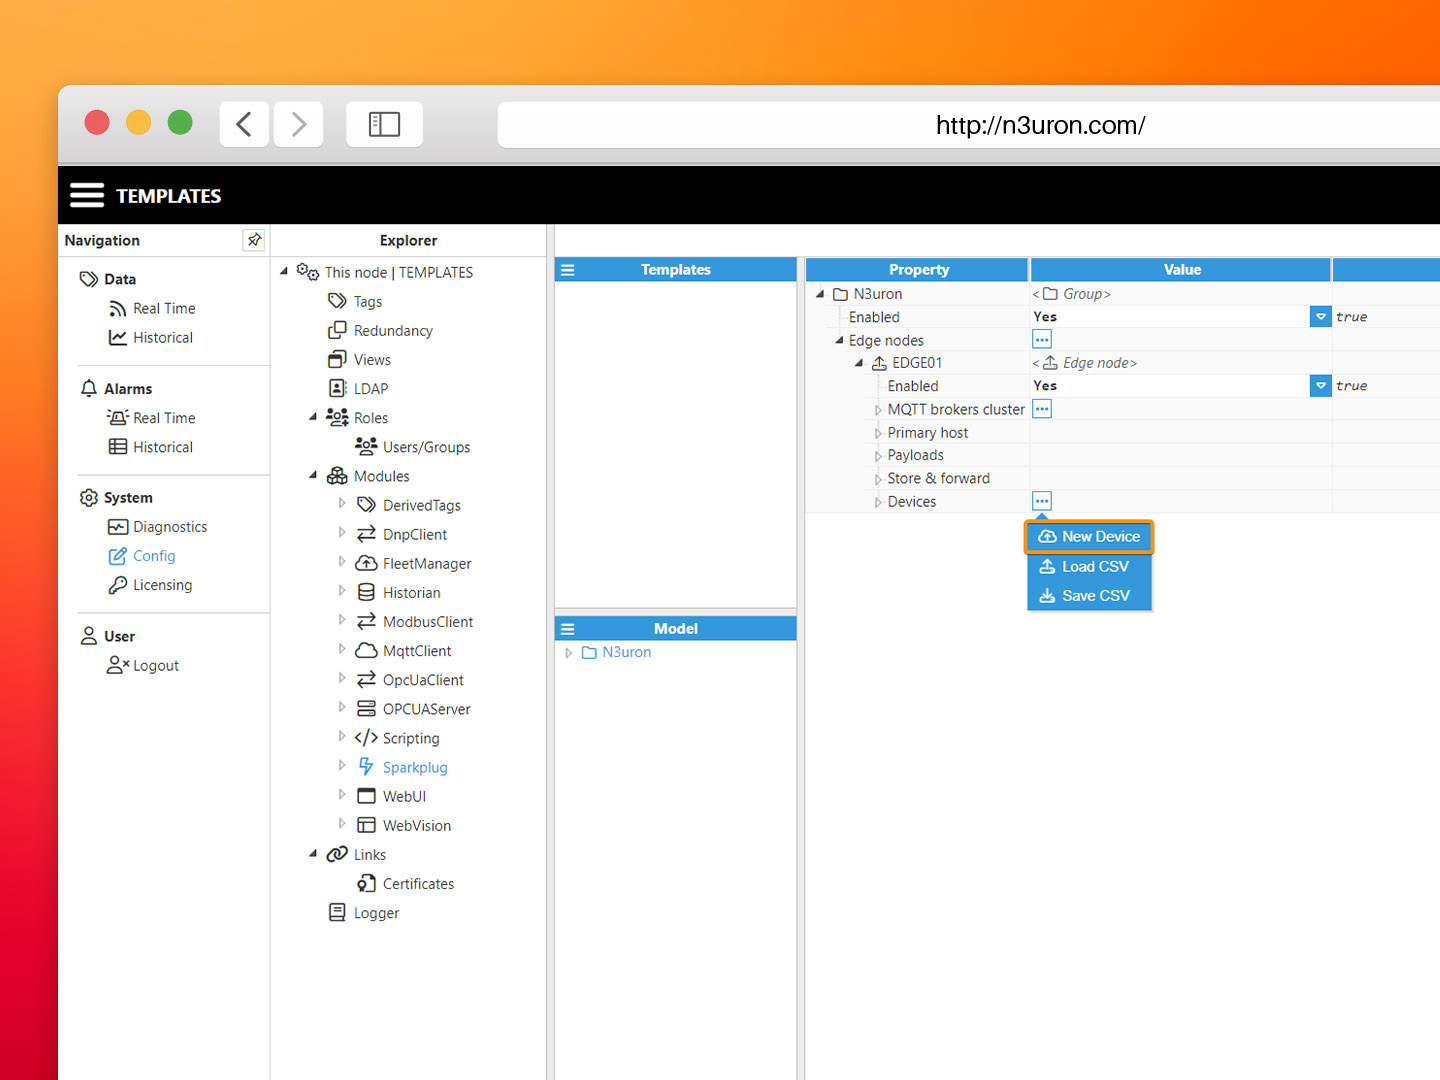
Finally, once the Edge node has been configured, we need to create a new Device.
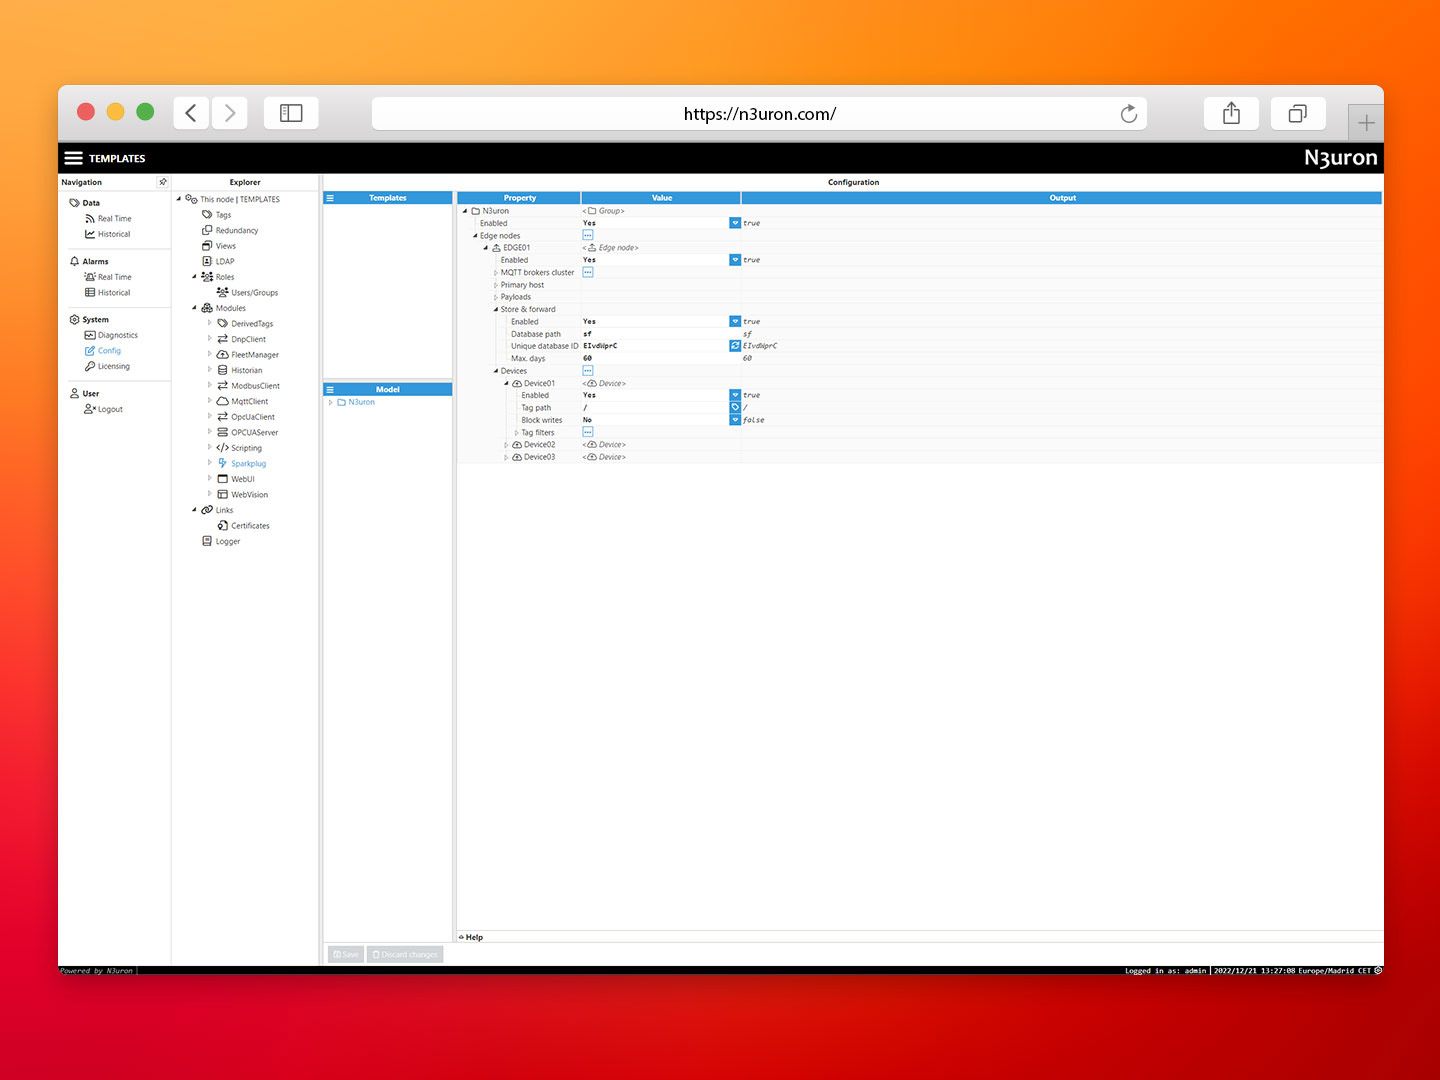
- Step 1: Click on the Devices button under the node, select New Edge Device, and give it a name, as shown in the image below. In this example, we have named them Device01, Device02, and Device03.
Image displaying how to create a new device in the N3uron’s Sparkplug client module
- Step 2: Configure the rest of the parameters as follows for each Device:
– Enabled: Yes.
– Tag Path: Define the tag path according to your data model, in this case, /.
– Block Writes: No.
Screenshot showing different devices in the N3uron’s Sparkplug client module
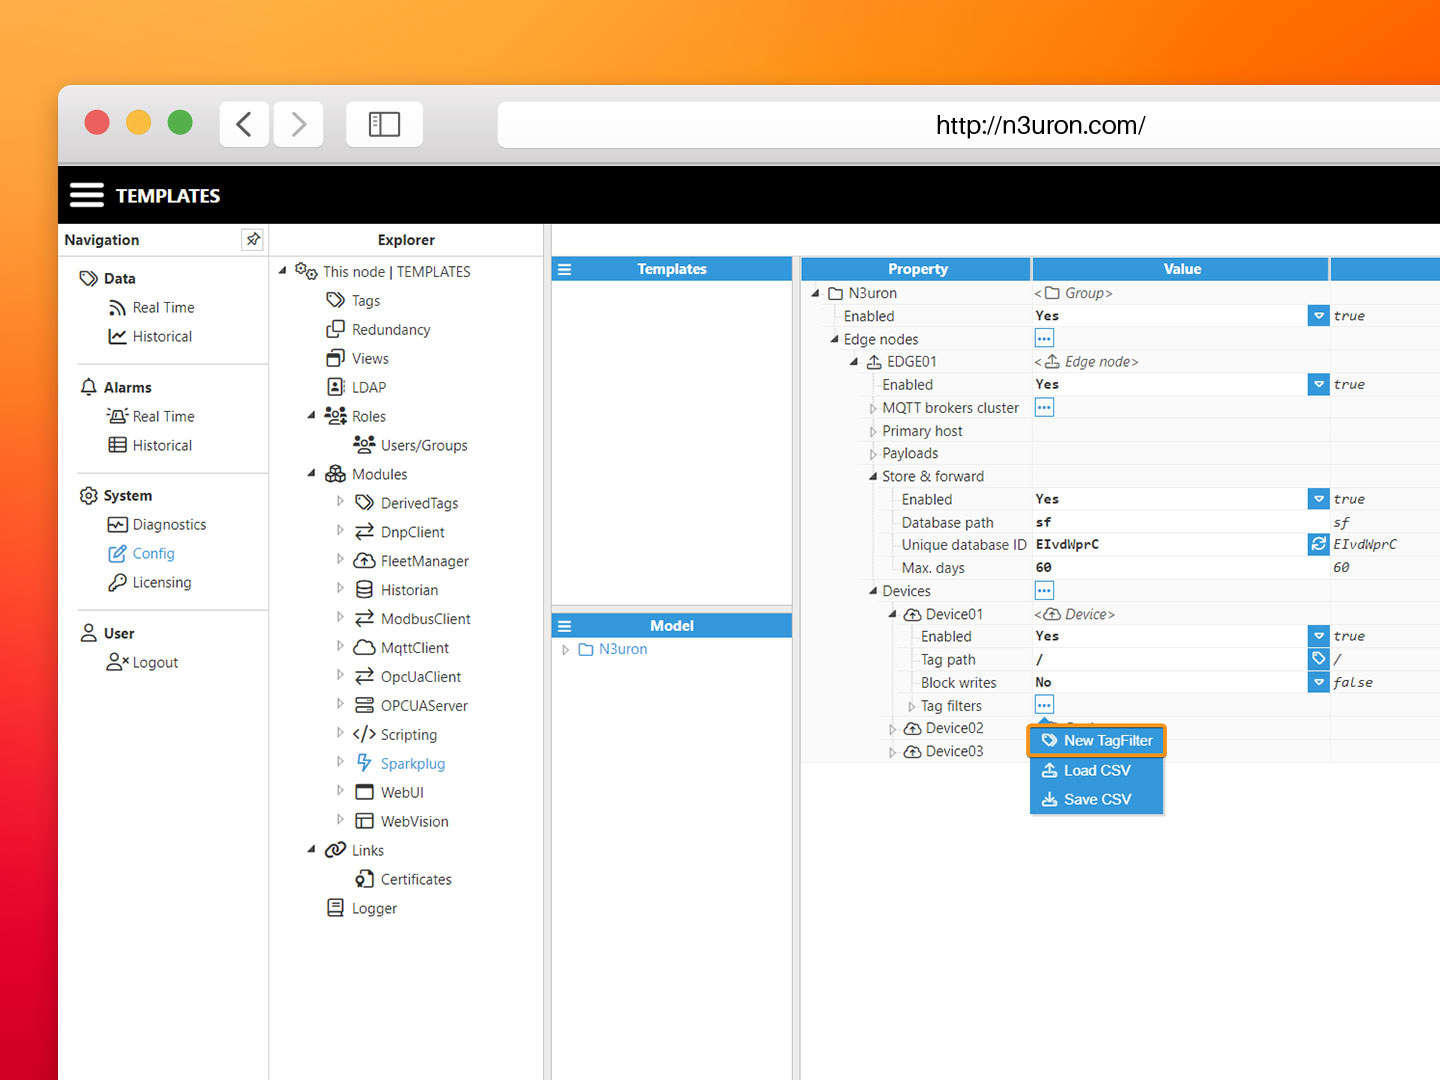
- Step 3: You will need to create a new filter for every Device. These filters will be used to define which data will be published to the Broker. To do so, click on the ellipsis button and select New Tag Filter, as shown below:
Image displaying how to create a new TagFilter in the N3uron’s Sparkplug client module
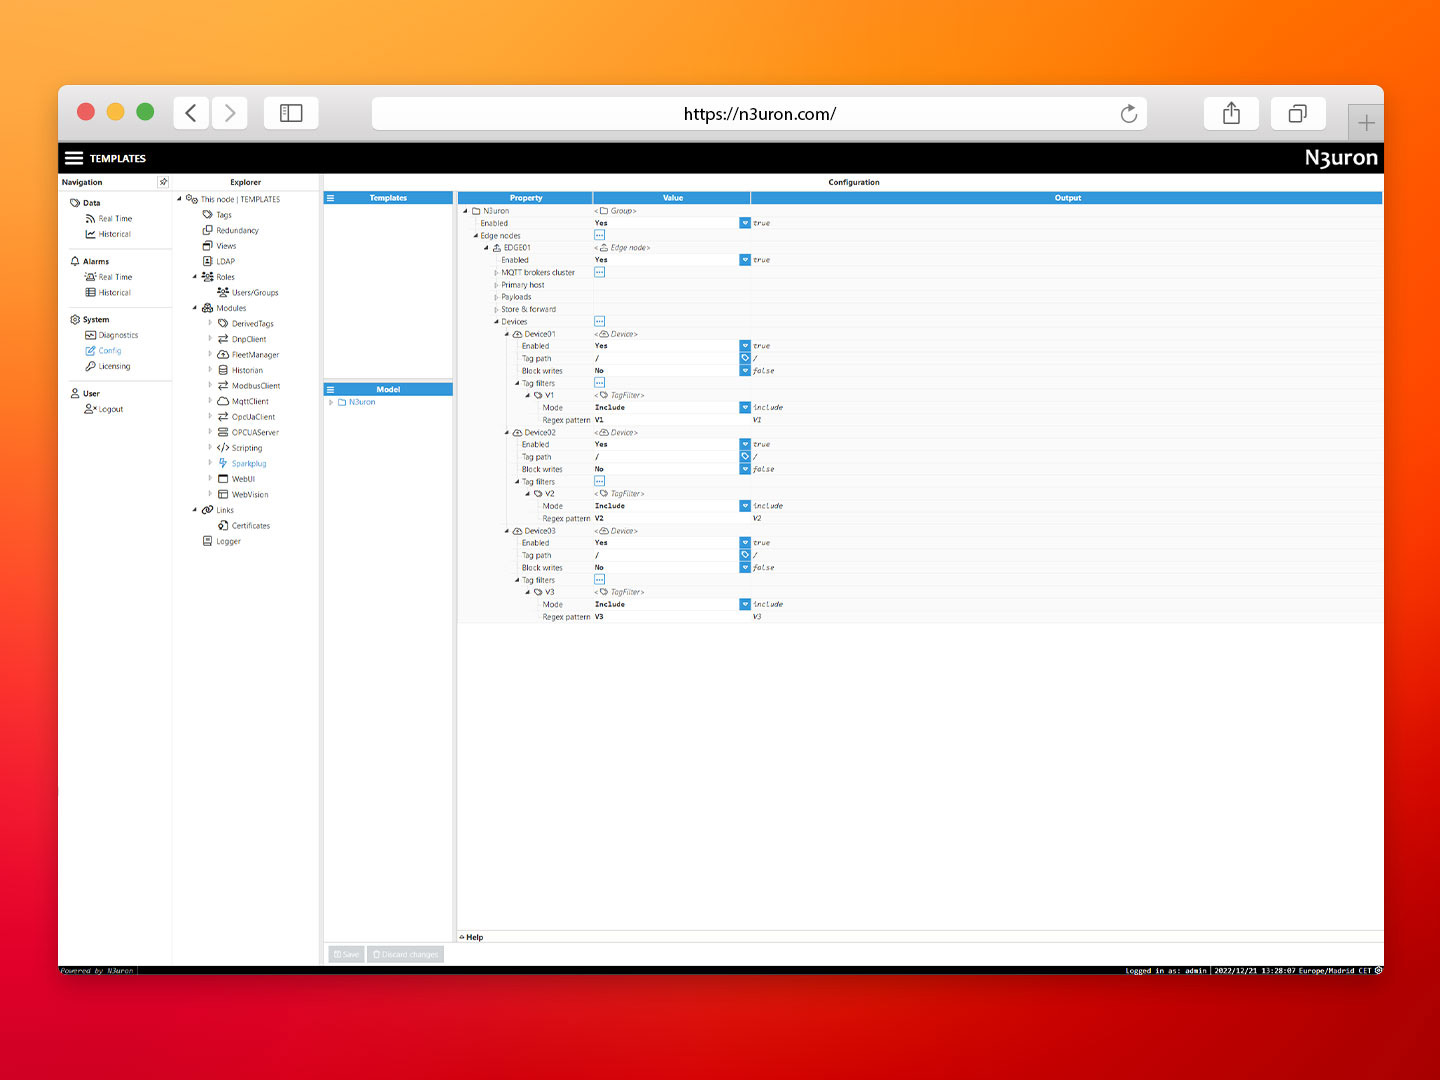
- Step 4: Provide a name for each filter (in this case, V1, V2, and V3) and enter the corresponding filtering expression in the Regex pattern.
Screenshot displaying the N3uron’s Sparkplug client module configuration with the corresponding devices
Configuring Tatsoft’s FactoryStudio
Now we are going to configure the client on the Tatsoft’s FactoryStudio side. Tatsoft will act as the client application that will subscribe to the data published by N3uron to the HiveMQ’s Cloud MQTT Broker.
It is assumed that you have already downloaded and installed Tatsoft. Once complete, access your Tatsoft’s FactoryStudio Server to start the configuration.
Configuring the Client (Tatsoft’s Factory Studio)
At this point, both the Broker and the user that we will use to connect to the Broker have already been configured. Next, we need to configure the Tatsoft’s FactoryStudio client, which provides Sparkplug Client functionality and allows it to subscribe to the data published to the broker.
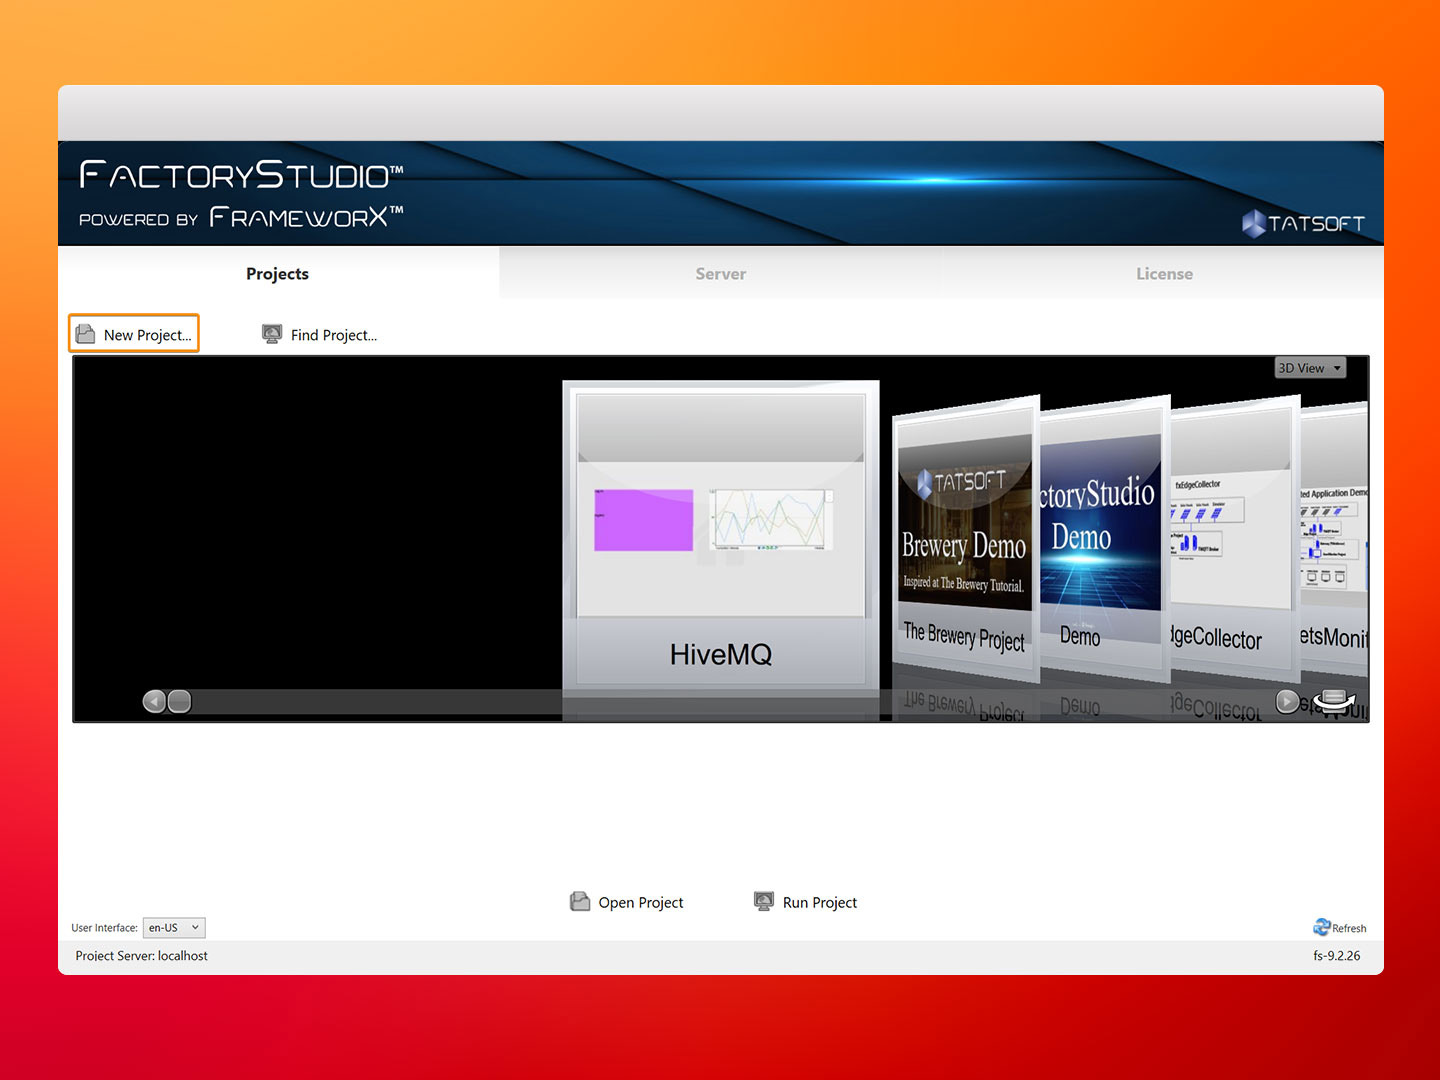
- Step 1: Once the Tatsoft FactoryStudio demo has been downloaded, open it and start creating a new project to begin configuring FactoryStudio as an MQTT Sparkplug application node.
Image showing how to create a new project in Tatsoft’s FactoryStudio
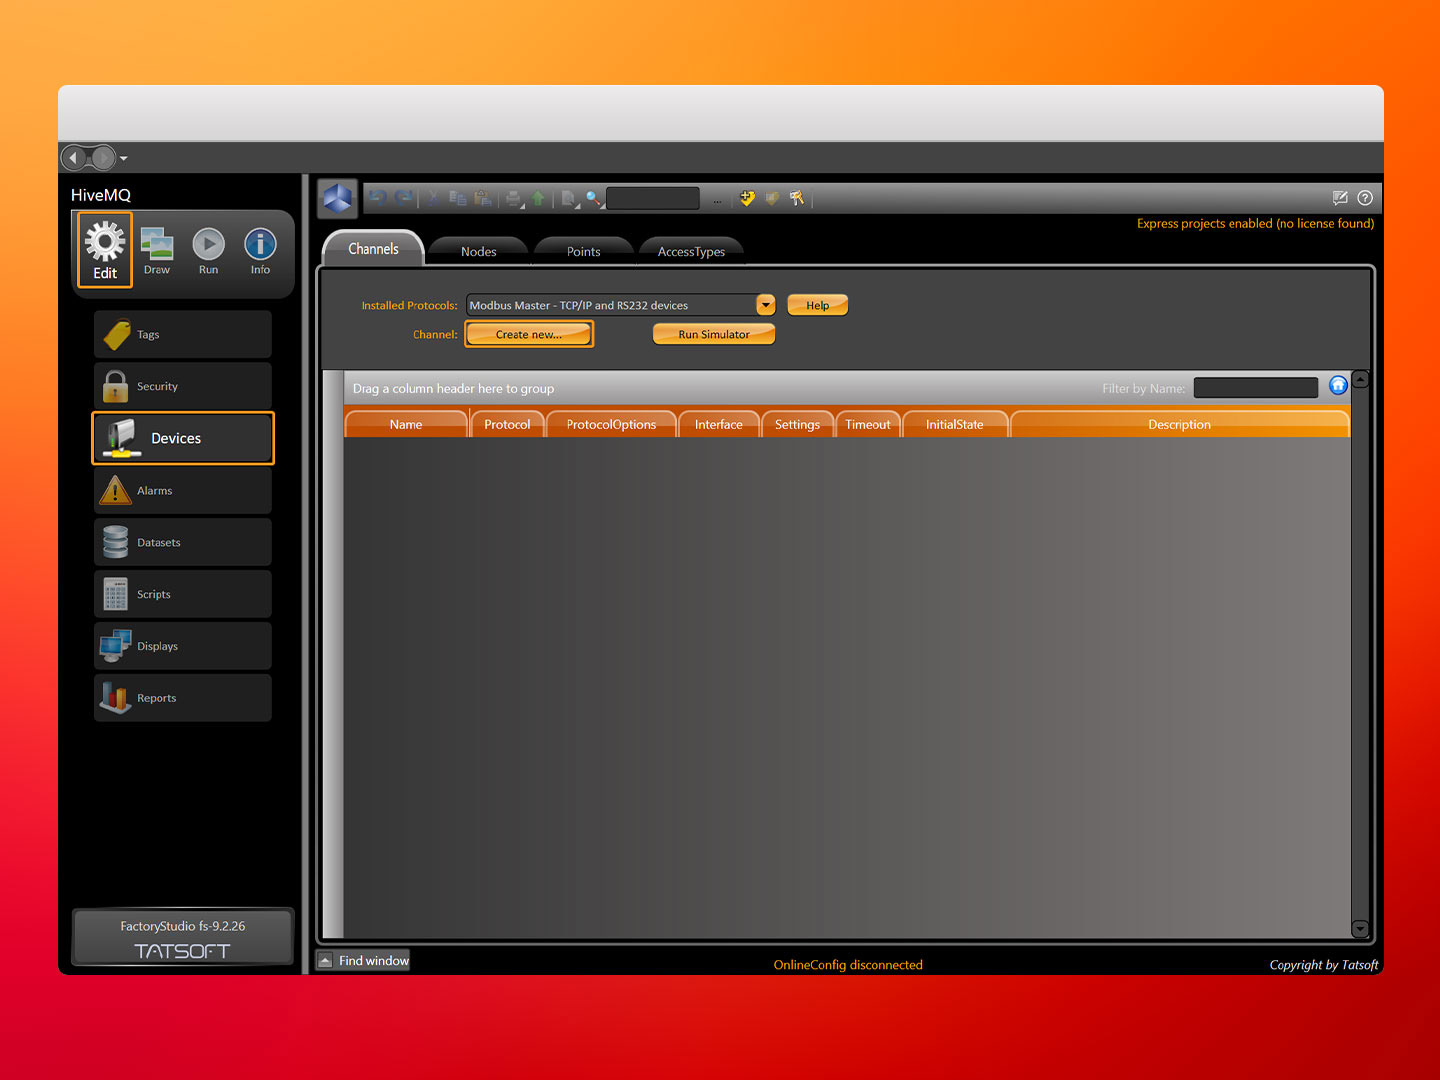
- Step 2: Once created, open it and go to edit. Then, under edit, select Devices and create a channel by clicking on Create New…
Screenshot displaying how to create a new channel in Tatsoft’s FactoryStudio
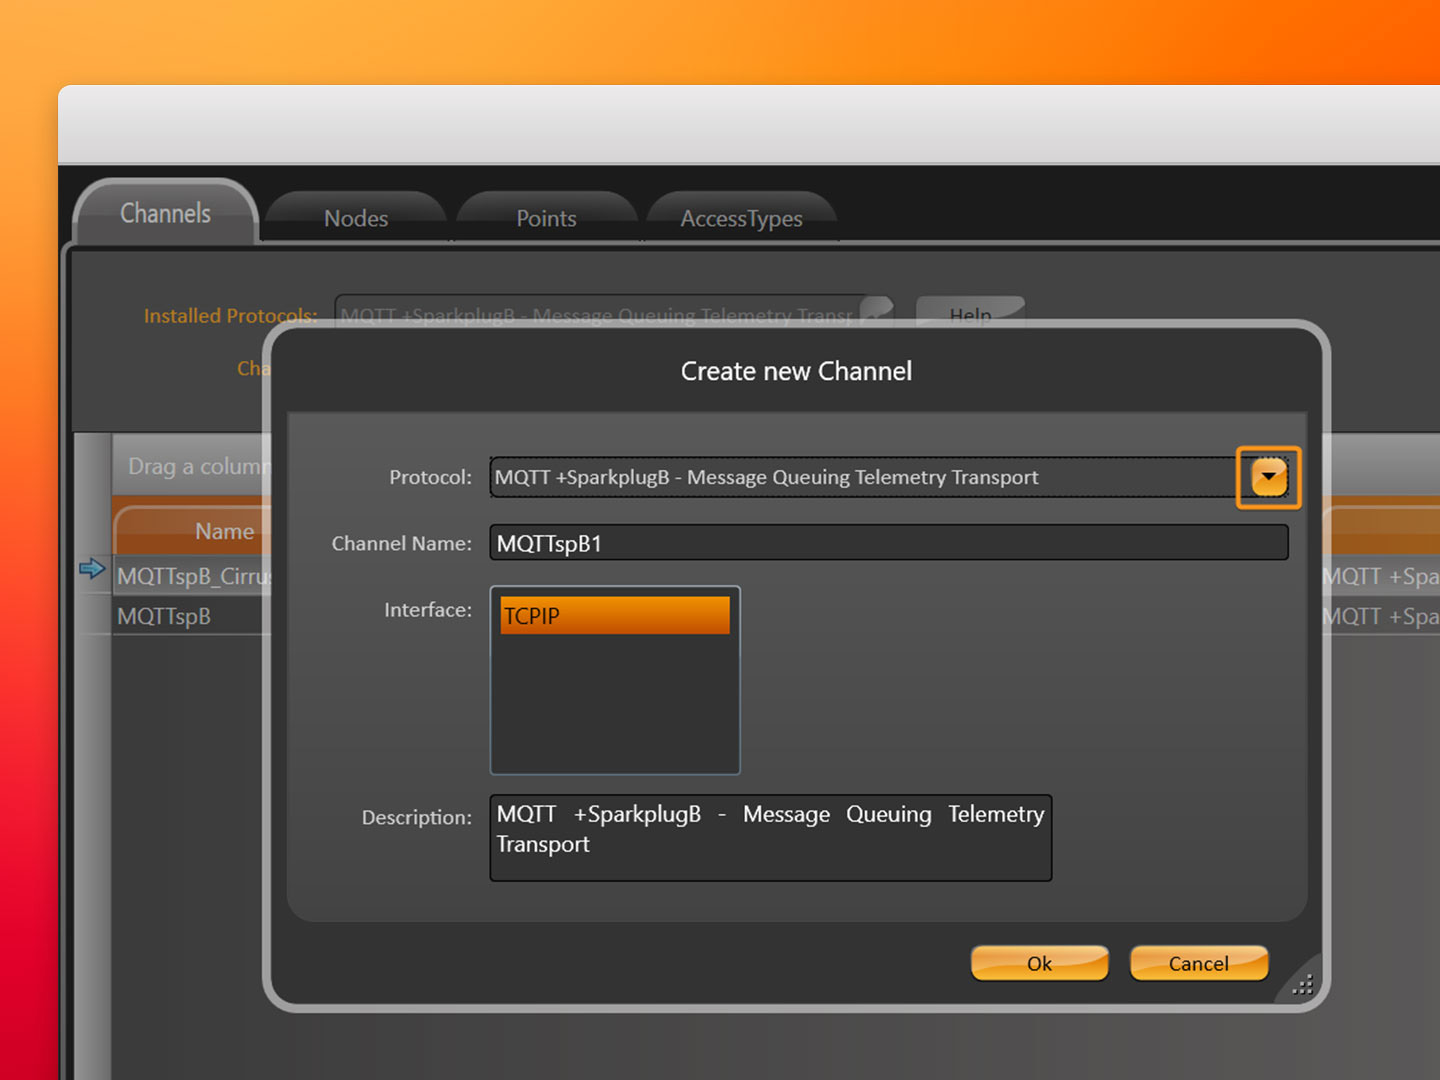
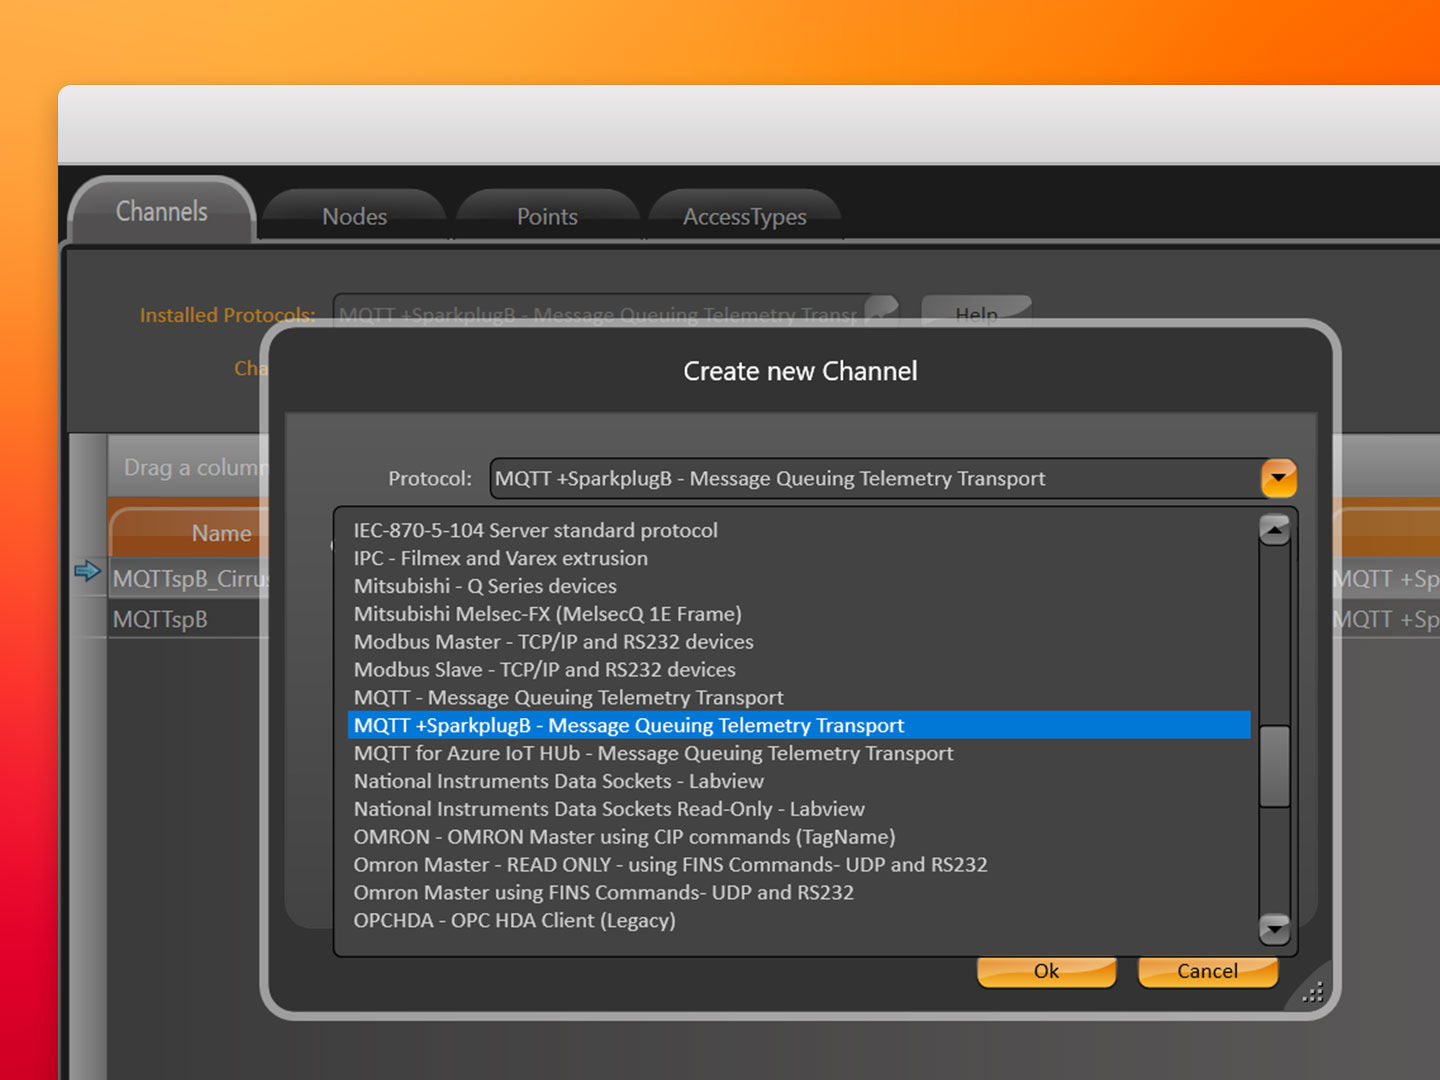
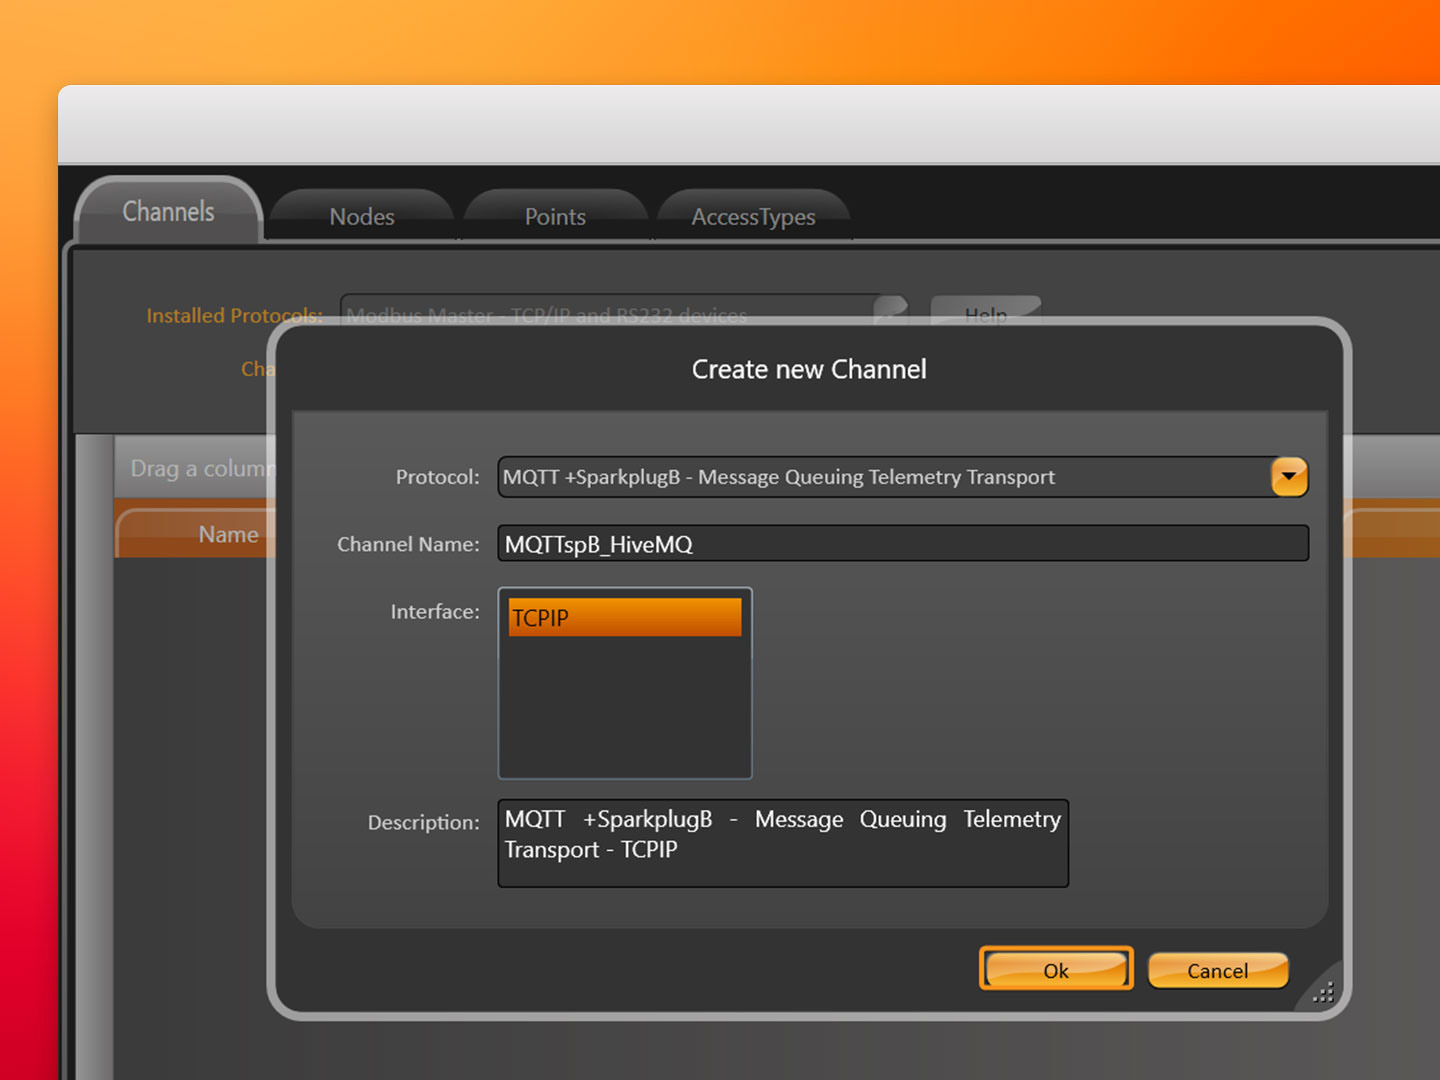
- Step 3: Specify the protocol from the drop-down menu (in this case, MQTT + SparkplugB), enter a Channel Name (in this case, MQTTspB1), and click on OK.
Image showing the drop-down menu button to select the corresponding protocol in Tatsoft’s FactoryStudio
Screenshot displaying the selection of the Sparkplug protocol in Tatsoft’s FactoryStudio
Image showing the channel configuration in Tatsoft’s FactoryStudio
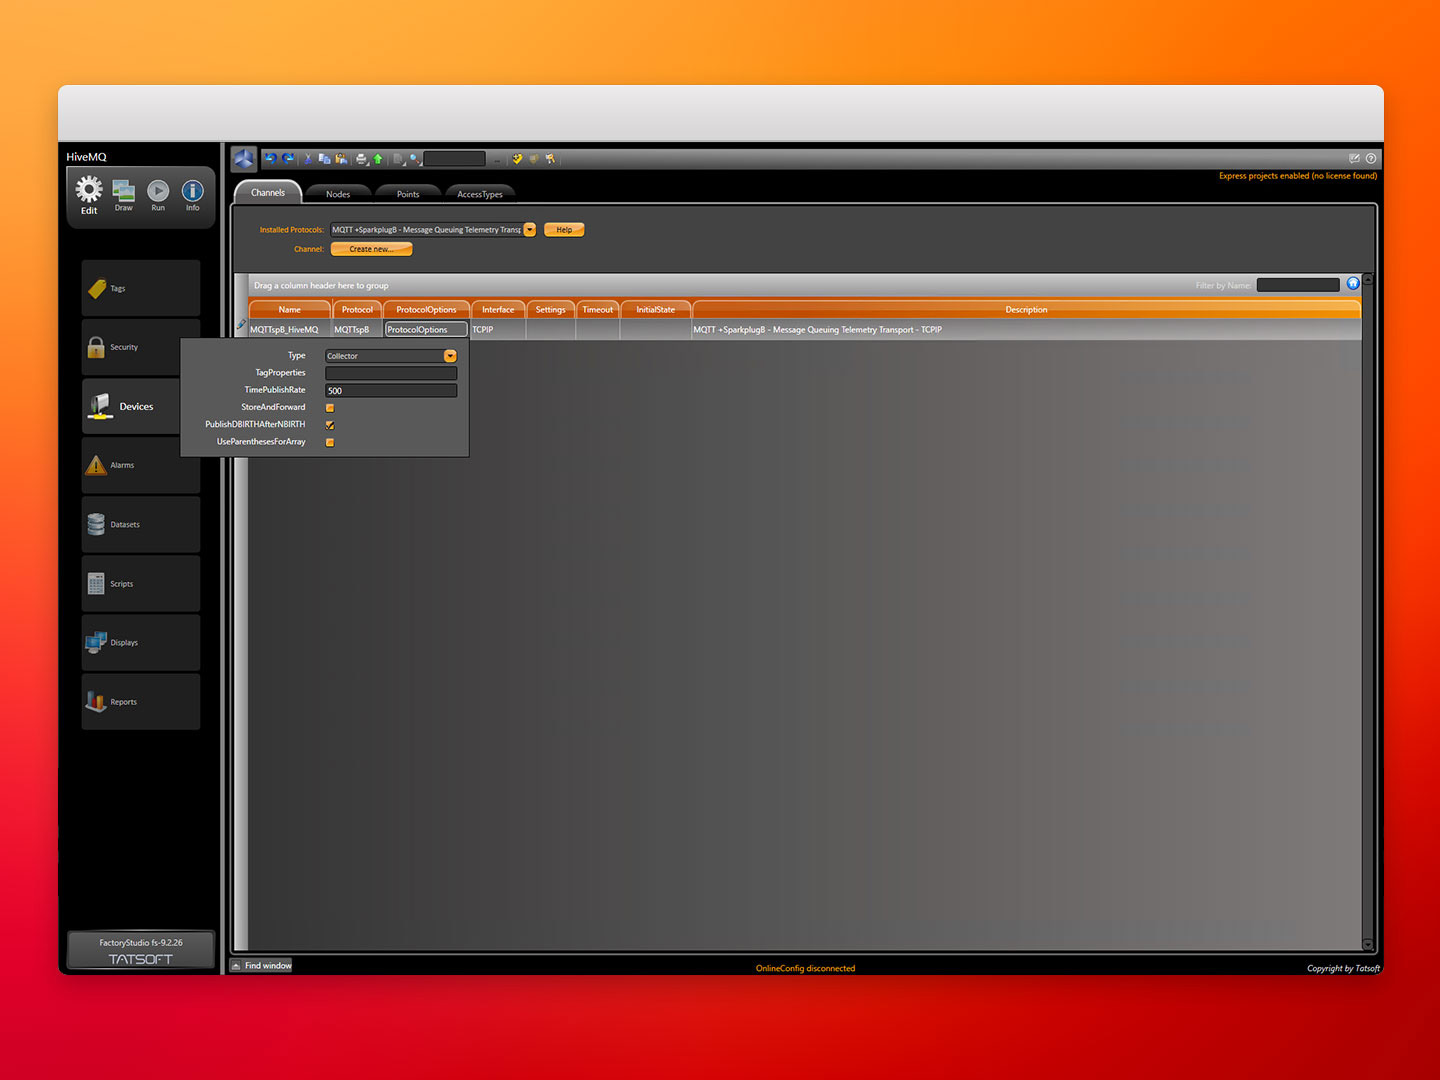
- Step 4: Once the Channel is created, go to ProtocolOptions under Channels. Here, click on the drop-down menu button and (in this case) select Collector.
Screenshot displaying the channel protocol options in Tatsoft’s FactoryStudio
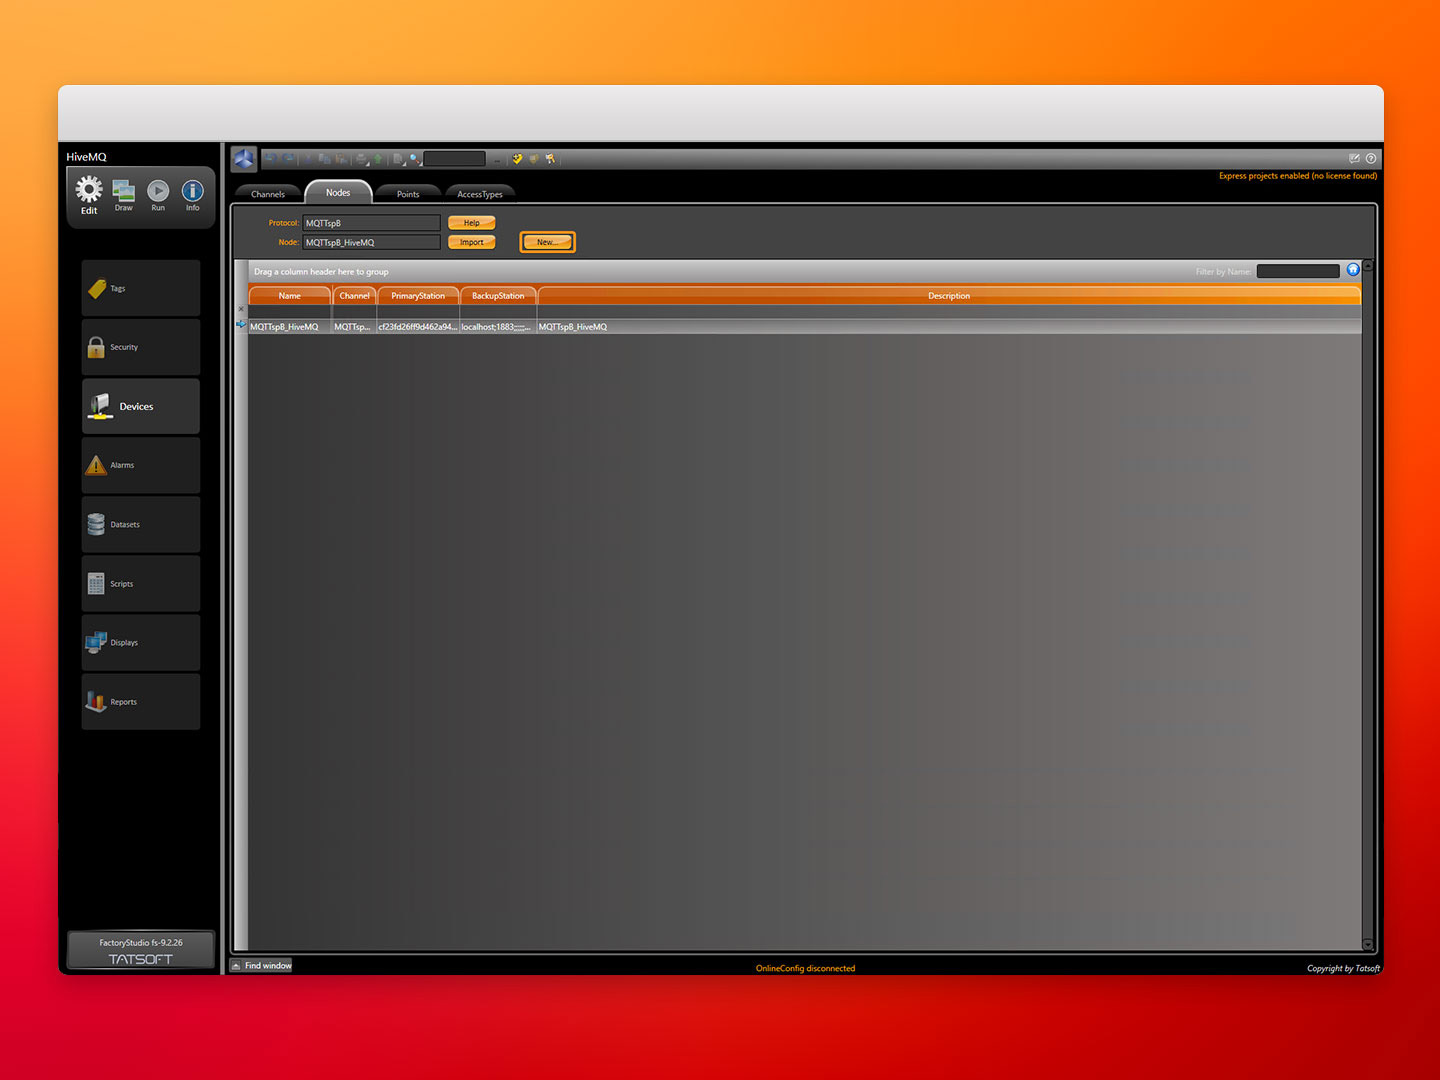
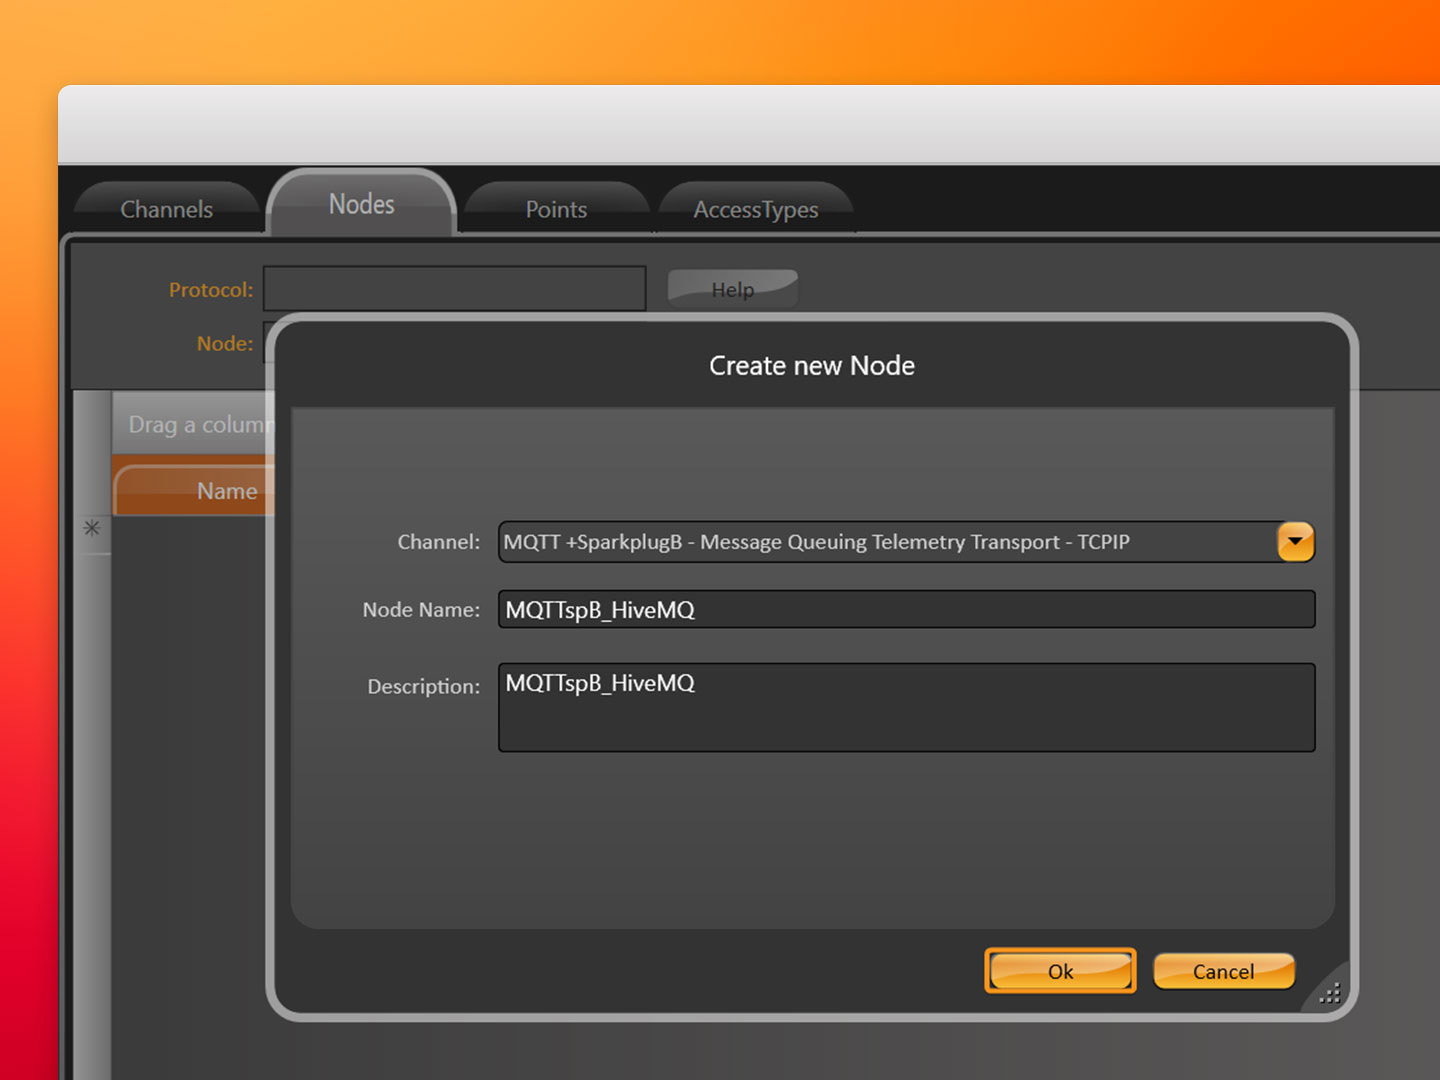
- Step 5: Next, a MQTT + SparkplugB node must be created under this channel. To do so, go to the Nodes section and click on New…, select the channel type, give it a name and choose a description. In this case, we’ve called it MQTTspB_HiveMQ.
Image showing the new node button in Tatsoft’s FactoryStudio
Screenshot displaying how to create a new node in Tatsoft’s FactoryStudio
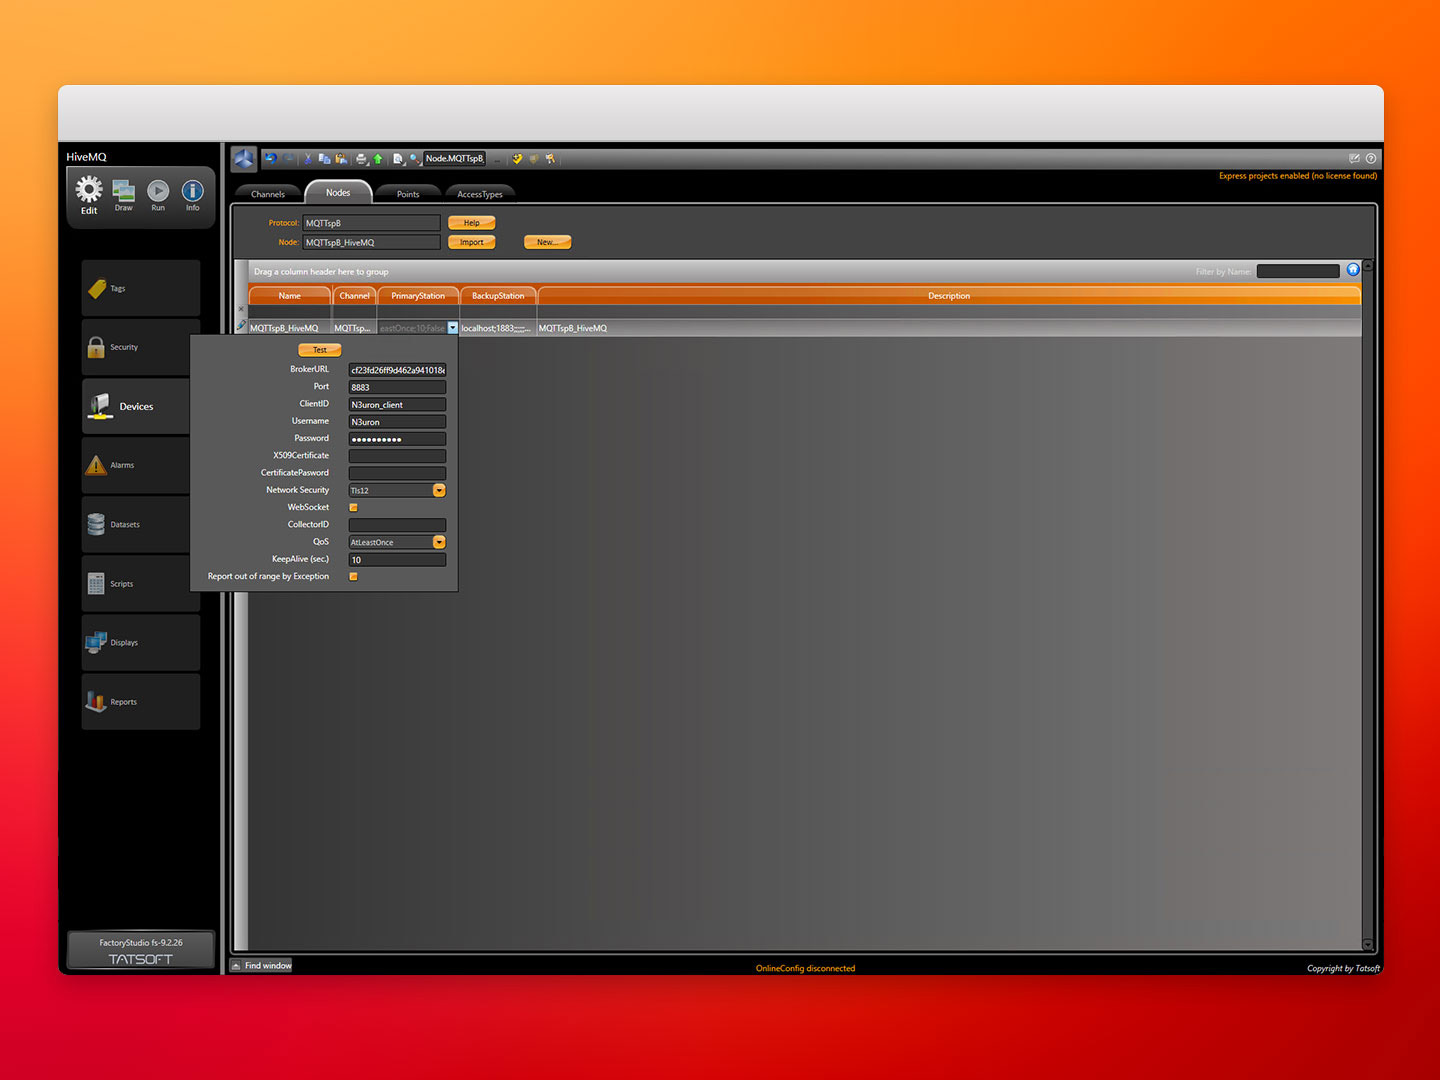
- Step 6: Now, click on Primary Station to introduce the HiveMQ Cloud MQTT broker details. Enter the Broker URL and the corresponding port, as well as the ClientID and the credentials. You’ll also need to select Tls12 encription in Network Security. In this example:
Broker URL: https://cf23fd26ff9d462a941018e3d44c0885.s2.eu.hivemq.cloud.
Port: 8883.
ClientID: N3uron_client.
Screenshot displaying the node primary station in Tatsoft’s FactoryStudio
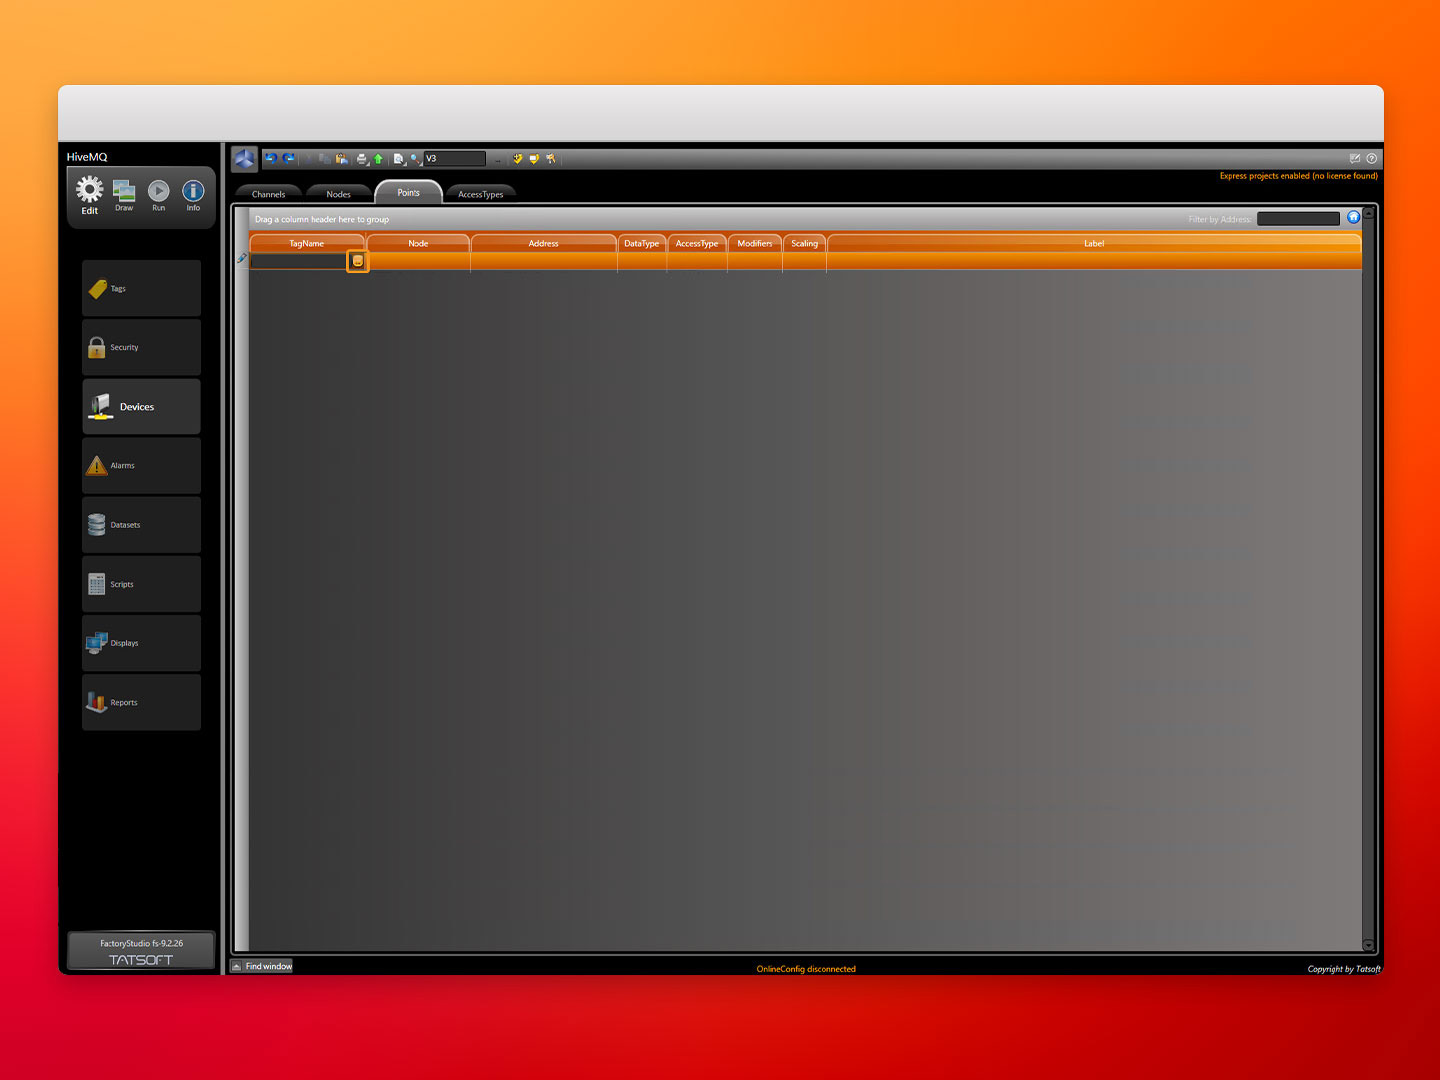
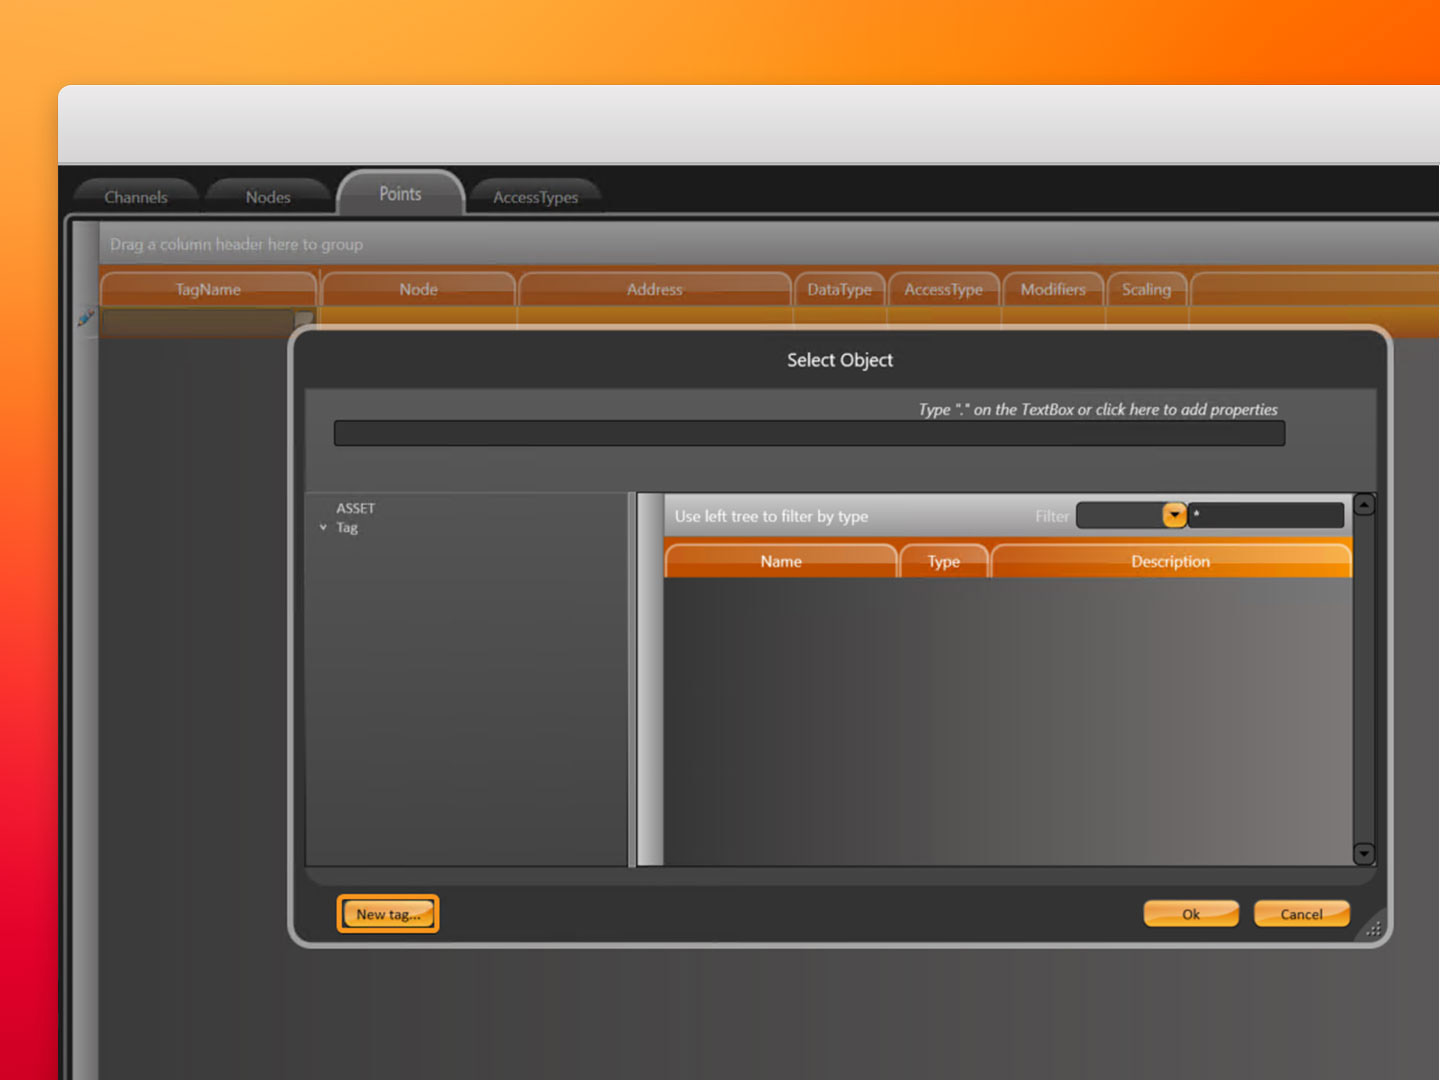
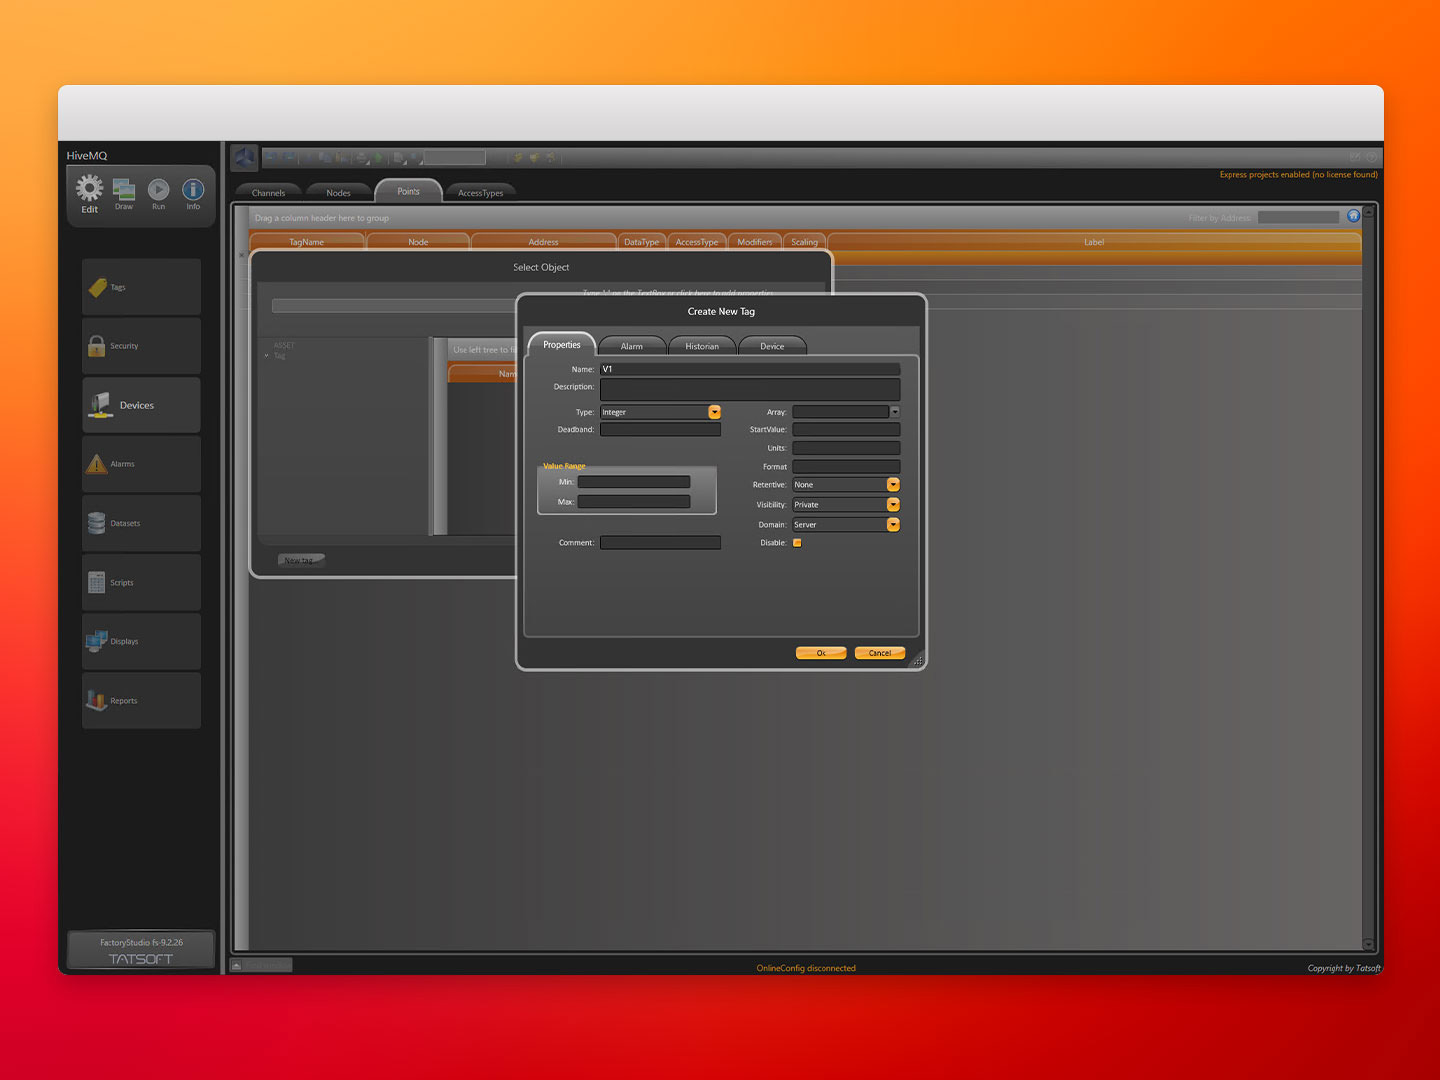
- Step 7: Once this step is complete, we must create the tags that we want to be displayed, which will be linked to the tag values that have been published. To do so, go to Points and here, click on the ellipsis button inside Tag Name, and then on New Tag.
Image showing the new tag button in Tatsoft’s FactoryStudio
Screenshot displaying how to create a new tag in Tatsoft’s FactoryStudio
Screenshot showing the tag configuration in Tatsoft’s FactoryStudio
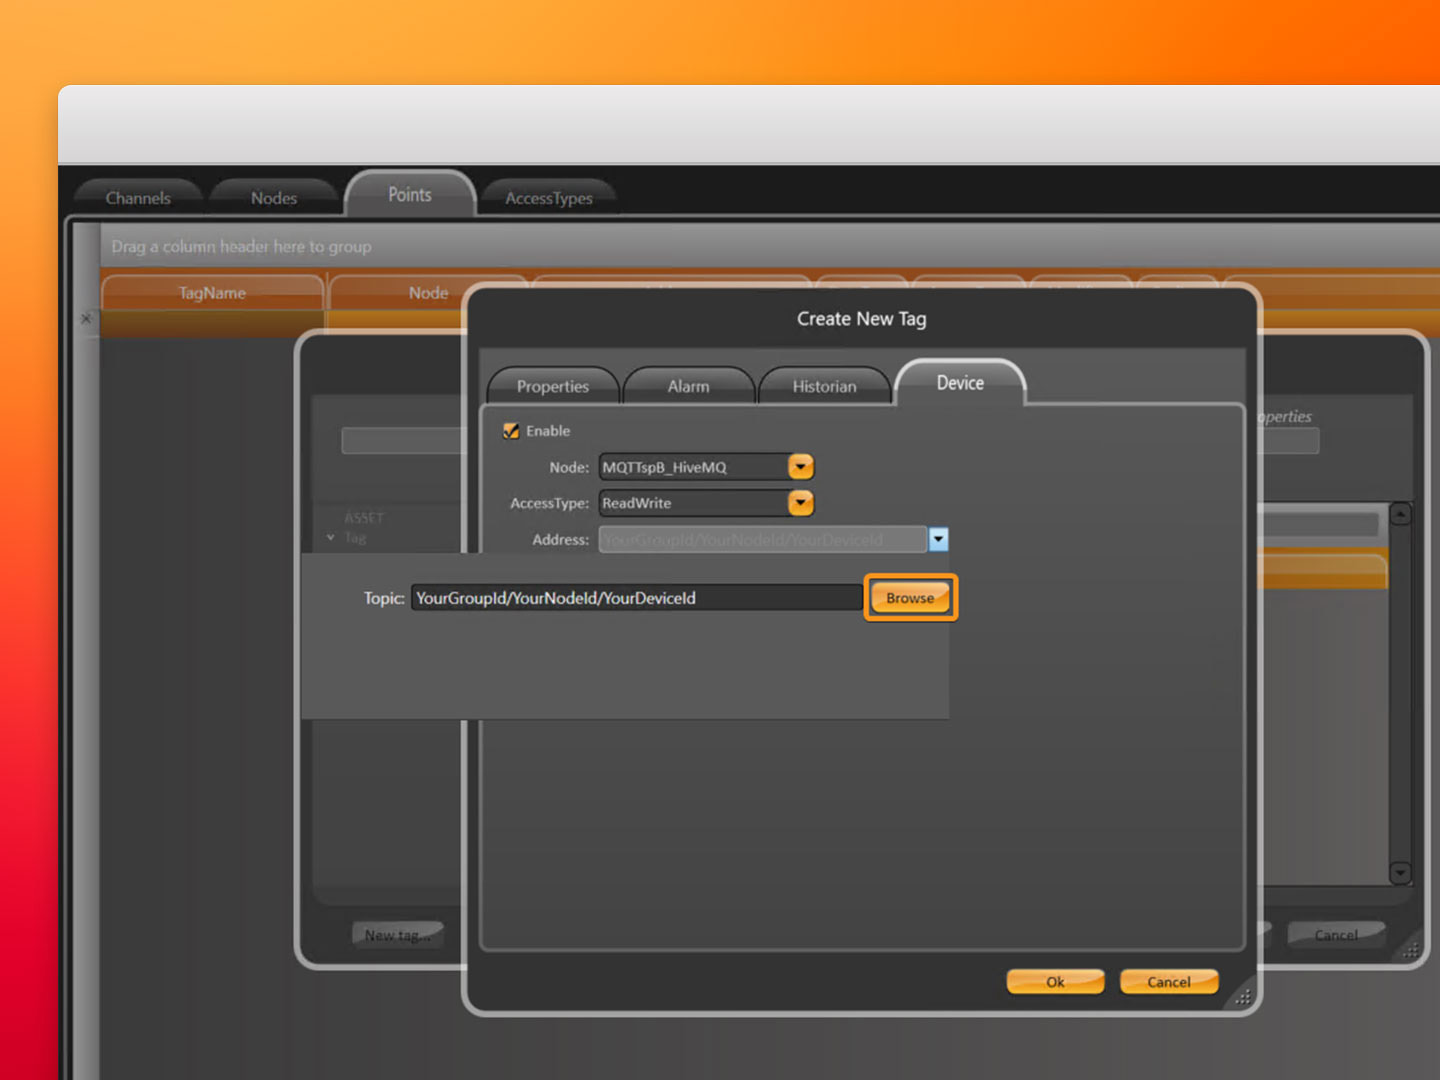
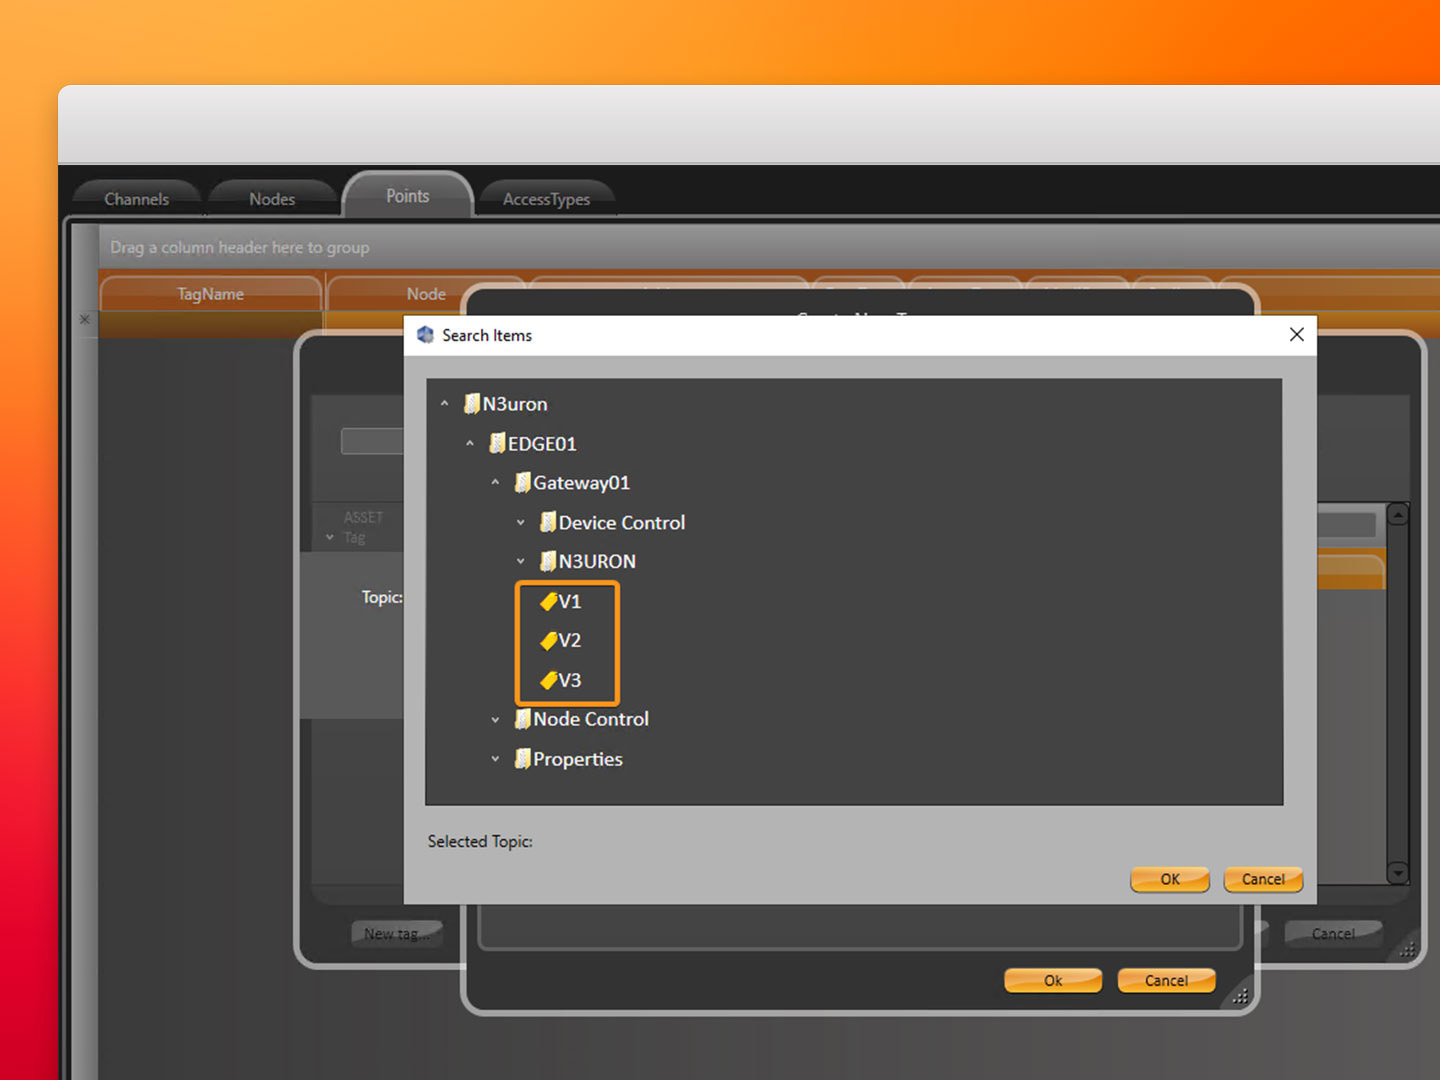
- Step 8: Under Device, click on Enable and click on Browse. The platform will listen to see if there are any devices to be announced. In this example, N3uron is listed, so we select all the tags we want to display.
Image displaying the browsing tags button in Tatsoft’s FactoryStudio
Screenshot displaying the corresponding tag selection in Tatsoft’s FactoryStudio
Once everything has been properly configured, let’s open the Tatsoft’s FactoryStudio in order to verify that Tatsoft has successfully subscribed to the data published by N3uron.
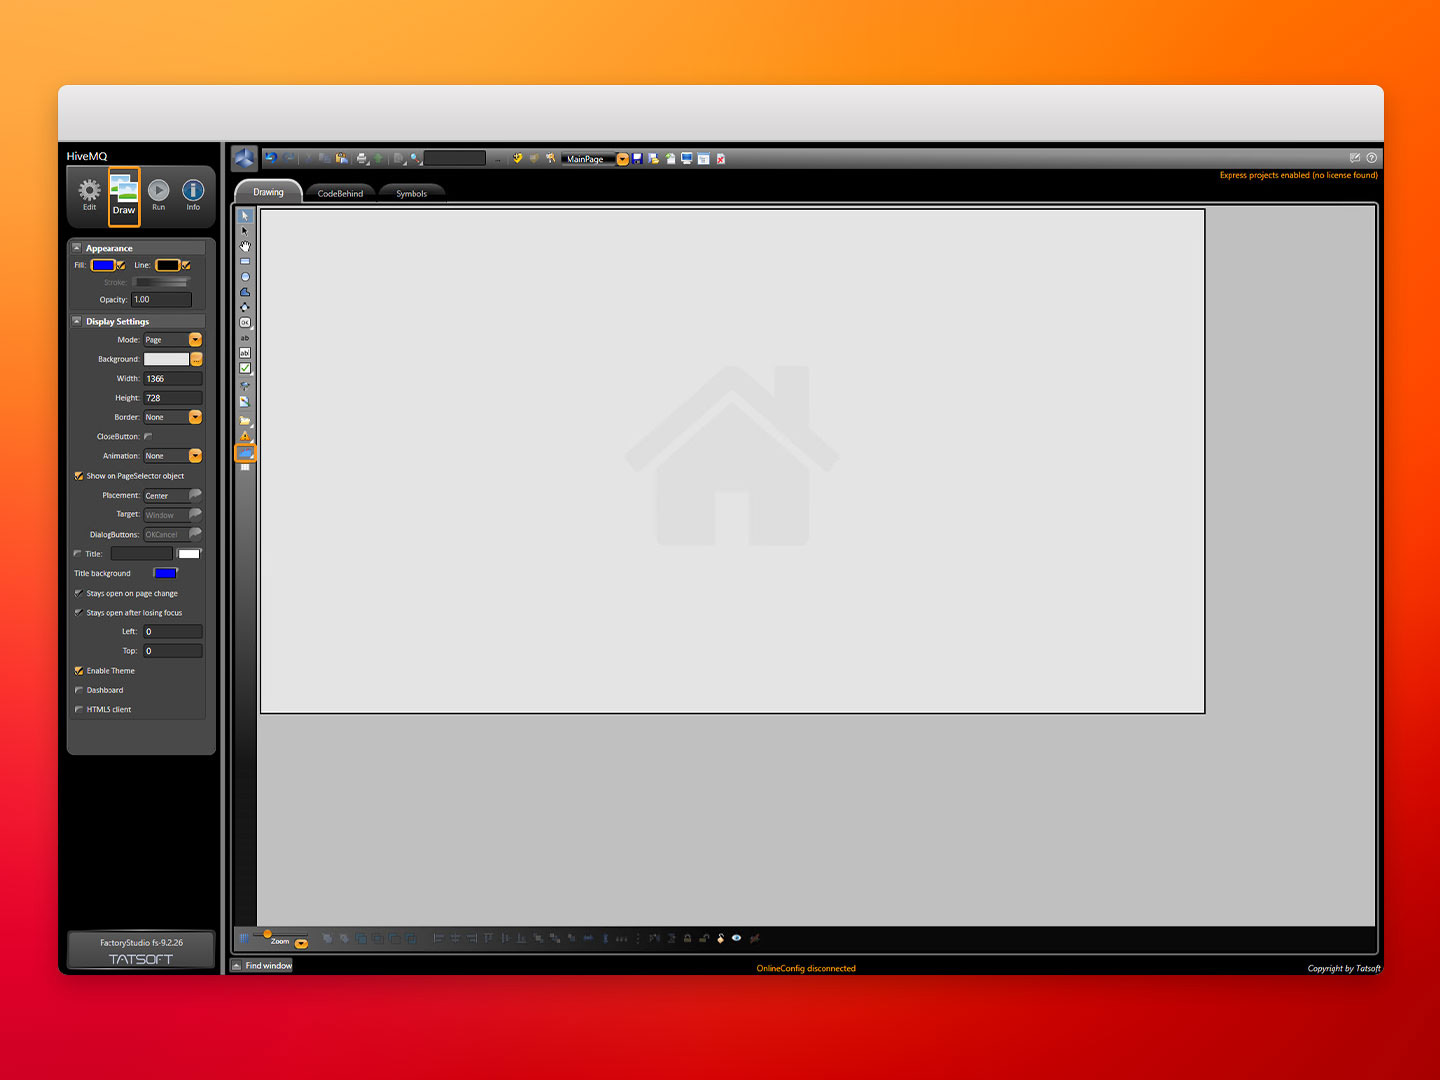
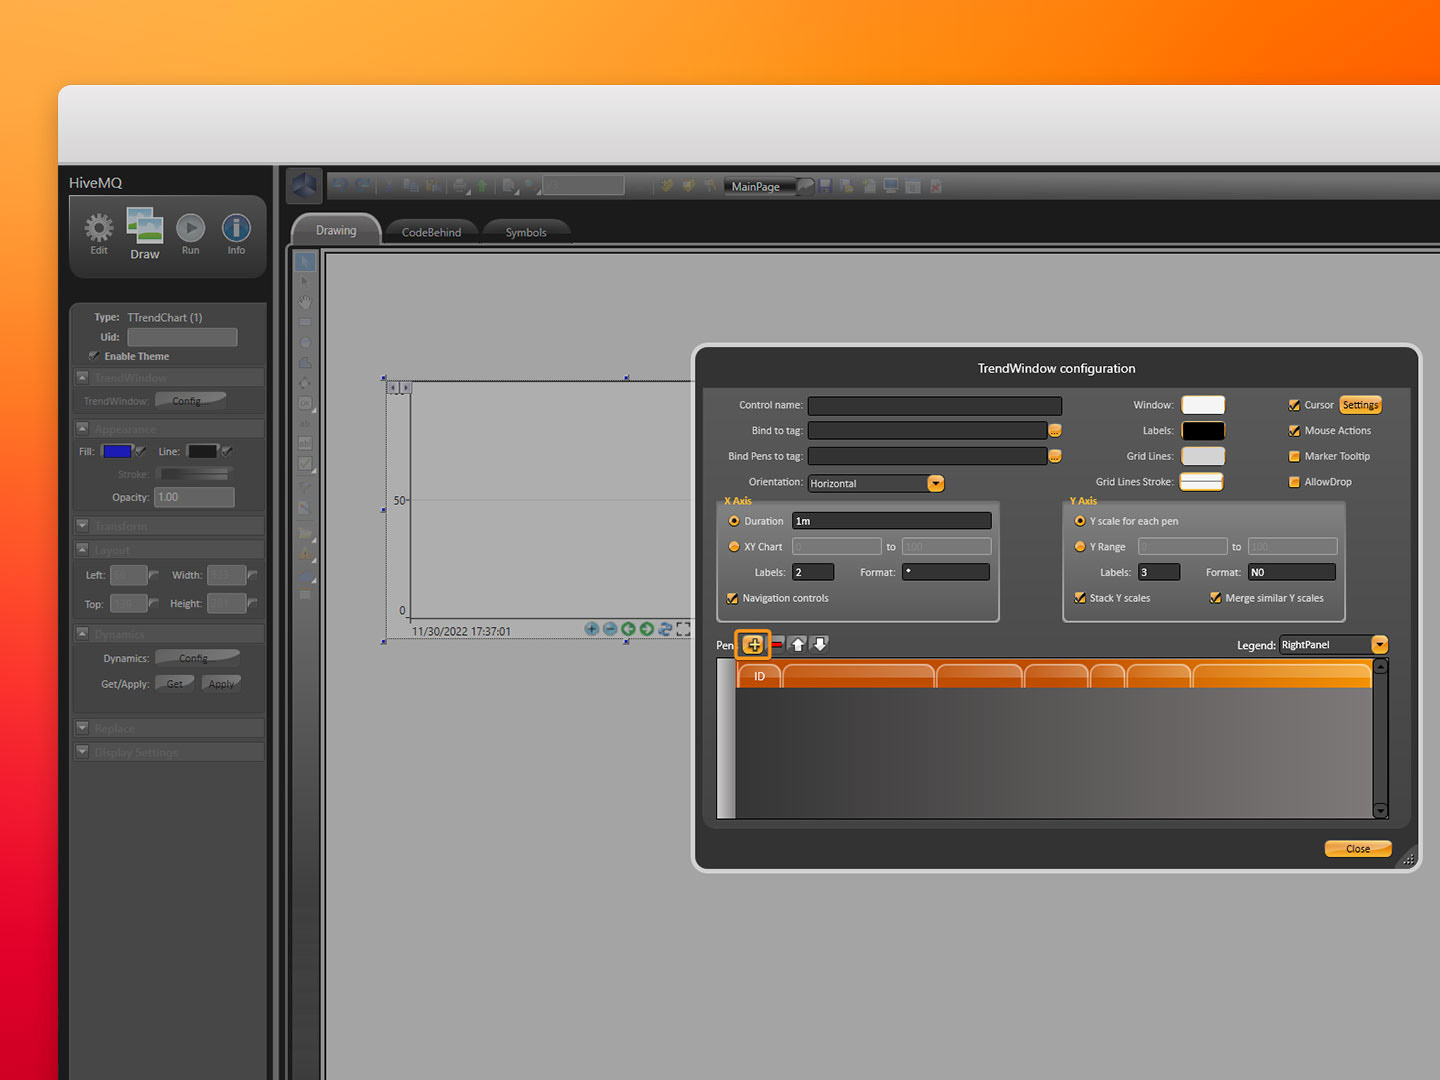
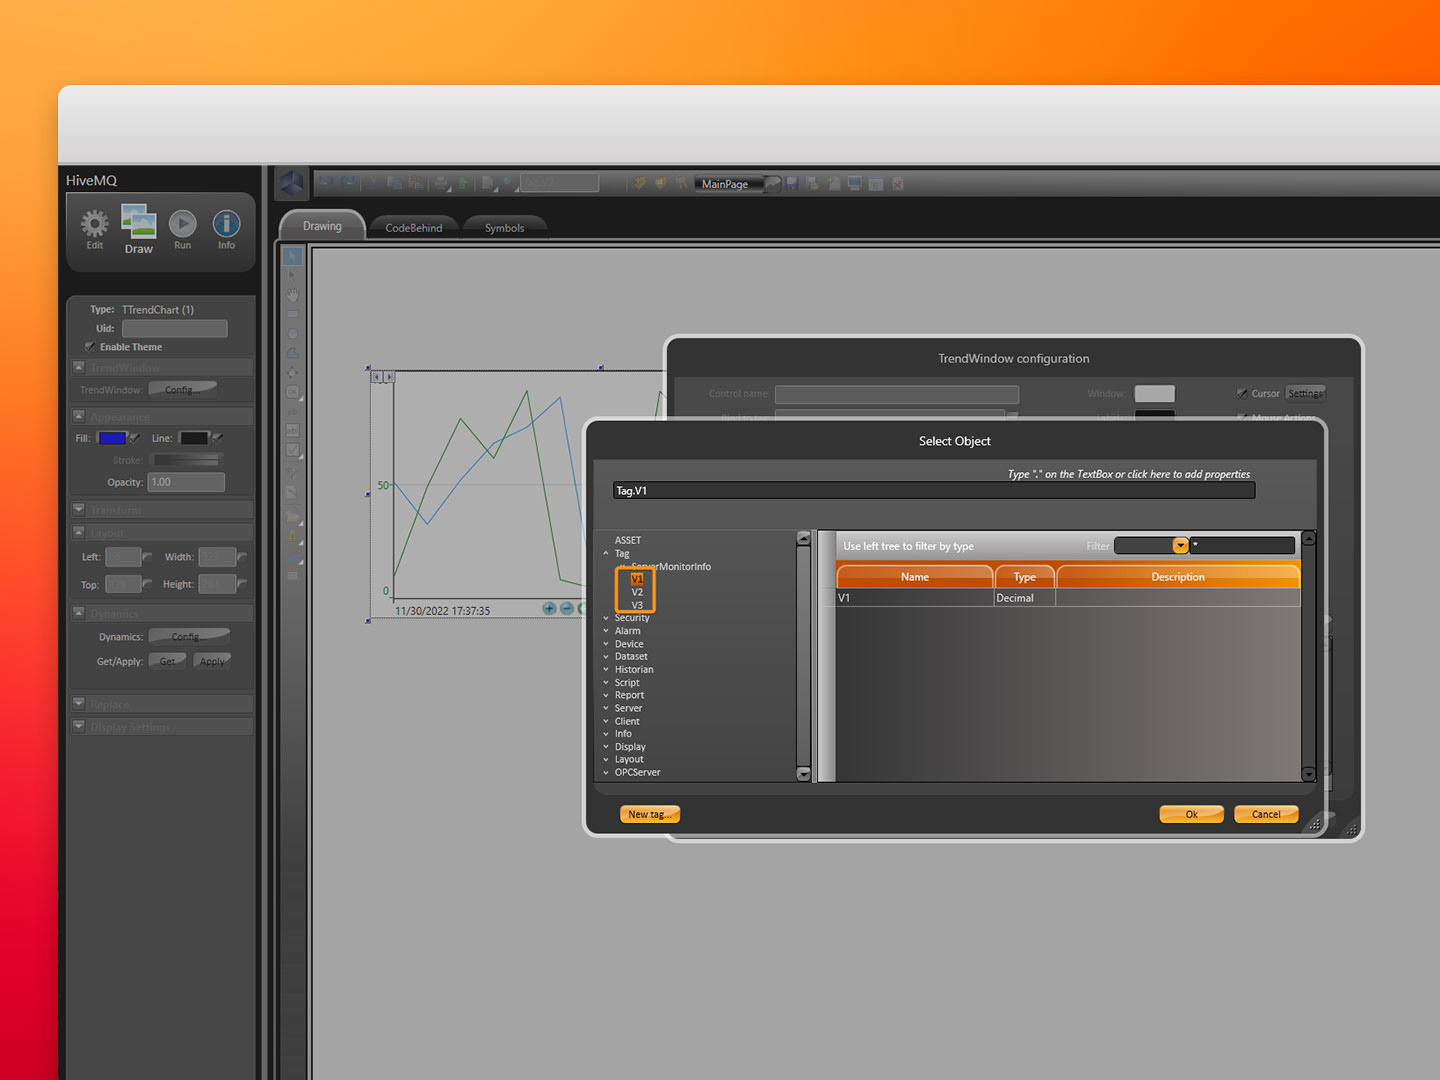
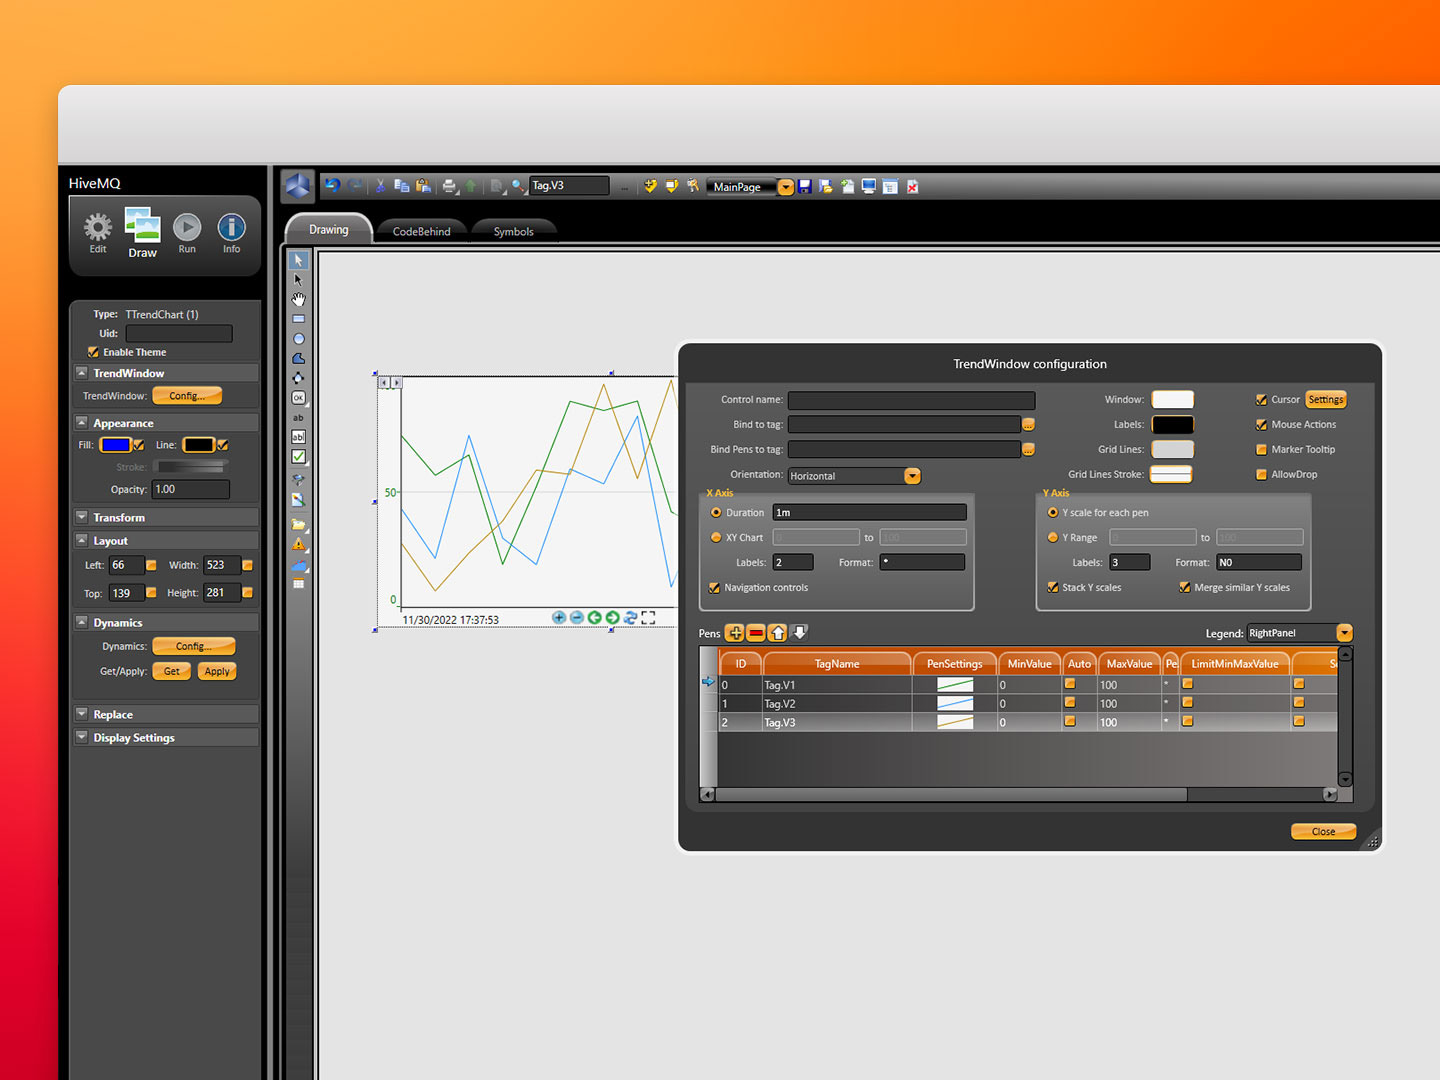
Inside Draw, click on the Trend Window button, where we’ll introduce the tags we want to display. In this case, V1, V2, and V3.
Screenshot displaying the draw section in Tatsoft’s FactoryStudio
Image showing how to add tags in Tatsoft’s FactoryStudio
Screenshot displaying the tags selection for the chart in Tatsoft’s FactoryStudio
Imagen showing the three tags selected in Tatsoft’s FactoryStudio
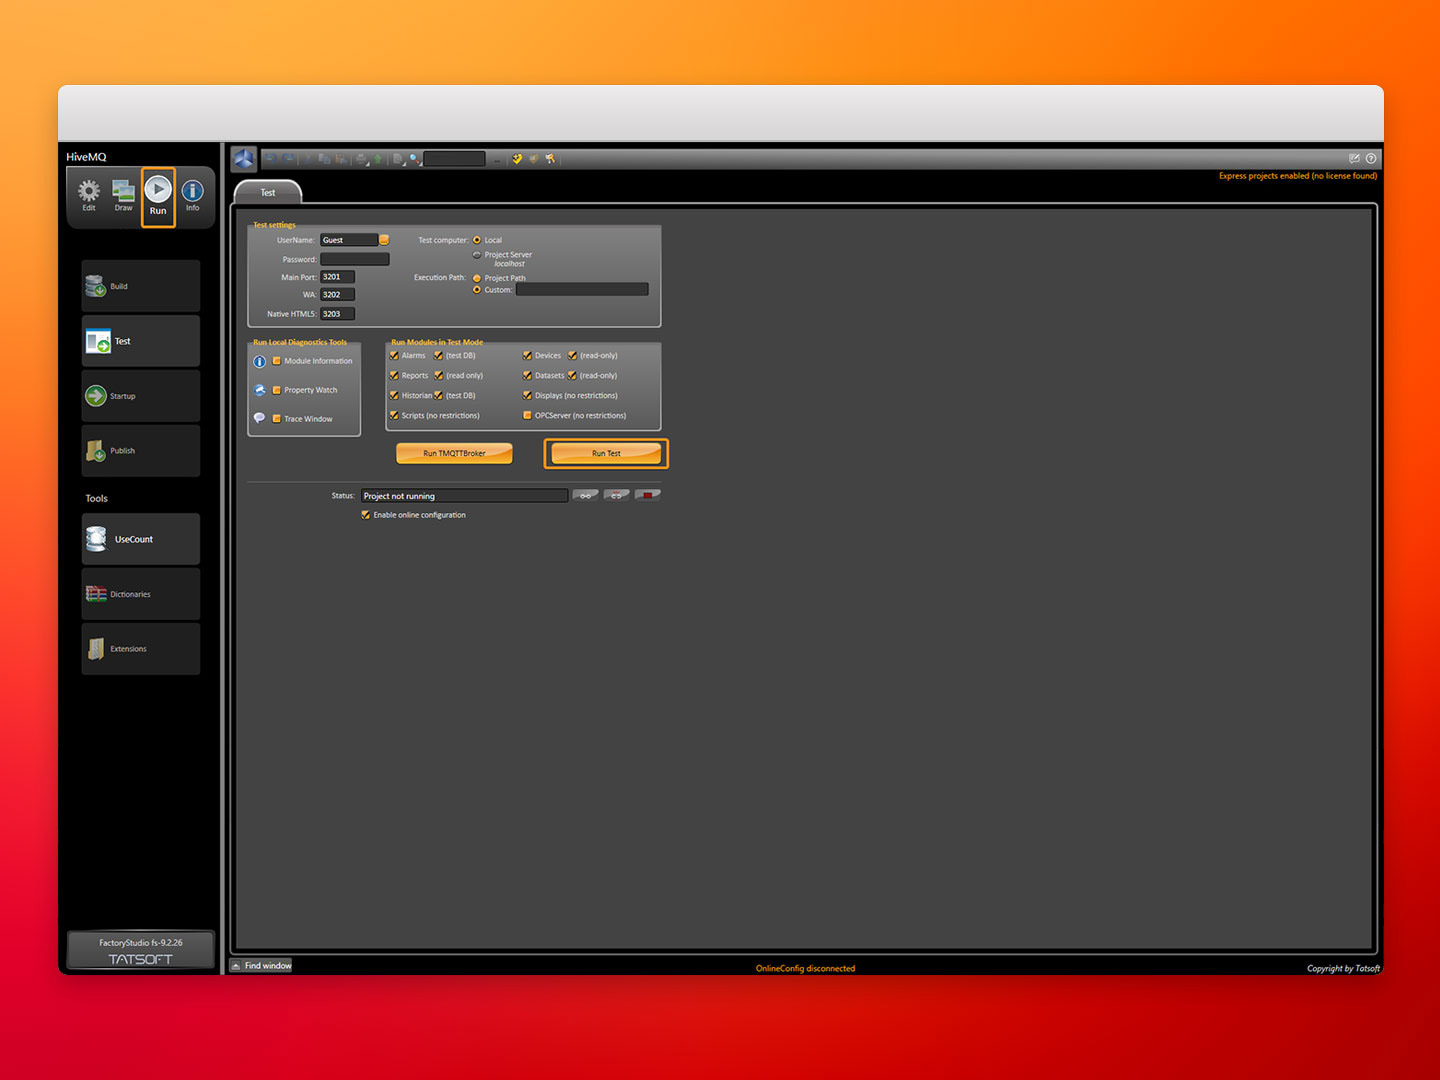
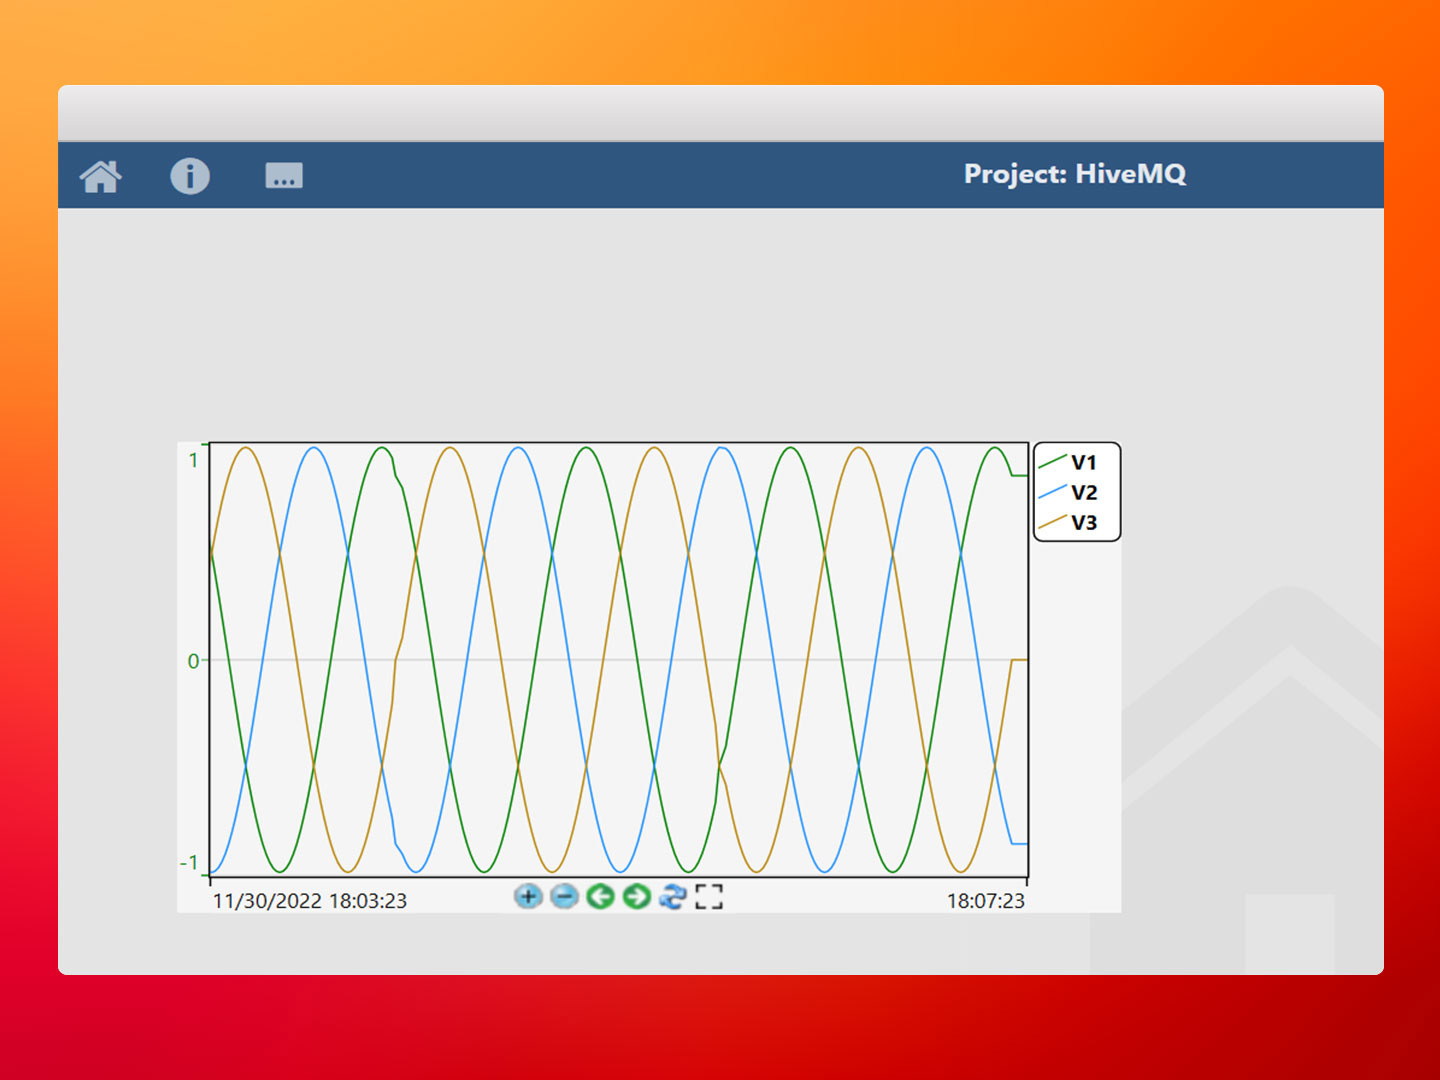
Next, go to Run and click on Run Test to display the value on Tatsoft’s FactoryStudio acting as our application node. It should now be possible to see the corresponding chart displaying all the previously selected tags.
Screenshot displaying the run test button in Tatsoft’s FactoryStudio
Screenshot displaying the three tags chart in real time in Tatsoft’s FactoryStudio
Conclusion on How to Build Scalable Data Models with N3uron’s Sparkplug Client Module
Connecting your assets to any Sparkplug-enabled application, such as Tatsoft, is extremely easy using N3uron’s Sparkplug Client module. If you’re ready to get going using MQTT Sparkplug, download the N3uron free trial version and read our Sparkplug Client Manual on how to implement and use N3uron’s Sparkplug Client module in our communication platform.
Diagram showing operational data flow between Industrial Assets, Ignition and N3uron Sparkplug Client Module.
